When developing and testing a program, errors are generally common. All developers make mistakes. The difference between a beginner developer and an expert developer is that the expert recognizes, diagnoses, and corrects errors much more quickly than a beginner.
In this chapter, we will help you get started by teaching you the tools and debugging features included in the Visual Basic Editor (VBE), as well as the tactics you can use to troubleshoot your code when problems arise.
These errors can be divided into three groups: syntax errors, runtime errors, and logical errors. Syntax errors can be avoided using the editor. Runtime errors—errors that occur during program execution and cause the program to crash—can be handled with the On Error statement. Logical errors are the most difficult to detect.
Syntax Error
Syntax errors occur when your code does not follow the syntax rules of VBA (e.g., incomplete or badly written code). These errors are relatively harmless because they typically occur during code development, and as long as the automatic syntax checking feature is enabled, some of them can be automatically detected by the VBE as you type your code.
However, the automatic syntax checking feature does not detect all syntax errors. Specifically, it can only detect syntax errors that occur within a single statement or line of code.
For example, the line Debug.Prinf is a syntax error that the automatic syntax checking feature can detect because it does not require other statements to make sense. The correct statement is Debug.Print.
The following code contains a syntax error that cannot be detected by the automatic syntax checking feature:
Sub SyntaxError()
    Dim n As Long
    For n = 10 To 20 Step 2
        MsgBox n
End Sub

Comments:
- The problem with this code is that it is missing a
Nextstatement. - This code is classified as a syntax error because it does not follow VBA’s syntax rules. Every
Forstatement must eventually be followed by a correspondingNextstatement within the same procedure. - The automatic syntax checking feature will never warn you about this error because it only checks individual statements as they are entered. Therefore, it cannot detect syntax errors that require other statements to ensure the procedure is correctly formed.
Visual Basic includes a syntax checking feature that:
- Checks each statement as you type for syntax errors, such as a misspelled keyword or a missing separator, and alerts you in case of an error;
- Translates the code into an internal form if the syntax is correct, which speeds up execution time.
This feature is enabled by default, but you can disable it if you prefer to write code without being warned about errors as they are detected.
To enable syntax checking:
- From the Tools menu, choose Options.
- Select the Editor tab.
- Check the Auto Syntax Check checkbox, as shown in the figure below.
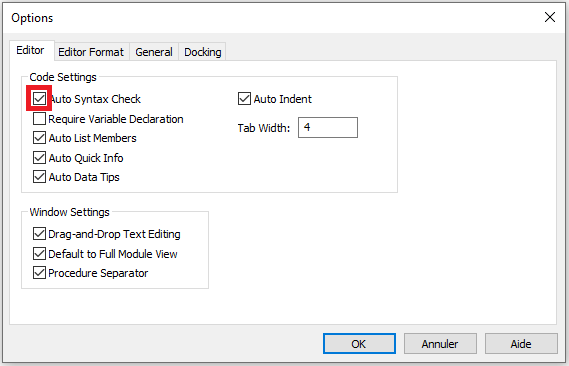
- Click OK.
Runtime Error
Runtime errors occur when the program attempts to perform an invalid operation. Examples of runtime errors include:
■ Division by zero
■ Attempting to open a non-existent workbook
■ Referring to a non-existent worksheet
Runtime errors are more difficult to detect than syntax errors for two reasons. First, the code is syntactically correct from the compiler’s point of view, so the errors cannot be detected automatically. Second, it is difficult to anticipate all the possible conditions your program might encounter.
Program with Runtime Errors
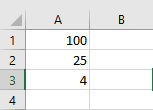
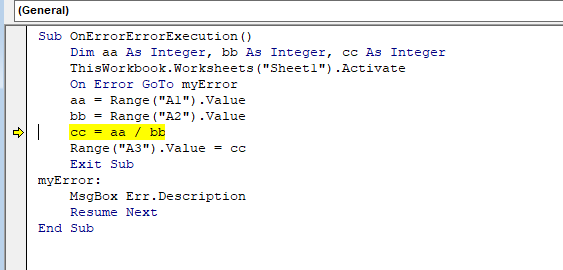
The following procedure triggers a runtime error. The content of cell A1 is divided by the content of cell A2. The result of the division is to be output in cell A3.
Sub RuntimeError()
    Dim aa As Integer, bb As Integer, cc As Integer
    ThisWorkbook.Worksheets("Sheet1").Activate
    aa = Range("A1").Value
    bb = Range("A2").Value
    cc = aa / bb
    Range("A3").Value = cc
End Sub
Comments
■ If the numbers 100 and 25 are in the two cells, the result is as expected, as shown in the figure below.
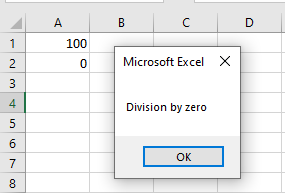
■ However, if the numbers 100 and 0 are in the cells, the program ends with a runtime error. A dialog box appears with an error message.
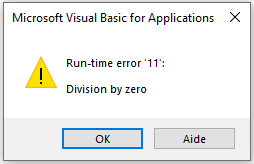
■ You can now click the End button or the Debug button. If you click Debug, the faulty line of code is highlighted in yellow and code execution is paused. In this case, it’s the line cc = aa / bb, as this is where the division is performed. This gives you a clue for troubleshooting.
■ If you click End, code execution is aborted. However, no reference to the faulty line of code is provided.
■ The error messages displayed are often not very informative. Clicking the Help button provides more information, but it doesn’t always relate directly to the issue that caused the error. Don’t worry—over time, you’ll develop an instinct for what might be wrong. Forums can also help, as they often provide quick solutions to problems.
Error Handling
An error can be managed even during code execution, provided its presence is anticipated and a configuration has been set in the code to handle it.
The On Error statement is used precisely for such cases, as it positions the procedure and starts an error-handling routine.
There are three syntax forms for the On Error statement:
On Error Resume NextOn Error GoToOn Error GoTo 0
These are described in the following table:
| Syntax | Description |
|---|---|
| On Error Resume Next | When a runtime error occurs, Visual Basic skips the line that caused the error and continues the procedure with the next line. |
| On Error GoTo | Specifies a label to jump to when an error occurs. This label marks the beginning of the error-handling routine. The label must appear in the same procedure as the On Error statement. |
| On Error GoTo 0 | Disables error handling in the procedure. When VBA encounters this statement, errors are detected but not handled. |
On Error Resume Next
When you use On Error Resume Next in your code, any error encountered will be ignored, and the code will continue to execute. This error-handling method is commonly used, but you must use it cautiously. Since it completely ignores any error that may occur, you may not be able to identify errors that should be fixed.
The previous procedure is now improved to handle the runtime error as follows:
Sub ErrorHandlingExample1()
    Dim aa As Integer, bb As Integer, cc As Integer
    ThisWorkbook.Worksheets("Sheet1").Activate
    On Error GoTo myError
    aa = Range("A1").Value
    bb = Range("A2").Value
    cc = aa / bb
    Range("A3").Value = cc
    myError:
    MsgBox Err.Description
    Resume Next
End Sub

Comments
- The statement
On Error GoTo myErrormeans that if a runtime error occurs in this procedure, it will jump to the line marked with the labelmyError. - The label is defined using
myError:—a label name followed by a colon. - If a runtime error occurs, the Err object stores the error details. For example, you can use the
Descriptionproperty to display the error message.
The table below lists the most important properties and methods of the Err object:
| Property or Method | Description |
|---|---|
| Clear | This method resets all information of the Err object. |
| Description | Contains a brief description of the error. |
| Number | Returns the error number. |
| Raise | Generates a built-in error message. |
| Source | Specifies the source of the error. |
■ Unlike the previous example, the program can continue—it does not stop.
■ Exit Sub (similar to Exit For or Exit Do for loops) can be used to exit a procedure early. If this statement were omitted, the code following the error label would always execute—even when there is no error, which should be avoided.
■ The statement Resume Next means that the program will continue execution from the statement following the one where the error occurred.
On Error GoTo
With this syntax, the line argument is required and specifies the line where the handler should begin. We can define this argument as any label or line number. It works when a runtime error occurs and the control jumps to the line, starting the error handler.
To avoid a compilation error, note that the label must be defined within the same procedure where the On Error statement is used.
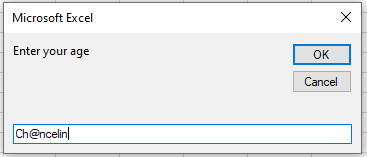
In the following example, a variable age is created to receive a numeric value. You will be prompted to enter a value in an input box, which will be assigned to the variable. It is known that a Byte type variable cannot store text (String) values and only accepts numeric values between 0 and 255.
Sub ErrorHandlingExample2()
    Dim age As Byte
    age = InputBox("Enter your age")
    MsgBox "Age is " & age
End Sub
Comments
■ If a numeric value is entered in the text box, it will be displayed in a message box.
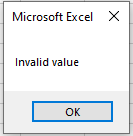
■ If text is entered, a runtime error will occur in the macro because the variable is numeric. For example, type the text “Chancelin”.
When you click OK, the following error appears:
We can now use error handling. In this situation, if an error occurs, the commands in the handler label will execute.
Using the On Error GoTo statement, if an error occurs, the process jumps to the error-handling label, which contains a command to display a message.
Sub ErrorHandlingExample3()
    On Error GoTo myError
    Dim age As Byte
    age = InputBox("Enter your age")
    MsgBox "Age is " & age
    Exit Sub
    myError:
    MsgBox "Invalid value"
End Sub
Comments
■ If there is no runtime error, all commands will be executed, including the contents of the error handler, since programming lines are executed sequentially.
■ To prevent the message Invalid value from displaying even when a numeric value is entered, you must insert the Exit Sub statement before the error-handling routine.
On Error GoTo 0
On Error GoTo 0 disables error handling in the current procedure. It does not specify line 0 as the start of the error-handling code, even if the procedure contains a line numbered 0. Without an On Error GoTo 0 statement, an error handler is automatically disabled when a procedure exits.
Sub ExampleErrorHandling4()
    On Error GoTo 0
    Dim age As Byte
    age = InputBox("Enter your age")
    MsgBox "Age is " & age
    Exit Sub
    myError:
    MsgBox "Invalid value"
End Sub
Logical Errors
Logical errors occur when an application compiles without syntax errors and runs without runtime errors but does not produce the expected result.
Logical errors can potentially go unnoticed for a long time because your application will appear to work correctly on the surface. Logical errors are not detected by the compiler during development or compilation and do not bother you by displaying runtime error messages to your end users. While most logical errors are detected and do not cause serious problems, some logical errors can be extremely difficult to find and may cause serious damage depending on how your application is used.
Finding the cause of logical errors is often difficult and can only be done through extensive testing and analysis of processes and results. Therefore, a testing environment is available in the development environment, which you can use to quickly find and eliminate errors.
Debugging
When learning a programming language, you make the most mistakes. Therefore, it is necessary to know how to find and fix errors and which tools are available for this purpose. Searching for and eliminating errors during programming is inevitable because programming errors will occur. However, it is always important to know how far—and especially if—the program ran correctly before the error. For this reason, a testing environment is available in the development environment that you can use to quickly find and fix errors.
The Code Window
When an error occurs, you can enter and modify your VBA macros in the Code Window. This is the window where your code resides. If this window is not yet visible, select Code from the View menu or press the shortcut key F7.
The Code Window contains the following objects:
- Object dropdown: Displays the names of selected objects. Click the arrow to the right to see a list of all objects associated with the form.
- Procedure dropdown: Lists all events Visual Basic detects for the form or control shown in the Object dropdown. When an event is selected, the associated event procedure appears in the Code Window. All procedures are also listed alphabetically in this dropdown, which greatly facilitates locating specific modules.
At the upper right edge of the vertical scrollbar in the Code Window, you can see the window splitter. The splitter is located just above the up-arrow symbol, as shown in the figure below.
This allows you to split the Code Window into two horizontally scrollable panes. This way, you can view different parts, such as the beginning and the end of a macro, at the same time.
The information displayed in the Object and Procedure dropdowns relates to the code of the currently active window. You can close a window by double-clicking the window splitter.
The Immediate Window
The Immediate Window is used to try various statements, functions, and operators available in the Visual Basic language before using them in your own VBA procedures. It is an excellent tool that allows you to type VBA statements and test their results immediately without writing a procedure.
For example, in the Immediate Window, type the following statement:
Worksheets.Add
Press Enter, and VBA adds a new sheet to the current workbook. The tab Sheet2 at the bottom of the workbook should now be highlighted.
The Immediate Window also allows you to ask questions. Suppose you want to know which cells are currently selected, the value of the active cell, the name of the active sheet, or the number of the current window. When working in the Immediate Window, you can easily get answers to these and other questions. The question mark (?) tells Excel to display the result of the statement in the Immediate Window. Instead of the question mark, you can use the keyword Print, as shown next.
The Immediate Window is an excellent way to test a macro. You can document the content of variables and positions in the code. For example, you can display certain variable contents in the Immediate Window to correct values that might cause errors. Consider the following example:
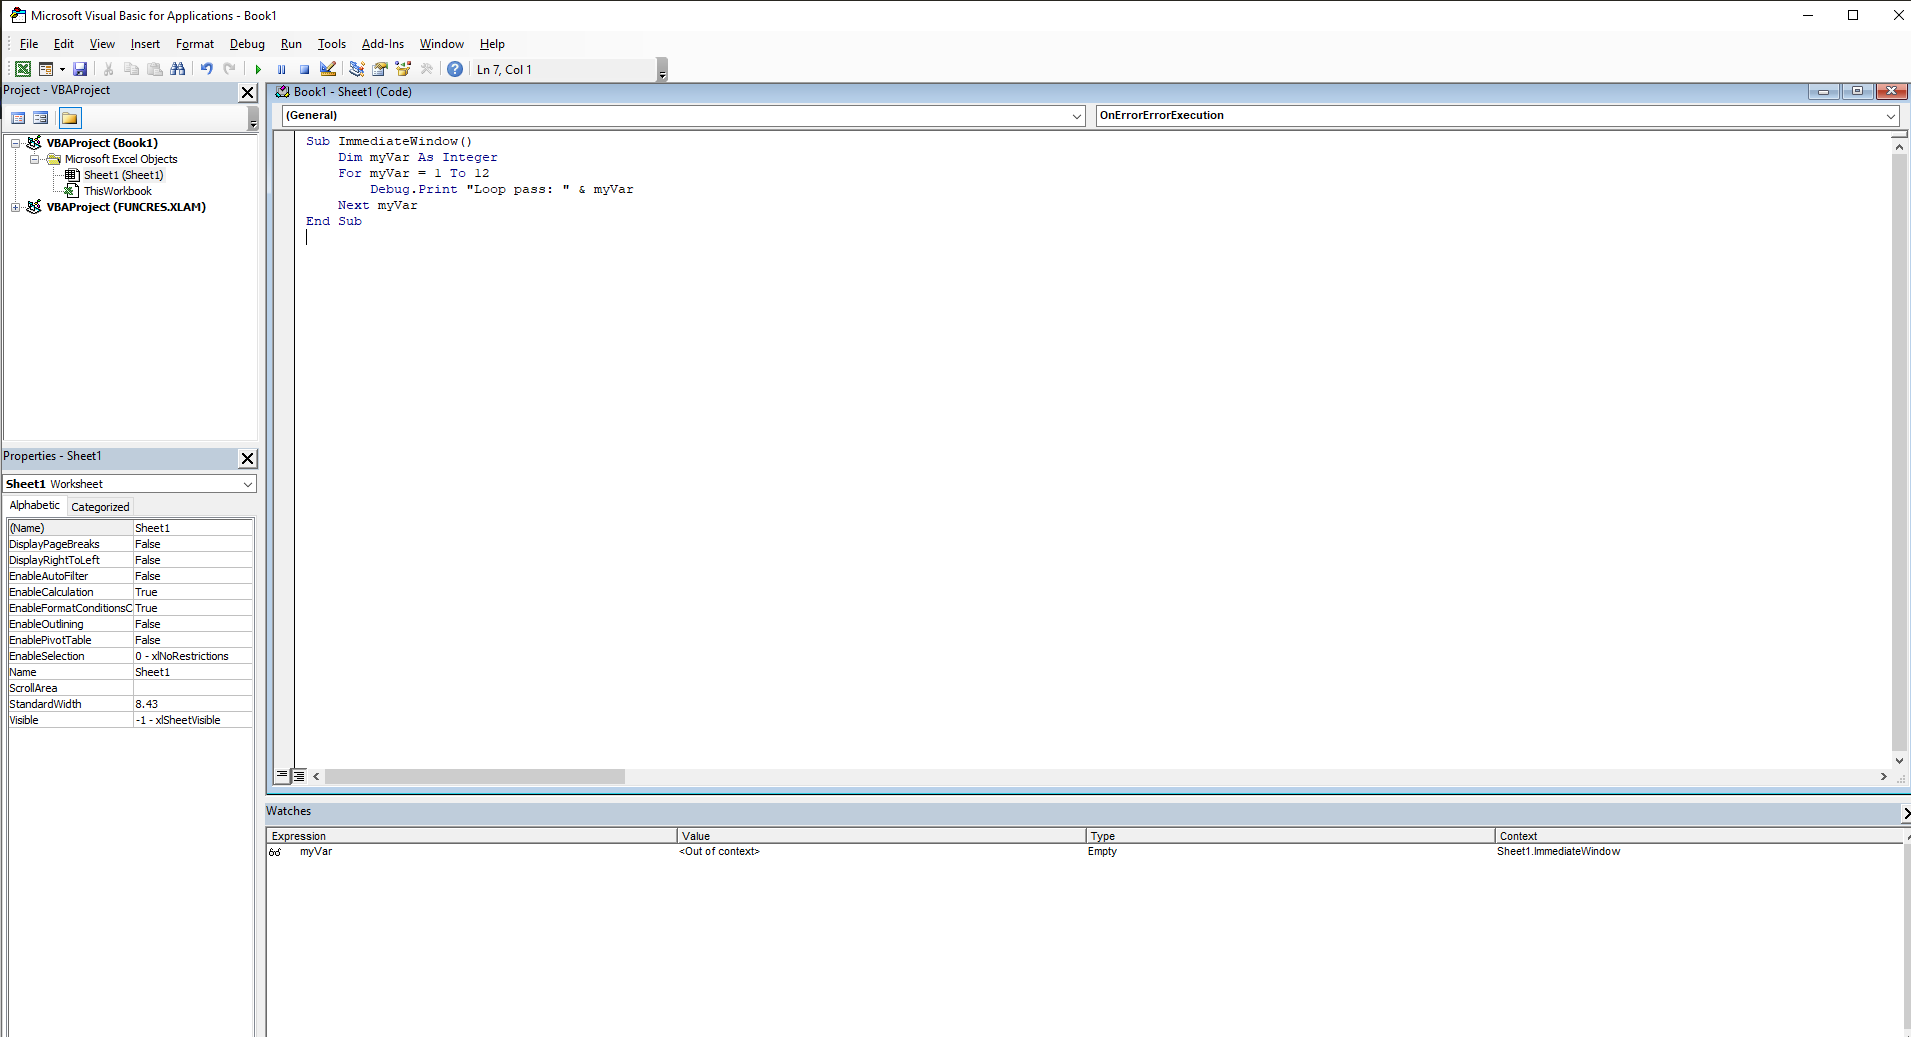
Sub ImmediateWindow()
    Dim myVar As Integer
    For myVar = 1 To 12
        Debug.Print "Loop pass: " & myVar
    Next myVar
End Sub
Comments:
- In this macro, the loop executes exactly twelve times.
- Each time the loop runs, the
Debug.Printcommand writes an entry in the Immediate Window that logs the current loop iteration.
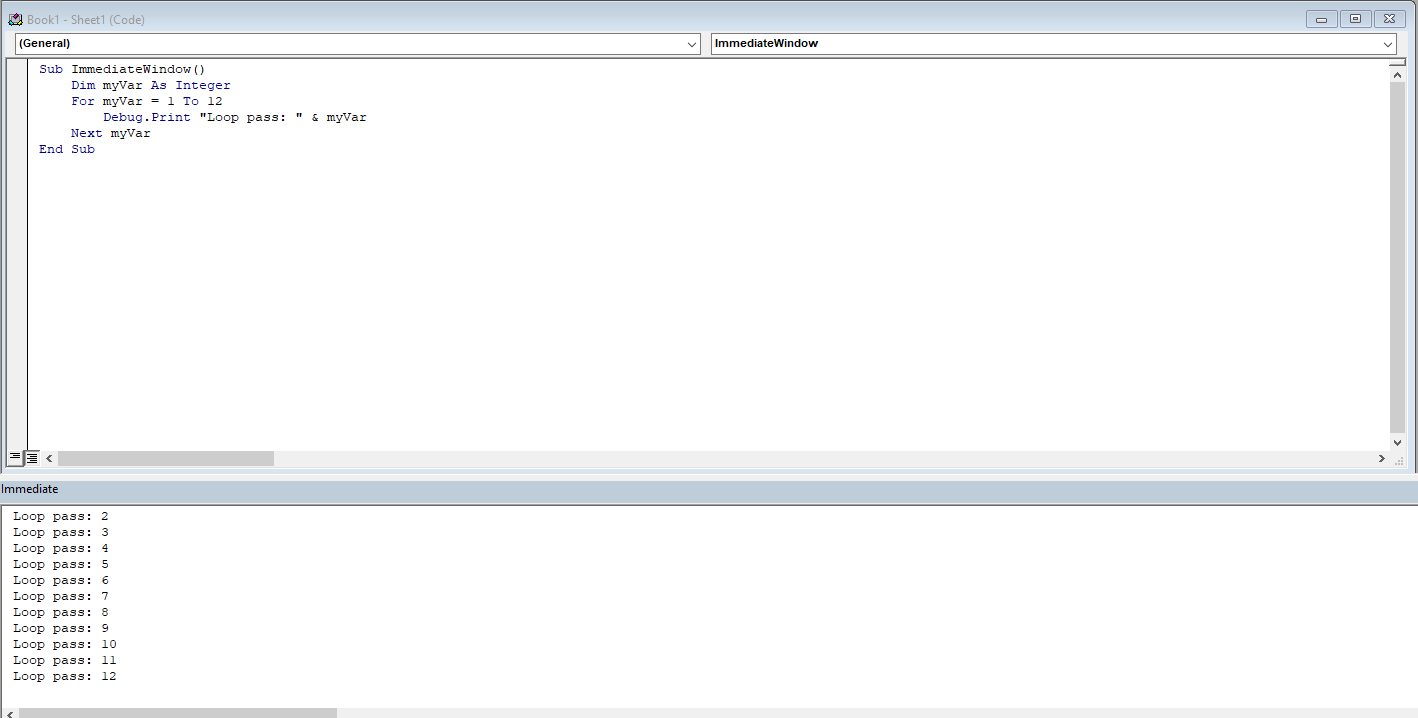
Place the cursor on the first line of the macro and press F5 to start the macro. Now check the result in the Immediate Window.
In a new line in the Immediate Window, enter the following statement and press Enter:
? 24/6
Excel displays the result of the division on the next line.
Step Through Code (Step-by-Step Execution)
Another way to troubleshoot Excel is to step through the macro line by line. To do this, place the cursor on the first line of the macro and press F8. You can also select Debug > Step Into from the menu. The macro stops after each statement. You can then check if the intended action was performed by briefly leaving the development environment and checking the results in your Excel workbook.
Using the previous example, ensure the numbers 100 and 25 are in the cells for the first step-through execution.
If you now place the cursor over a variable (e.g., variable aa), you will see its current value (here, 100 for aa). You will also see that variable cc still has the value 0, because the currently selected statement has not yet been executed. After the next step, variable cc will have the value 4.
This simple example shows you can use the step-through method to follow a program’s flow piece by piece, making it easier to locate the source of a logical error.
Another option is to set the cursor at the line to which you want the macro to run, then press Ctrl + F8. The code runs up to the currently marked line and stops exactly there. You can now verify if the macro worked correctly. If everything is correct, press F5 to let the macro run to completion. If something is wrong, cancel the macro using Run > Reset from the menu.
Breakpoints
If stepping through code takes too long for a given program, you can also work with breakpoints. The program runs all statements until such a breakpoint. Set a breakpoint near where you suspect the source of an error.
To set a breakpoint, click in the gray left margin where you want the breakpoint. A red dot appears. A breakpoint is set on the line where the cursor is. In the example, the line where cc = aa / bb is calculated is suitable.
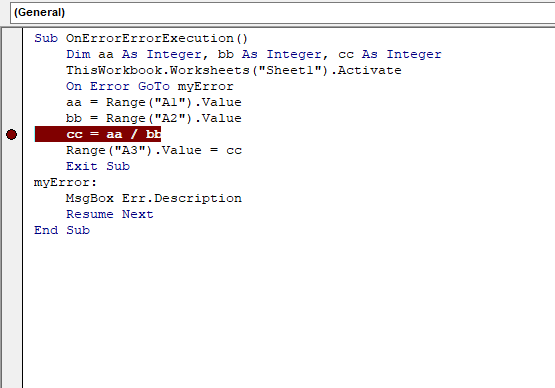
Run the program using the F5 key. It breaks before executing the line with the breakpoint. From that point, you can run the program step-by-step and check variable values as described above.
You can set multiple breakpoints. A breakpoint can be removed by placing the cursor on the appropriate line and pressing F9 again.
Adding a Watch
Many errors in procedures are caused by variables taking unexpected values. If a procedure uses a variable whose value changes in various places, you might want to pause the procedure and check the current value of that variable. Visual Basic offers a special Watch window that lets you keep an eye on variables or expressions during procedure execution.
To add a Watch window, select Watch Window from the View menu (or press Shift + F9). Now you can monitor when a particular variable changes.
In the following example, a loop runs exactly twelve times. The variable myVariable changes on each loop iteration. According to logic, the following macro should stop after the first loop iteration.
Sub ImmediateWindow()
    Dim myVar As Integer
    For myVar = 1 To 12
        Debug.Print "Loop pass: " & myVar
    Next myVar
End Sub
To add a watch for the variable myVariable, follow these steps:
- In the development environment’s Debug menu, select Add Watch.
- Enter the variable name (
myVariable) in the Expression field. - Check Break When Value Changes.
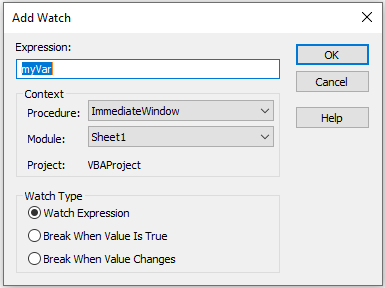
The macro will pause the first time the variable myVariable changes.
| Field | Description |
|---|---|
| Expression | Displays the name of a variable you highlighted in your procedure. If you opened the Add Watch dialog without selecting a variable name, type the name of the variable you want to watch in the Expression box. |
| Context | Here you specify the name of the procedure containing the variable and the name of the module where that procedure is located. |
| Type | Specifies how to watch the variable. Selecting Watch Expression lets you see the variable’s value in the Watch window while paused. Selecting Break When Value Is True automatically stops the procedure when the variable becomes true (nonzero). Selecting Break When Value Changes stops the procedure every time the variable or expression’s value changes. |
You can add a Watch before running a procedure or after pausing execution.
The Watch window lists the following procedure WhatDate:
Sub WhatDate()
    Dim currentDate As Date
    Dim futureDate As Date
    Dim x As Integer
    currentDate = Date
    For x = 1 To 365
        futureDate = Date + x
    Next
End Sub
The procedure WhatDate uses a For ... Next loop to calculate the date corresponding to x days in the future. If you run this procedure, you won’t get any result unless you insert the following statement in the procedure code: MsgBox "In " & x & " days, it will be " & nouvelleDate
In this example, however, you do not care to display each date day by day. What if all you want is to stop the program when the variable x reaches 150? In other words, what date will it be 150 days from now? To get the answer, you can insert the following statement in your procedure:
If x = 150 Then MsgBox "In " & x & " days, it will be " & nouvelleDate
Adding new instructions to your procedure just to get an answer about the value of a certain variable when a specific condition occurs is not always practical. Instead of adding MsgBox or other debug instructions to your code that you must later remove, you can use the Watch window to avoid extra code maintenance. If you add watch expressions to the procedure, Visual Basic will stop the For ... Next loop when the specified condition is met, allowing you to check the desired variable values.
To add a watch for the variable x with the condition x = 150, follow these steps:
- In the development environment Debug menu, select Add Watch.
- In the Expression textbox, enter:
x = 150. - In the Context section, choose
QuelleDatein the Procedure dropdown. - In the Watch Type section, select the option Break When Value Is True.
- Click OK to close the Add Watch dialog. Visual Basic opens the Watch window and adds your expression
x = 150.
Now add another expression to the Watch window to track the current date:
- In the Code window, place the cursor anywhere on the variable name
LaDate. Choose Debug > Add Watch and click OK to accept the default Watch Expression type. Note thatLaDatenow appears in the Expression column of the Watch window. - In the Code window, place the cursor anywhere on the variable name
nouvelleDate. Choose Debug > Add Watch and click OK to accept the default Watch Expression type.
x 
Note that nouvelleDate now also appears in the Expression column of the Watch window. After these steps, the QuelleDate procedure contains three watches.
On Error GoTo 0
On Error GoTo 0 disables error handling in the current procedure. It does not specify line 0 as the beginning of the error-handling code, even if the procedure contains a line numbered 0. Without an On Error GoTo 0 statement, an error handler is automatically deactivated when a procedure exits.
Sub ExampleErrorHandling4()
    On Error GoTo 0
    Dim age As Byte
    age = InputBox("Enter your age")
    MsgBox "Age is " & age
    Exit Sub
    myError:
    MsgBox "Invalid value"
End Sub
Logical Errors
Logical errors occur when an application compiles without syntax errors and runs without runtime errors but does not produce the expected result. Logical errors may go unnoticed for a long time because the application appears to function correctly. Logical errors are not caught by the compiler during development or compilation and do not interrupt users with explicit runtime error messages. Although most logical errors are detected and do not cause major issues, some can be extremely difficult to identify and may result in serious consequences depending on how the application is used.
Identifying the cause of logical errors is often difficult and can only be achieved through intensive testing and analysis of processes and outcomes. A testing environment is available in the development environment to help locate and eliminate errors quickly.
Debugging
When learning a programming language, you’re likely to make many mistakes. Therefore, it’s important to know how to find and correct errors and what tools are available to help. During programming, errors are inevitable. However, it’s important to know how far the program ran correctly before the error occurred. For this reason, a testing environment is provided in the development environment that can be used to quickly locate and correct errors.
The Code Window
In case of errors, you can enter and edit your VBA macros in the Code window. This is where your code resides. If the window is not already open, select the Code command from the View menu or press the F7 shortcut key.
The Code window contains the following objects:
- Object drop-down list: Displays the names of the selected objects. Click the arrow to the right of the list box to view all objects associated with the form.
- Procedure drop-down list: Lists all events detected by Visual Basic for the form or control shown in the Object box. When you select an event, the corresponding event procedure appears in the code window. All procedures are displayed alphabetically in this list, making it easier to locate specific modules.
If you look at the top-right edge of the vertical scroll bar of the code window, you’ll see the split box. The split box is located just above the up arrow symbol, as shown in the following figure.
Steps:
- In the Debug menu, select Add Watch.
- Enter
x = 150in the Expression field. In the Procedure drop-down, selectWhatDate. - Under Watch Type, select Break When Value Is True.
- Click OK to add the watch. Visual Basic opens the Watch Window and displays
x = 150.
Now, to track the current date:
- In the Code window, place the cursor on
currentDate. - Choose Debug > Add Watch, then click OK with default settings.
Repeat the same for futureDate.
After completing these steps, the WhatDate procedure has three watches active.
Place the insertion point anywhere inside the QuelleDate procedure code and press F5.
Note that the value of the variable x in the Watch Window is the same as the value you specified in the Add Watch dialog box. In addition, the Watch Window displays the values of both variables: LaDate and nouvelleDate. The procedure is in break mode. You can press F5 to continue or ask another question, such as “What will the date be in 250 days?” The next step shows you how.
Choose Debug | Edit Watch and enter the following expression: x = 277.
Click OK to close the Edit Watch dialog box.
Note that the Watch Window now displays a new value for the expression. x is now False.
Press F5 to continue the procedure’s execution.
The procedure stops again when the value of x equals 277. The value of curDate is the same; however, the newDate variable now contains a new value, a date 277 days from now. You can again modify the expression value or complete the procedure.
Press F5 to finish running the procedure.
When your procedure is running and a watch expression has a value, the Watch Window displays that value. If you open the Watch Window after the procedure has ended, you will see instead of the variable values. In other words, when the watch expression is out of context, it has no value.
The Locals Window
The Locals Window is not displayed in the development environment by default. However, you can display this window via the View menu. The Locals Window shows all variables declared in the current procedure and their values, allowing you to clearly verify the values of your variables.
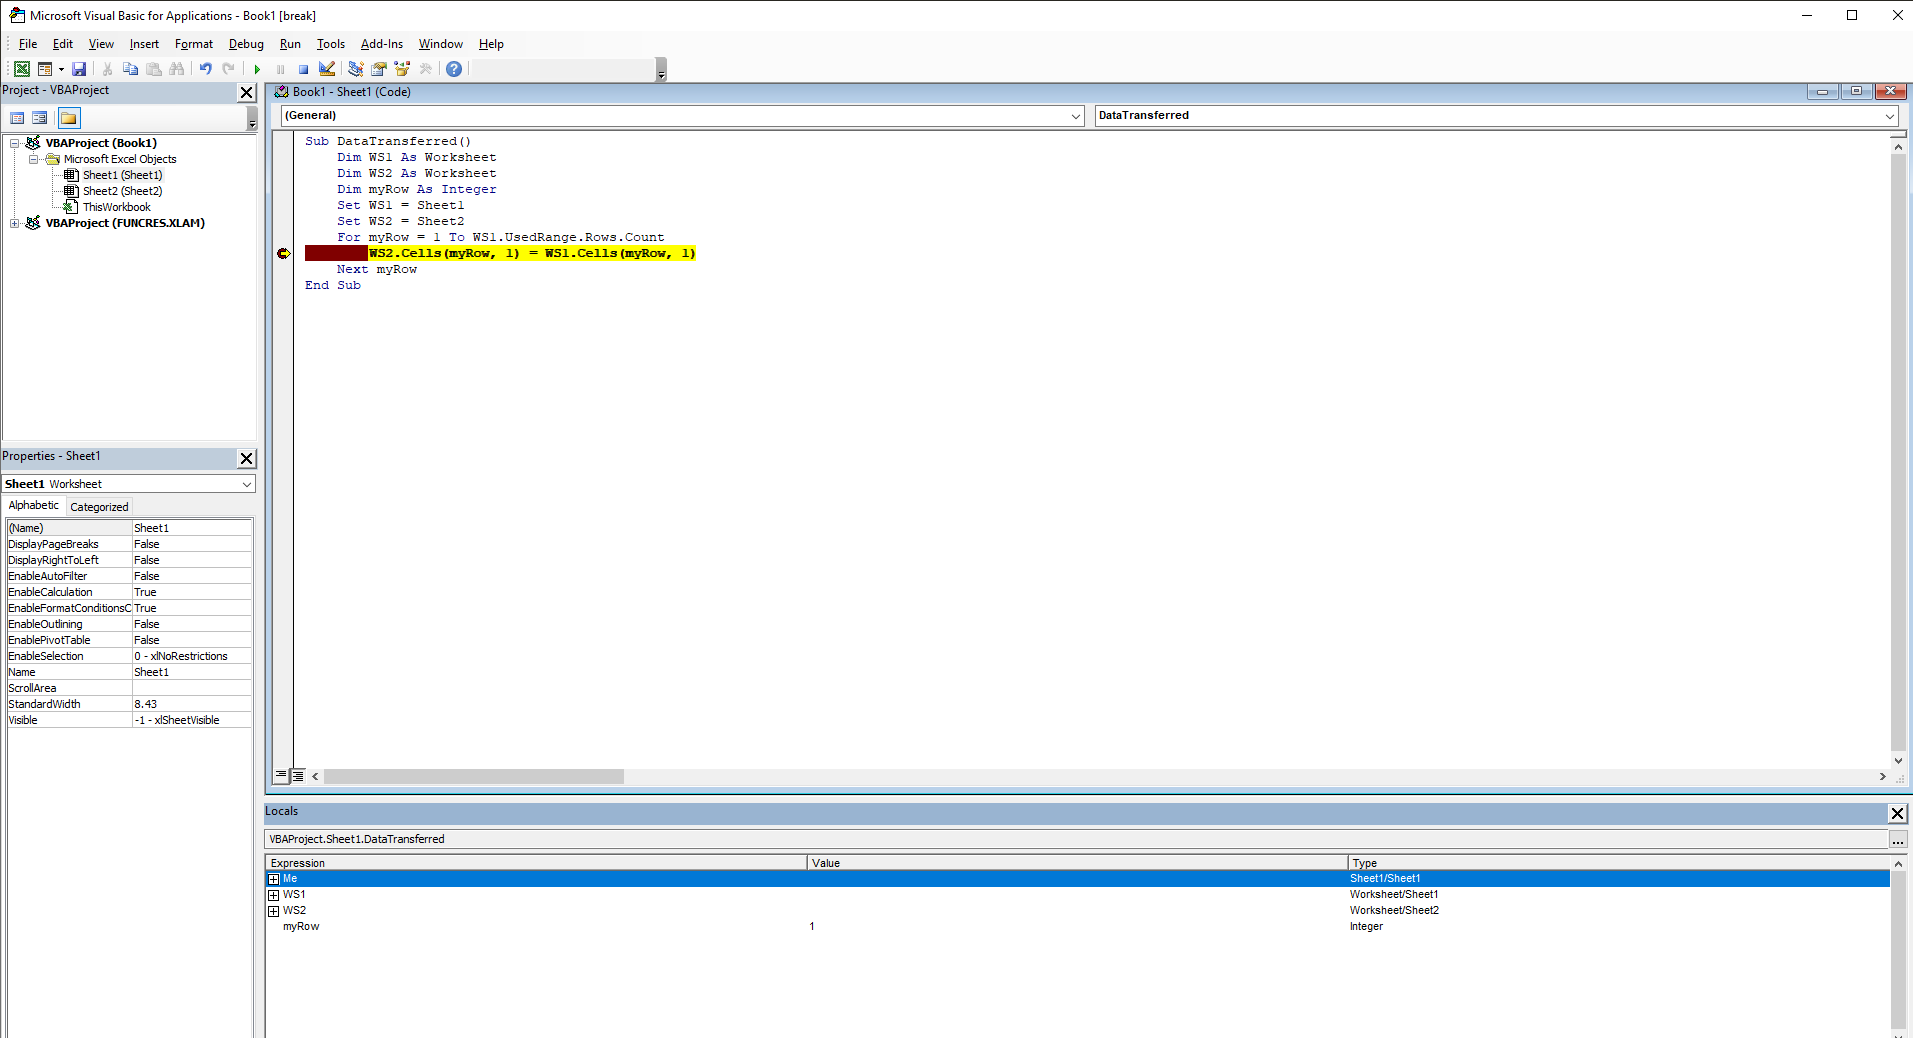
To test this feature, enter the following macro, which transfers all used cells from Sheet5 to Sheet6:
Sub DataTransferred()
    Dim WS1 As Worksheet
    Dim WS2 As Worksheet
    Dim myRow As Integer
    Set WS1 = Sheet5
    Set WS2 = Sheet6
    For myRow = 1 To WS1.UsedRange.Rows.Count
        WS2.Cells(myRow, 1) = WS1.Cells(myRow, 1)
    Next myRow
End Sub
Comments
- In the first step, declare two object variables of worksheet type. Then use the
Setstatement to assign them. - In a For loop, you then transfer all cells from column A of Sheet5 to the target worksheet Sheet6.
- You use the
Cellsproperty, which requires two arguments. The first argument represents the currently active row, and the second argument represents the column. Since the column remains constant (column A), you can set this argument to 1. The row argument is incremented on each loop pass.
To use the Locals Window, proceed as follows:
- Place the mouse pointer on a line within the loop.
- Press the F9 key to set a breakpoint on that line.
- Start the macro by pressing the F5 key.
- The macro runs to the breakpoint. The contents of the variables are now displayed in the Locals Window.
- Continue stepping through the loop by pressing F5 again.
The following columns are displayed in the Locals Window:
- Expression: Lists the names of variables. The first variable in the list is a special module-level variable that can be expanded to show all module-level variables for the current module. Global variables and variables from other projects are not available in the Locals Window.
- Value: If you click directly on a value entry, the cursor changes to an input field. You can modify this value and press Enter. If the value is not allowed, the edit field remains active, and the value is highlighted. A message box also appears describing the error. You can press Esc to cancel the change. For example, you can change the value of the variable
ito 7. Excel would then continue after the seventh loop pass. - Type: This column shows the variable’s data type. However, you cannot change the type.
- Call Stack: At the top right of the Locals Window, you’ll find a button with ellipsis (…). Clicking it displays a list of currently active procedure calls in break mode. When code is running in a procedure, it’s added to the call stack. Each time another procedure is called, it’s added to the stack. Procedures are removed from the list as execution returns to the calling procedure.
Incidentally, you can also remove a breakpoint during execution. After stopping the macro again, press F9.
The Debug Toolbar
The Debug Toolbar provides icons that simplify quick code testing.
To display this toolbar, click Toolbars on the View tab and then select Debug.
The following icons are available, from left to right:
- Design Mode: Toggles design mode on and off.
- Run/Continue: Runs the current procedure if the cursor is within one; runs the UserForm if a form is active.
- Break: Stops program execution and enters break mode. You can also press Esc to stop the macro.
- Reset: Clears the call stack and module-level variables and ends the project.
- Toggle Breakpoint: Sets or removes a breakpoint on the current line. You can also press F9 to toggle a breakpoint.
- Step Into: Executes exactly one statement in the code. You can also use F8 to step through code line by line.
- Step Over: Executes a procedure or statement in the code window.
- Step Out: Executes the remaining lines of the current procedure.
- Locals Window: Displays the Locals Window.
- Immediate Window: Displays the Immediate Window. You can also press Ctrl + G.
- Watch Window: Displays the Watch Window.
- Quick Watch: Opens the Quick Watch dialog with the current value of the selected expression.
- Call Stack: Displays the Call Stack dialog showing active procedure calls (procedures that have started but not yet ended).
Error Messages
The following is a table of catchable error codes. As you can see, this list skips some numbers. Among the unused numbers, those from 1 to 1000 may be used by Visual Basic in the future.
| Error Code | Message |
|---|---|
| 3 | Return without GoSub |
| 5 | Invalid procedure call |
| 6 | Overflow |
| 7 | Out of memory |
| 9 | Subscript out of range |
| 10 | This array is fixed or temporarily locked |
| 11 | Division by zero |
| 13 | Type mismatch |
| 14 | Out of string space |
| 16 | Expression too complex |
| 17 | Cannot perform requested operation |
| 18 | User interrupt |
| 20 | Resume without error handler |
| 28 | Stack space overflow |
| 35 | Sub or Function not defined |
| 47 | Too many application clients for DLL |
| 48 | Error loading DLL |
| 49 | Bad DLL calling convention |
| 51 | Internal error |
| 52 | Bad file name or number |
| 53 | File not found |
| 54 | Bad file mode |
| 55 | File already open |
| 57 | Device I/O error |
| 58 | File already exists |
| 59 | Bad record length |
| 61 | Disk full |
| 62 | Input past end of file |
| 63 | Bad record number |
| 67 | Too many files |
| 68 | Device unavailable |
| 70 | Permission denied |
| 71 | Disk not ready |
| 74 | Can’t rename with different drive |
| 75 | Path/file access error |
| 76 | Path not found |
| 91 | Object variable or With block variable not set |
| 92 | For loop not initialized |
| 93 | Invalid string pattern |
| 94 | Invalid use of Null |
| 95 | Application-defined or object-defined error |
| 322 | Cannot create necessary temporary file |
| 325 | Invalid format in resource file |
| 380 | Invalid property value |
| 423 | Property or method not found |
| 424 | Object required |
| 429 | ActiveX component can’t create object |
| 430 | Class does not support Automation |
| 432 | File name or class name not found during Automation operation |
| 438 | Object doesn’t support this property or method |
| 440 | Automation error |
| 442 | Connection to type library or object library for remote processing lost |
| 443 | Automation object has no default value |
| 445 | Object doesn’t support this action |
| 446 | Object doesn’t support named arguments |
| 447 | Object doesn’t support current locale setting |
| 448 | Named argument not found |
| 449 | Argument not optional |
| 450 | Wrong number of arguments or invalid property assignment |
| 451 | Object not a collection |
| 452 | Invalid ordinal |
| 453 | Specified DLL function not found |
| 454 | Code resource not found |
| 455 | Code resource lock error |
| 457 | This key is already associated with an element of this collection |
| 458 | Variable uses an Automation type not supported in Visual Basic |
| 481 | Invalid picture |
| 500 | Variable not defined |
| 501 | Cannot assign to variable |
| 502 | Object not safe for scripting |
| 503 | Object not safe for initialization |
| 32811 | Element not found |
Protecting VBA Projects
If you’ve invested a lot of time in programming your VBA projects and now want to protect them from unauthorized access, you have several options:
- Assign a password
- Create an add-in
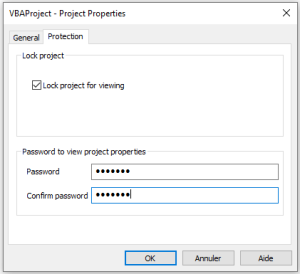
To assign a password to protect your code:
- Switch to the development environment.
- Right-click on the workbook in the Project Explorer that you want to protect and select VBAProject Properties from the context menu.
- Go to the Protection tab.
- Check Lock project for viewing.
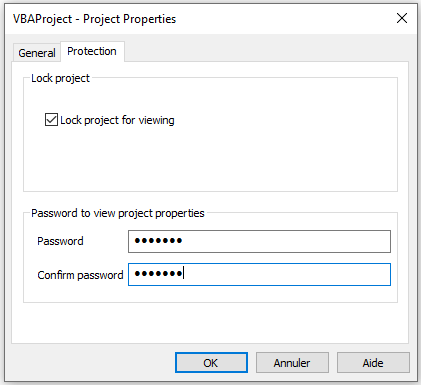
- Assign and confirm a password.
- Click OK to finish.
- Save, close, and reopen the Excel file. Try to view the code.
You will now see the following dialog box:
If you want to protect the macro from running without a password, add the following lines of code:
Sub ProtectProject()
    Dim passcode As Variant
    passcode = Application.InputBox("Enter a password", "Password")
    Select Case passcode
        Case Is = False
            ' do nothing
        Case Is = "easy"
            Range("A1").Value = "This is a secret code"
        Case Else
            MsgBox "Incorrect password"
    End Select
End Sub
Comments
- The macro uses the
InputBoxmethod of theApplicationobject. If the user clicks Cancel, the method returns False, and nothing happens. - Only if the user knows the password (still “easy”) will the secret code be executed. If the entered password is incorrect, a MsgBox appears.
- Note that the user cannot inspect the password in the Visual Basic Editor because the project is locked for viewing.
The second method to protect your code is to create an add-in. The code is compiled and can no longer be modified afterward.