
The following VBA procedure demonstrates how to insert cell ranges into a worksheet:

Sub ZelleEinfuegen()
    ThisWorkbook.Worksheets("Sheet1").Activate
    Range("A2:A3").Insert Shift:=xlShiftDown
    Range("6:7").Insert
End Sub
Detailed Explanation:
The Insert Method
The Insert method of the Range object is used to insert new cells, rows, or columns into a worksheet.
Optional Parameter: Shift
The Shift parameter determines how existing neighboring cells are adjusted to make room for the inserted cells.
- xlShiftDown: shifts existing cells downward
- xlShiftToRight: shifts existing cells to the right
If you omit the Shift parameter, Excel will determine the appropriate direction based on the shape of the selected range:
- If the range is taller than it is wide, Excel will shift cells down.
- If the range is wider than it is tall, Excel will shift cells to the right.
What This Procedure Does:
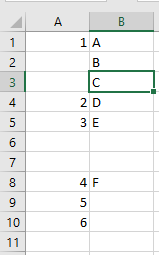
- Activates the worksheet named « Tabelle1 ».
- Inserts two new cells at range A2:A3, pushing the existing content downward (due to Shift:=xlShiftDown).
- Inserts two entire new rows at row positions 6 and 7 (Range(« 6:7 »).Insert). Since these are full rows, Excel automatically shifts the rows below downward. No Shift argument is needed in this case.
Additional Notes:
- If you want to insert entire rows instead of just cells, you can use:
- Range(« A2:A3 »).EntireRow.Insert
This inserts two complete rows above row 2 and row 3.
- Similarly, to insert entire columns:
- Range(« A2:A3 »).EntireColumn.Insert
This would insert a full new column before column A.
Summary
- Use Range(…).Insert to add new cells.
- Use Shift to control whether existing cells shift down or to the right.
- When inserting entire rows or columns, Excel automatically handles shifting; the Shift parameter is unnecessary.