
If you frequently need to print large and complex Excel worksheets, you may encounter the issue where only the first page contains the column headers. You can easily scroll through the document without losing sight of the column titles because the header row is frozen. However, when printing the document, the top row is only printed on the first page. If you’re tired of flipping prints back and forth to see what type of data each column or row contains, here’s how to solve the problem.
Repeat Header Rows on Each Page in Excel
When your document is long and needs to be printed, you may notice that only the first page has the column headers at the top. You can set page layout options to repeat the top row on every printed page.
- Open the worksheet you are going to print.
- Go to the Page Layout tab.
- Click Print Titles in the Page Setup group.

- Ensure you are on the Sheet tab in the Page Setup dialog box.
- Look for Rows to repeat at top in the Print Titles section.
- Click the Collapse Dialog Box icon next to the Rows to repeat at top field.
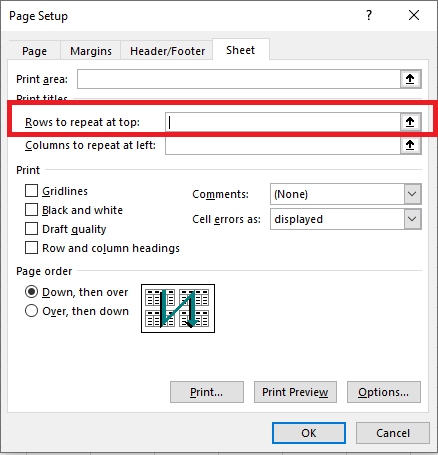
The Page Setup dialog box collapses, and you return to the worksheet. You will notice the cursor changes to a black arrow, which is useful for selecting a whole row with a single click.

- Select the row(s) you want to print on every page.
- To select multiple rows, click on the first row, hold down the mouse button, and drag to the last row you want to select.
Click Enter again or click the Collapse Dialog Box button to return to the Page Setup dialog.

Now, your selection will appear in the Rows to repeat at top field.
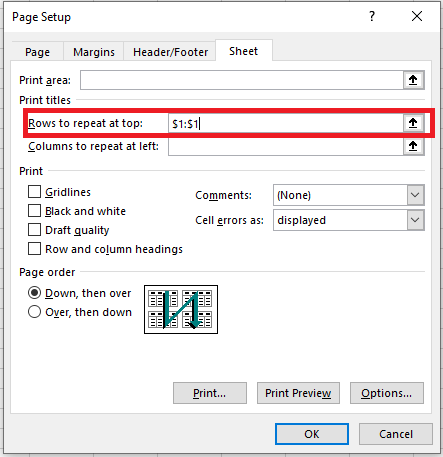
You can skip steps 6-8 and directly type the range using the keyboard. However, be cautious about how you enter it — you must use absolute references (with the dollar sign $). For example, if you want to see the first row on each printed page, the reference should look like this: $1:$1.
Click Print Preview to see the result.
Get a Header Column on Every Printed Page
When your worksheet is too wide, the header column will only appear on the first printed page. If you want to make your document more readable, follow the steps below to print the column with the row titles on the left side of each page.
- Open the worksheet you want to print.
- Follow steps 2-4 as mentioned in the section for Repeating Header Rows.
- Click the Collapse Dialog Box icon next to Columns to repeat at left.
- Choose the column(s) you want to appear on each printed page.
- Click Enter again or click the Collapse Dialog Box button to verify that the selected range appears in the Columns to repeat at left field.
- Press Print Preview in the Page Setup dialog box to review your document before printing.
Now, you won’t have to flip through the pages to find the meaning of each row’s values.
Print Row Numbers and Column Letters
Excel typically refers to the columns of the worksheet by letters (A, B, C) and the rows by numbers (1, 2, 3). These letters and numbers are called row and column headers. Unlike row and column titles, which are printed only on the first page by default, these headers are not printed at all. If you want to see these letters and numbers on your prints, follow these steps:
- Open the worksheet you want to print with row and column headers.
- Go to the Page Layout tab.
- In the Sheet Options group, check the box Print under Headings.
If the Page Setup window is still open on the Sheet tab, simply check the Row and Column Headings box in the Print section. This will also make row and column headers visible on every printed page.
- Open the Print Preview pane (File / Print or Ctrl + F2) to check the changes.
The Print Titles feature can really simplify your life. Printing row and column titles on each page allows you to easily understand the information in the document. You won’t get lost in the prints when row and column titles appear on every page. Try it, and you’ll definitely benefit from it!