Accessing the commands you use most often should be easy. That’s exactly what the Quick Access Toolbar is designed for. Add your favorite commands to the Quick Access Toolbar so they are just one click away, regardless of which ribbon tab is currently open.
What is the Quick Access Toolbar?
The Quick Access Toolbar is a small customizable toolbar located at the top of the Office application window that contains a set of frequently used commands. These commands are accessible from nearly any part of the application, regardless of which ribbon tab is currently selected.
The Quick Access Toolbar has a dropdown menu that includes a predefined set of default commands, which can be shown or hidden. Additionally, it provides an option to add your own commands.
There’s no hard limit to how many commands you can add to the Quick Access Toolbar, though not all may be visible depending on your screen size.
Where is the Quick Access Toolbar in Excel?
By default, the Quick Access Toolbar is located in the top-left corner of the Excel window, above the ribbon. If you prefer having it closer to the worksheet area, you can move it below the ribbon.
Customizing the Quick Access Toolbar
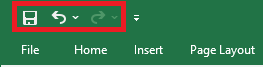
By default, the Excel Quick Access Toolbar contains only three buttons: Save, Undo, and Redo. If you frequently use other commands, you can also add them to this toolbar.
These instructions apply to Excel, but they work the same for other Office applications like Outlook, Word, PowerPoint, etc.
You can customize the Quick Access Toolbar by:
- Adding your own commands
- Changing the order of both default and custom commands
- Displaying the toolbar in one of two available locations
- Adding macros
- Exporting and importing your customization settings
Limitations:
- You can only add commands to the toolbar. Individual list items (like spacing values) and individual styles can’t be added—only the entire list or gallery.
- Only command icons can be shown, not text labels.
- You can’t resize toolbar buttons. The only way to change their size is by changing your screen resolution.
- The toolbar cannot be displayed on multiple lines. If you add more commands than there is space for, some will be hidden. To access them, click the More Commands button.
Accessing the Customize Quick Access Toolbar Window
Most customizations are made from the Customize the Quick Access Toolbar window, found in the Excel Options dialog.
You can access it in several ways:
- Go to File > Options > Quick Access Toolbar
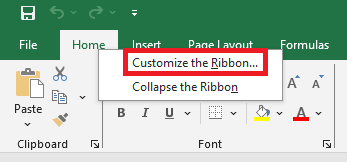
- Right-click anywhere on the ribbon and choose Customize the Quick Access Toolbar…
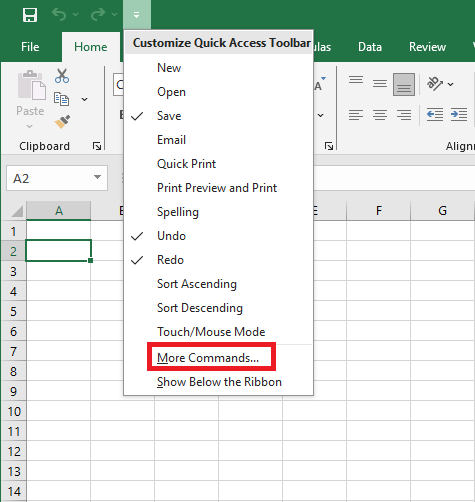
- Click the Customize Quick Access Toolbar button (the downward arrow at the far right), then select More Commands…

This opens the dialog where you can add, remove, and rearrange toolbar commands.
Adding a Command Button to the Quick Access Toolbar
Depending on the type of command, you can add it in one of three ways:
Enable a Command from the Predefined List
- Click the Customize Quick Access Toolbar button (downward arrow).
- From the list of commands, click the one you want to enable.
For example, to create a new worksheet with one click, select New, and the button will appear in the toolbar.

Add a Ribbon Button to the Quick Access Toolbar
- Right-click the desired ribbon command.
- Select Add to Quick Access Toolbar from the context menu.
Add a Command Not on the Ribbon
- Right-click the ribbon and choose Customize the Quick Access Toolbar…
- In the Choose commands from dropdown, select Commands Not in the Ribbon
- From the list on the left, select the command to add
- Click Add
- Click OK to save
For example, to close all Excel windows with one click, you can add the Close All button.

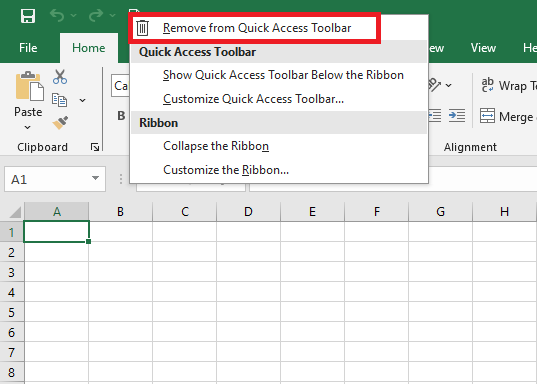
Removing a Command from the Quick Access Toolbar
To remove a command (default or custom), right-click it and select Remove from Quick Access Toolbar.
Or, open the Customize Quick Access Toolbar window, select the command, and click Remove.
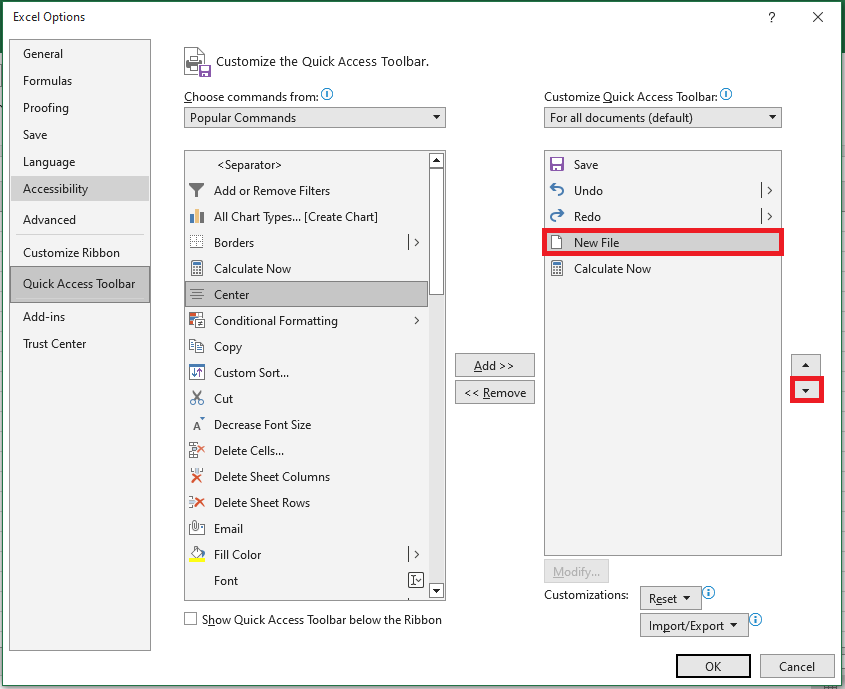
Rearranging Commands on the Quick Access Toolbar
To change the order of commands:
- Open the Customize Quick Access Toolbar window.
- On the right-hand list, select the command you want to move.
- Use the Up or Down arrow to change its position.
For example, to move the New File button to the far right, select it and click Move Down.
Grouping Commands on the Quick Access Toolbar
If your toolbar contains many commands, you may want to group them logically—e.g., separating default from custom commands.
Although you can’t create full command groups like on the ribbon, you can add separators:
- Open the Customize Quick Access Toolbar dialog.
- In the Choose commands from dropdown, select Popular Commands.
- In the command list, select and click Add.
- Use Move Up or Move Down to place it where you want.
- Click OK to save.
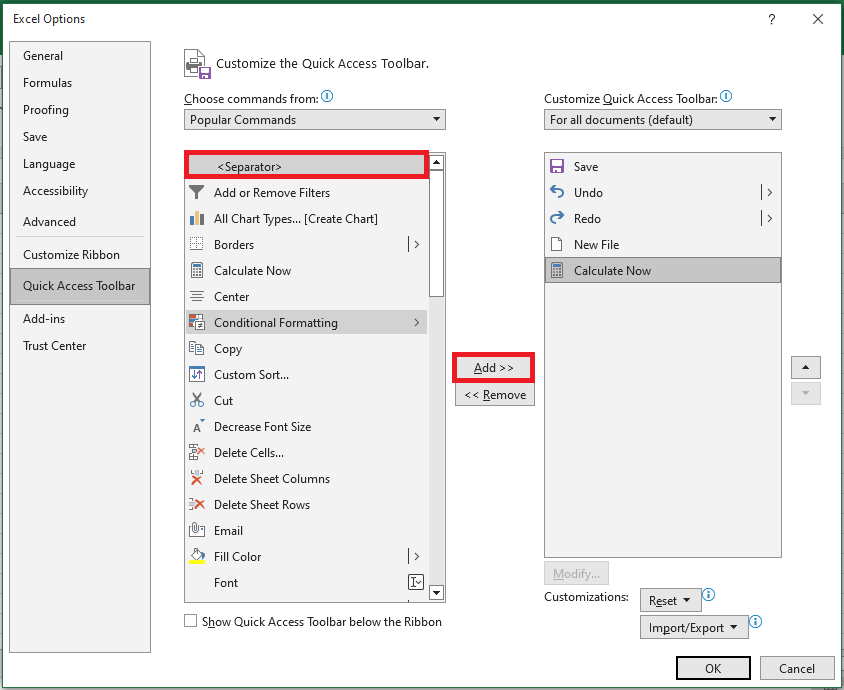
Therefore, the Quick Access Toolbar appears to have two sections.

Moving the Quick Access Toolbar Above or Below the Ribbon
By default, the Quick Access Toolbar is placed above the ribbon. If you prefer to have it below, follow these steps:
- Click the Customize Quick Access Toolbar button.
- In the dropdown menu, select Show Below the Ribbon.
To move it back to the top, click the same button again and select Show Above the Ribbon.