The content of a cell can be aligned both horizontally and vertically. By default, Excel aligns numbers to the right and text to the left. All cells use bottom alignment by default.
The most commonly used alignment commands are located in the Alignment group on the Home tab of the ribbon.
To change text alignment:
- Select the relevant cells and activate the Home tab. Then go to the Alignment group.

- To change the vertical alignment of the cell content relative to the row height, click one of the following tools in the Alignment group:
- Top Align
- Middle Align
- Bottom Align
- To change the horizontal alignment of the cell content relative to the column width, click one of the following tools:
- Align Left
- Center
- Align Right
If you want to change how the data appears in a cell, you can rotate the font angle or modify the text alignment. To do this:
- Select a cell, row, column, or range.
- Go to Home > Orientation, then choose an option.
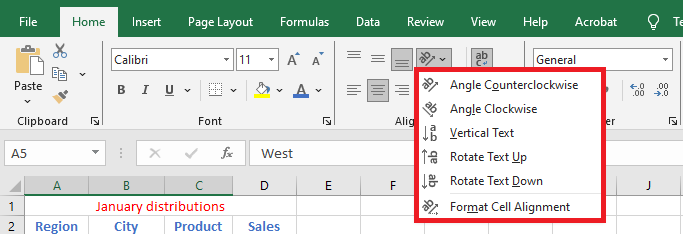
You can rotate your text up, down, left, or right, or align it vertically:
To rotate text to a specific angle:
- Select a cell, row, column, or range.
- Go to Home > Orientation > Format Cell Alignment.
- Under Orientation on the right-hand side, in the Degrees box, use the up or down arrow to set the exact number of degrees to rotate the cell’s text.
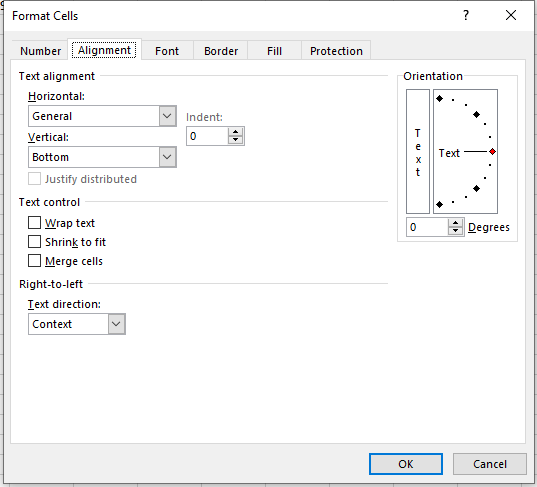
- Positive numbers rotate the text upward.
- Negative numbers rotate the text downward.
Horizontal Alignment Options
Horizontal alignment options control how the content is distributed across the width of the cell (or cells). They are available in the Format Cells dialog box:
- General: Aligns numbers to the right, text to the left, and centers logical and error values. This is the default setting.
- Left (Indent): Aligns content to the left side of the cell. If the text is wider than the cell, it overflows into the cell on the right. If the right cell isn’t empty, the text is cut off. Also available on the ribbon.
- Center: Centers the content within the cell. If the text is too wide, it overflows into adjacent empty cells; otherwise, it is truncated. Also available on the ribbon.
- Right (Indent): Aligns content to the right side. If the text is too wide, it overflows to the left if the adjacent cell is empty. Also available on the ribbon.
- Fill: Repeats the content to fill the width of the cell. If adjacent cells to the right are also set to Fill, they will also be filled.
- Justify: Justifies the text left and right across the cell. Applies only if the cell is set to wrap text and spans multiple lines.
- Center Across Selection: Centers the text across selected columns. Useful for centering a title across multiple columns.
- Distributed: Distributes the text evenly across the selected column.
Vertical Alignment Options
Vertical alignment options are not used as often as horizontal ones. They are mostly useful when row height has been increased significantly.
Here are the vertical alignment options available in the Format Cells dialog box:
NOTE:
If you choose Left, Right, or Distributed, you can also adjust the Indent setting, which adds horizontal spacing between the cell border and the text.
- Top: Aligns cell content at the top of the cell. Also available on the ribbon.
- Center: Vertically centers the content in the cell. Also available on the ribbon.
- Bottom: Aligns content to the bottom of the cell. Also available on the ribbon.
- Justify: Justifies the text vertically within the cell; this applies only when the cell uses wrap text and multiple lines. This setting can increase line spacing.
- Distributed: Distributes the text evenly vertically in the cell.