VBA has a rich set of built-in controls that you can use in your form. Using them, it’s easy to create any user interface that meets the full requirements of a Windows environment. Control elements are created using the Toolbox toolbar, which is displayed on screen either by selecting View | Toolbox, or by clicking the Standard toolbar button.

The Toolbox contains buttons used to create controls. All buttons in the toolbox, except for the Select Objects button, are used to create controls. By clicking the Select Objects button, you can select an existing control in the form for further editing (resizing or moving).
Table: Toolbox Buttons and Commands
| Name | Tooltip | Description |
|---|---|---|
| Label |
Caption | Displays information |
| TextBox |
Text Box | Allows text input |
| ComboBox |
Drop-down list | Allows selection and/or entry in a list |
| ListBox |
List box | Allows selection in a list |
| CheckBox |
Check box | Returns True or False |
| OptionButton |
Option button | Allows a choice from a list of options |
| ToggleButton |
Toggle button | Returns True or False |
| Frame |
Frame | Container used to group controls |
| CommandButton |
Command button | Triggers actions (Sub/Function) |
| TabStrip |
Tab control | Adds tabs to the UserForm |
| MultiPage |
MultiPage | Allows multiple pages |
| ScrollBar |
Scroll bar | Increments or decrements values |
| SpinButton |
Spin button | Increments or decrements values |
| Image |
Image | Inserts an image |
| RefEdit |
RefEdit | Retrieves a cell range address |
To place a control on the form, click the corresponding button in the Toolbox and drag the control’s frame to the desired location. After that, the control can be moved, resized, copied to clipboard, pasted, or removed from the form.
Label
The Label control is used to display information or captions. The user cannot modify the text displayed in the label at runtime. The main property is Caption, which defines the displayed text.
A Label does not display values from data sources or expressions; it is always unbound and does not change when navigating records.
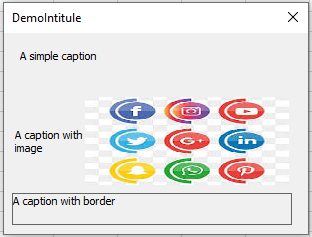
The following example shows different types of Labels: simple, with an image, and with a border. To implement this, create a form and place three Labels. The image file used is D:logo.jpg. In the form module, enter:
Private Sub UserForm_Initialize()
   Me.Caption = "DemoIntitule"
   Label1.Caption = "A simple caption"
   Label2.Caption = "A caption with image"
   Label2.Picture = LoadPicture("logo.jpg")
   Label2.PicturePosition = fmPicturePositionRightCenter
   Label3.Caption = "A caption with border"
   Label3.BorderStyle = fmBorderStyleSingle
   Label3.WordWrap = True
End Sub
Comments:
- In Label2’s properties window, the image is loaded using the
Pictureproperty.PicturePositiondefines the image’s position relative to the text. - Label3 uses
BorderStyleto determine whether a border is shown. - The
WordWrapproperty determines if the text wraps within the control.
Parfait. Voici la suite exacte en anglais à partir de la section 2 – TextBox (Text Box), y compris toutes les sous-sections, propriétés, explications et blocs de code, sans résumé ni reformulation :
TextBox
The TextBox control is primarily used for user input of text, which is then used in the program or to output calculation results. Text entered into the TextBox can be converted to numbers or formulas via code. The main event associated with the TextBox is the Change event.
Table: Basic TextBox Properties
| Property | Description |
|---|---|
| Name | Sets the name of the TextBox |
| Text | Returns the text contained in the TextBox |
| Multiline | Boolean value that enables multiline input |
| ScrollBars | Defines the display mode of scrollbars |
| SelLength, SelStart, SelText | Characterize the selected text fragment |
| MaxLength | Sets the maximum number of characters allowed |
| PasswordChar | Sets the character displayed when entering a password |
| ControlTipText | Tooltip text shown when mouse hovers over the control |
| Enabled | When set to False, locks the control for the user and it cannot receive focus |
| Locked | When set to True, prevents user from editing the TextBox content |
Adding Two Numbers
As an example with TextBoxes, let’s create a project where two numbers entered in two TextBoxes are added together, and the result is displayed in a third TextBox, as shown in the following figure.

Design:
Place three Labels, three TextBoxes, and two CommandButtons on a form. Use the Properties window to set their values as follows:
| Object | Property | Value |
|---|---|---|
| UserForm | Caption | c = a + b |
| Label | Caption | A |
| TextBox | Name | txtA |
| Label | Caption | B |
| TextBox | Name | txtB |
| Label | Caption | C |
| TextBox | Name | txtC |
| CommandButton | Name | cmdOK |
| Caption | OK | |
| CommandButton | Name | cmdANNULER |
| Caption | CANCEL |
Form Module Code:
Private Sub cmdOK_Click()
    Dim a As Double, b As Double, c As Double
    a = txtA.Text
    b = txtB.Text
    c = a + b
    txtC.Text = c
End Sub

Private Sub cmdANNULER_Click()
    Unload Me
End Sub
Comments:
- The two numbers are entered in
txtAandtxtB; the sum is calculated and displayed intxtCwhen OK is clicked. - The syntax
Unload Mecloses the form when CANCEL is clicked.
Keyboard Shortcut Button
The Accelerator property assigns a key (letter or number) that, when pressed along with <Alt>, triggers the control’s click event. That character must appear in the control’s Caption and will appear underlined.
For example, add the following initialization procedure to assign <Alt> + O to OK and <Alt> + A to CANCEL:
Private Sub UserForm_Initialize()
    cmdOK.Accelerator = "O"
    cmdANNULER.Accelerator = "A"
End Sub
NOTE:
When launching an Excel form, a series of events occur. One of these is Initialize, triggered after controls are loaded but before the form is displayed.
<Enter> and <Escape> Keys
- Setting
Default = Trueon a button allows it to be triggered by the<Enter>key. - Setting
Cancel = Trueallows the<Escape>key to trigger that button.
Private Sub UserForm_Initialize()
    cmdOK.Default = True
    cmdCancel.Cancel = True
End Sub
Pressing <Enter> runs the OK action; <Escape> closes the form.
Locked Result Field
To completely lock a TextBox from user interaction, set:
Private Sub UserForm_Initialize()
    txtC.Enabled = False
End Sub
This disables the TextBox from being focused or edited.
Prevent a Button from Receiving Focus on Click
If a button gets focused when clicked, users may need to refocus a text field afterward. To prevent that, set:
Private Sub UserForm_Initialize()
    cmdOK.TakeFocusOnClick = False
End Sub
Moving Focus Between Fields with
To move focus with <Enter>, handle the KeyDown event in each TextBox and use the SetFocus method.
Private Sub txtA_KeyDown(ByVal KeyCode As MSForms.ReturnInteger, _
    ByVal Shift As Integer)
    If KeyCode = vbKeyReturn Then
        txtB.SetFocus
    End If
End Sub

Private Sub txtB_KeyDown(ByVal KeyCode As MSForms.ReturnInteger, _
    ByVal Shift As Integer)
    If KeyCode = vbKeyReturn Then
        cmdOK_Click
        txtA.SetFocus
    End If
End Sub

Private Sub UserForm_Initialize()
    txtC.Locked = True
End Sub
SetFocus moves focus to the specified control: Object.SetFocus
Tooltip (ControlTipText)
Tooltips are shown when hovering over a control. You can define them using the ControlTipText property.
Private Sub cmdOK_Click()
    Dim a As Double, b As Double, c As Double
    a = txtA.Text
    b = txtB.Text
    c = a + b
    txtC.Text = c
End Sub

Private Sub cmdANNULER_Click()
    Unload Me
End Sub

Private Sub UserForm_Initialize()
    txtA.ControlTipText = "Value of a"
    txtB.ControlTipText = "Value of b"
    txtC.ControlTipText = "Value of c"
    cmdOK.ControlTipText = "Sum of a + b"
    cmdANNULER.ControlTipText = "Cancel the operation"
End Sub
Password Input Field
You can use the PasswordChar property to mask input characters. Example of a password-protected button:
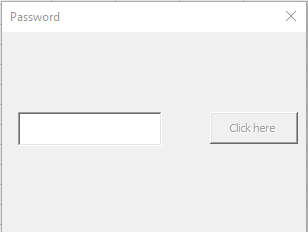
Design:
- One TextBox named
TxtMotpasse - One CommandButton named
CmdMessage
Code:
Private password As String

Private Sub UserForm_Initialize()
    cmdMessage.Enabled = False
    txtPassword.PasswordChar = "*"
    password = "chancelin"
End Sub

Private Sub txtPassword_KeyDown(ByVal KeyCode As MSForms.ReturnInteger, ByVal Shift As Integer)
    If KeyCode = vbKeyReturn Then
        If LCase(txtPassword.Text) = LCase(password) Then
            cmdMessage.Enabled = True
        Else
            cmdMessage.Enabled = False
        End If
    End If
End Sub

Private Sub cmdMessage_Click()
    MsgBox "Password entered correctly"
End Sub
Comments:
LCase()is used to ignore case sensitivity.Enableddetermines whether a control can receive focus and respond to events.
Très bien. Voici la suite exacte en anglais à partir de la section 2.9 – Multiline TextBox jusqu’à la fin de la section 6 sur les contrôles synchronisés SpinButton et TextBox, incluant toutes les propriétés, explications, et blocs de code :
Multiline TextBox
A TextBox can be used as a multiline input field. To do so, set the MultiLine property to True.
Let’s build a simple project that converts euros to dollars. The project has two TextBoxes:
- A single-line TextBox for entering the amount.
- A multiline TextBox for displaying the result.
When the <Enter> key is pressed in the first box, the conversion is calculated and displayed.
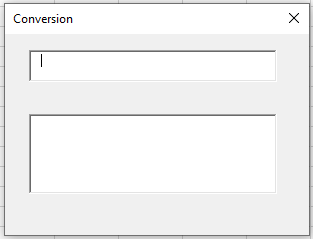
Design:
Place two TextBoxes on a form and set the following properties:
| Object | Property | Value |
|---|---|---|
| TextBox | Name | TxtMontant |
| TextBox | Name | TxtConversion |
Form Module Code:
Private taux As Double

Private Sub UserForm_Initialize()
    taux = 1.19
    txtConversion.MultiLine = True
    txtConversion.Locked = True
End Sub

Private Sub txtMontant_KeyDown(ByVal KeyCode As MSForms.ReturnInteger, _
                             ByVal Shift As Integer)
    If KeyCode = vbKeyReturn Then
        Dim r As Double
        Dim d As Double
        r = txtMontant.Text
        d = FormatNumber(r / taux, 2)
        txtConversion.Text = "Amount entered in euros: " & r & vbCr & _
                             "Conversion rate: " & taux & vbCr & _
                             "Converted amount: " & d & " Dollars"
    End If
End Sub
Comments:
- To prevent users from modifying the result, the multiline field is locked using the
Lockedproperty. vbCr(orChr(13)) inserts a carriage return (line break).
Sharing Values Between Forms
If multiple forms exist in the project, they can exchange values via public variables declared in a standard module.
Example:
- UserForm1 has two TextBoxes and one CommandButton.
- UserForm2 has one TextBox to receive the result.
Standard Module Code:
Public valeurechange As Double
UserForm1 Code:
Private Sub CommandButton1_Click()
    valeurechange = CDbl(TextBox1.Text) + CDbl(TextBox2.Text)
    Unload Me
    UserForm2.Show
End Sub
UserForm2 Code:
Private Sub UserForm_Initialize()
    TextBox1.Text = valeurechange
End Sub
Comment:
CDbl()converts a numeric value into a double-precision number.
CheckBox and ToggleButton
The CheckBox and ToggleButton controls allow the user to make a selection. Their key property is Value:
True: selectedFalse: unselectedNull: neither selected nor unselected (grayed out)
To use Null, the TripleState property must be set to True.
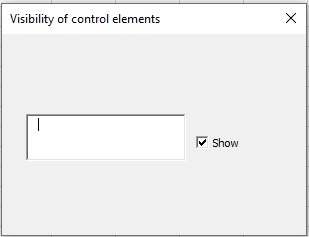
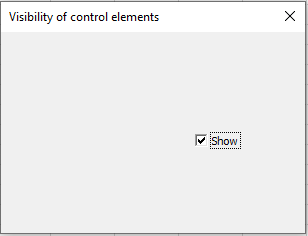
Controlling Control Visibility
The Visible property determines if a control is shown (True) or hidden (False).
Example: Use a CheckBox to toggle the visibility of a TextBox.
Private Sub UserForm_Initialize()
    CheckBox1.Caption = "Show"
    TextBox1.Visible = True
    CheckBox1.Value = True
End Sub

Private Sub CheckBox1_Change()
    If CheckBox1.Value Then
        TextBox1.Visible = True
    Else
        TextBox1.Visible = False
    End If
End Sub
Controlling Accessibility of Controls
The Enabled property defines whether the control is usable by the user.


Example: Use a CheckBox to toggle whether a CommandButton is enabled:
Private Sub UserForm_Initialize()
    CommandButton1.Caption = "ACCESSIBLE"
    CheckBox1.Caption = "Lock"
    CheckBox1.Value = True
End Sub

Private Sub CheckBox1_Change()
    If CheckBox1.Value Then
        CommandButton1.Enabled = False
    Else
        CommandButton1.Enabled = True
    End If
End Sub

Private Sub CommandButton1_Click()
    MsgBox "Hello! (-:"
End Sub
Comment:
If the box “Lock” is checked, the button is disabled. If unchecked, it becomes available.
Frame
The Frame control is used to group other controls together. Its main property is Caption.
CheckBoxes and OptionButtons can also be grouped in code using the GroupName property.
OptionButton
The OptionButton (radio button) allows mutually exclusive choices. They are often grouped inside a Frame, or using their GroupName property.
Key properties/events:
Value:True= selected,False= not selectedClickandChange: main events
Selecting the Operation to Perform
Revisiting example Addition of two numbers let’s now use OptionButtons to let the user choose between Addition and Subtraction.
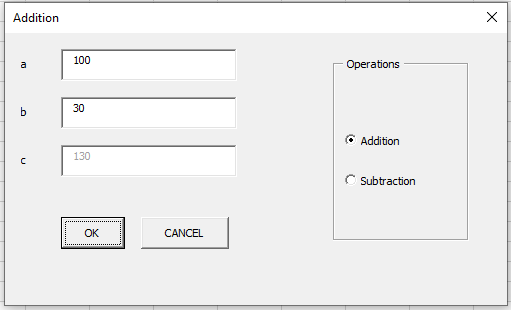
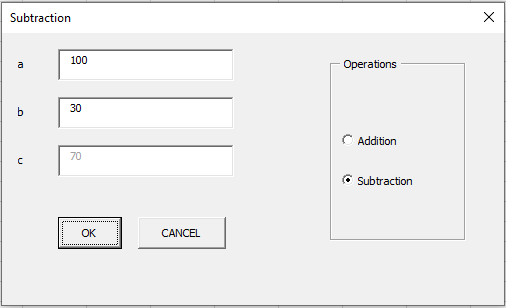
Design:
Form contains:
- 3 Labels
- 3 TextBoxes (txtA, txtB, txtC)
- 2 CommandButtons (cmdOK, cmdANNULER)
- 1 Frame (
Caption = Operations) - 2 OptionButtons (optAddition, optSoustraction)
Code:
Private Sub UserForm_Initialize()
    optAddition.Value = True
End Sub

Private Sub cmdOK_Click()
    Dim a As Double, b As Double, c As Double
    a = txtA.Text
    b = txtB.Text
    If optAddition.Value Then
        c = a + b
    End If
    If optSoustraction.Value Then
        c = a - b
    End If
    txtC.Text = c
End Sub

Private Sub optAddition_Click()
    Me.Caption = "Addition"
End Sub

Private Sub optSoustraction_Click()
    Me.Caption = "Subtraction"
End Sub
Comments:
- The selected OptionButton determines the operation performed.
- The form’s title (
Caption) is updated based on the selected operation.
ScrollBar and SpinButton
The ScrollBar and SpinButton controls are used to define numeric values.
ScrollBarincludes a slider.SpinButtonhas increment/decrement arrows only.
Both have:
Value(current value)Min,Max(range)
Synchronizing a SpinButton with a TextBox
Let’s create a form where a SpinButton adjusts a TextBox value, and vice versa.
Design:
Place a TextBox (txtZonetexte) and a SpinButton (SpinBouton) on the form.
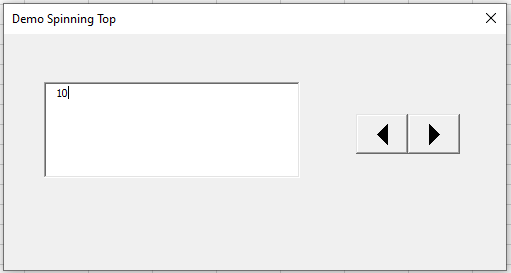
Code:
Private Sub UserForm_Initialize()
    SpinBouton.Min = 1
    SpinBouton.Max = 10
End Sub

Private Sub SpinBouton_Change()
    txtZonetexte.Text = SpinBouton.Value
End Sub

Private Sub txtZonetexte_Change()
    Dim v As Variant
    v = txtZonetexte.Text
    If IsNumeric(v) Then
        If SpinBouton.Min <= v And v <= SpinBouton.Max Then
            SpinBouton.Value = v
        End If
    End If
End Sub
Comments:
- Use
IsNumeric()to validate that the TextBox contains a number. - Also check that the value falls within the valid range (
MintoMax). - In this example, Min is 1 and Max is 10 (set during initialization).