
Do you want your applications to be user-friendly and easy to use? In this chapter, we’ll explore the elements that allow you to create a custom interface for your projects. This will make applications flexible, reflect business logic as much as possible, and offer optimal user experience.
A custom form or UserForm is a dialog box in which you place various controls your application needs. You may design the interface with one or several forms. Moreover, the entire set of controls will serve only to accomplish that specific task. In all cases, using forms will give your project an individual look, streamline processing of application data, and reduce time spent performing necessary operations.
About UserForms
Creating a UserForm
The first step in creating a UserForm is to insert one in the Visual Basic Editor. To do this, press Alt + F11 to access the VBE and select your workbook’s name in the Project Explorer, as shown in the figure below.

With the workbook name selected, click Insert > UserForm in the menu bar.

A new UserForm opens in its design window, as illustrated.

Customizing a UserForm
UserForms have a variety of properties. You can display the Properties window for the UserForm by clicking View > Properties Window or its icon.

Under the Project Explorer, you will see the Properties window, partially visible in the figure.

For the first UserForm of the workbook, VBA assigns a default value of UserForm1 to its Name and Caption properties. If you were to create a second UserForm, its default properties would be UserForm2, and so on. To distinguish between Name and Caption, the figure shows where the Name was replaced with frmEmployees and the Caption (displayed in the title bar) was changed to Employees.

NOTE:
When naming a UserForm—or any object—it is best to assign a name that reflects its purpose. It is recommended to use the prefix frm (for UserForm) followed by an intuitive name such as Employees.
Adding Controls to a Custom Form
As we saw in the previous chapter, a control is an object like a Label, TextBox, OptionButton, or CheckBox in a UserForm or embedded in a worksheet that allows users to view or manipulate information. VBA supports these and other controls, accessible from the VBE Toolbox.
To display the Toolbox, click its icon or choose View > Toolbox.

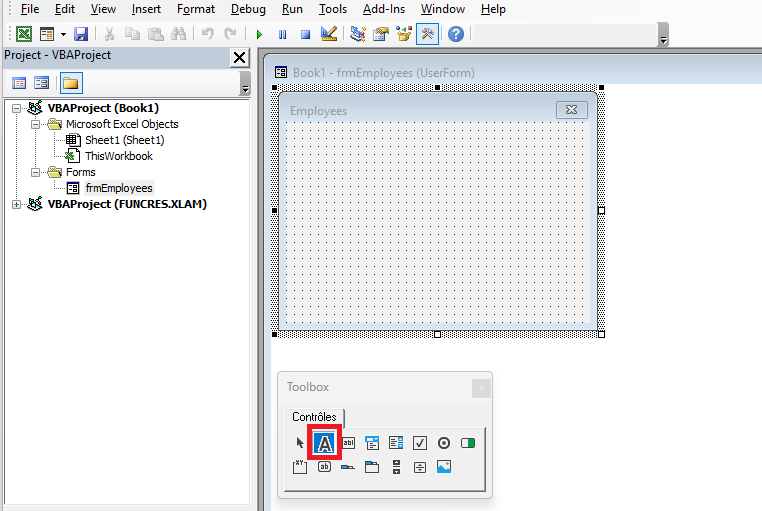
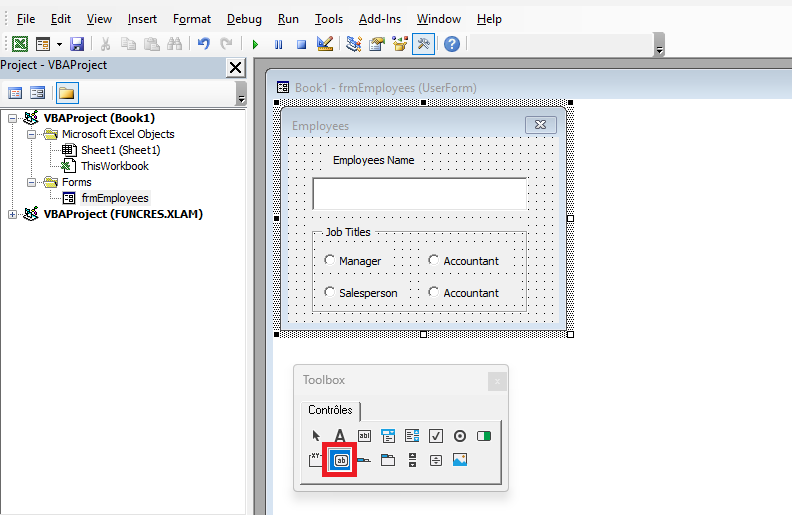
The controls you place on your UserForm depend on its purpose. For a simple form to gather employee info, you might need a text box for employee name and a list of job titles. The figure shows the toolbox with the Label control hovered.

To place a control on your UserForm, draw it in the UserForm’s design area. Click the control’s icon in the Toolbox and draw it like you would a shape on a worksheet.
When a Label control is drawn, it will show the default caption Label1. You can change this caption to something meaningful in the Properties window.

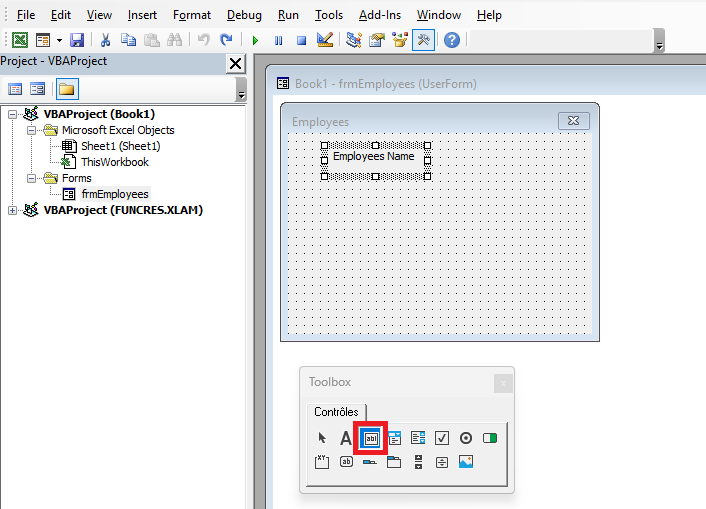
Since the label is placed above the text box and its purpose is to indicate employee name, the caption is changed to Employee Name. Then the TextBox icon is selected to place a text box under the label.
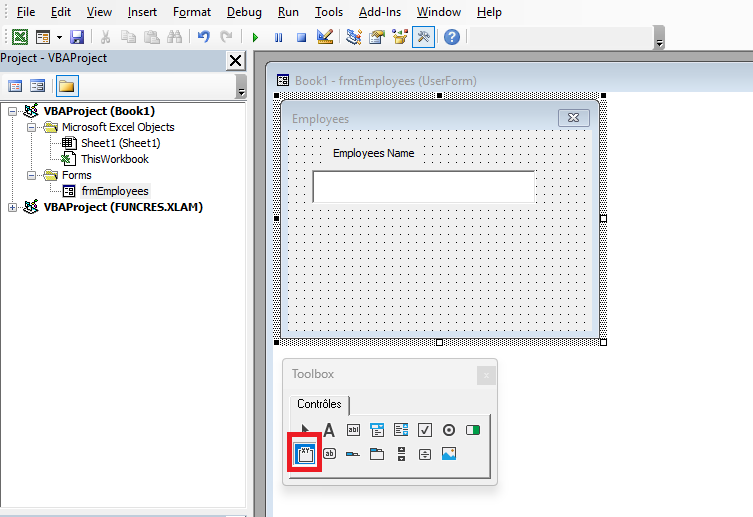
After clicking the TextBox icon, draw it below the label. The text box should be wide enough to accept and display a name. Then, select the Frame icon to place a Frame control.
The Frame control, once drawn, shows the default caption Frame1. Frames group controls visually, often under a theme. In this case, it will contain job titles so the user can select only one.
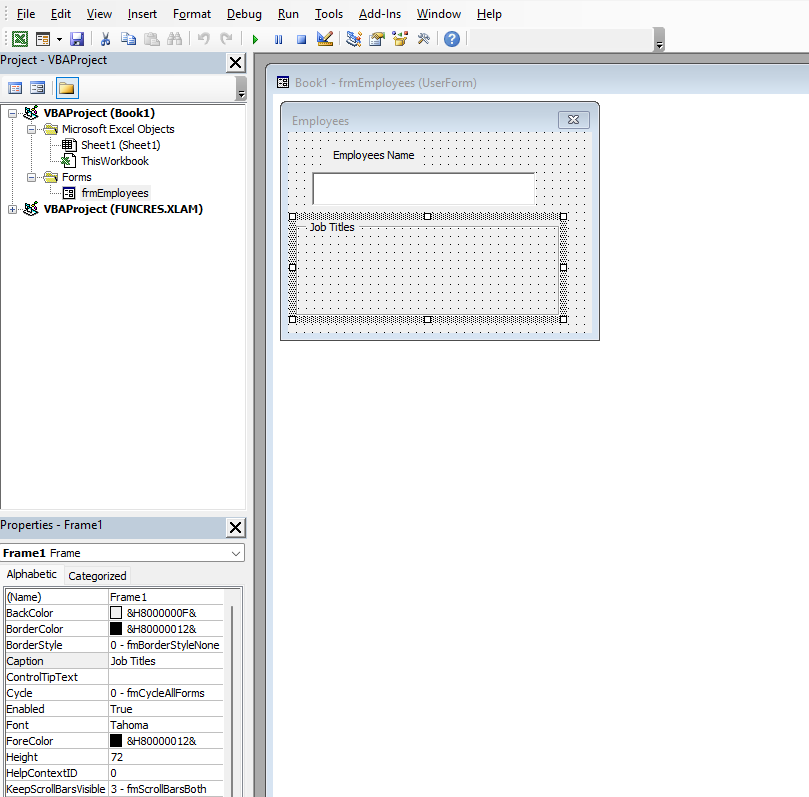
Change the caption Frame1 to Job Titles. Then select the OptionButton icon in the Toolbox. Since employees have only one job title, use OptionButtons within the Frame for selection.
Add two CommandButtons: one labeled OK to confirm inputs and another Cancel to exit the form.

Properties, Methods, and Events of UserForms
UserForm Properties
The form has a wide range of properties that let you control appearance and behavior. The most used are Name and Caption.
| Property | Description |
|---|---|
| Name | Name of the UserForm |
| ActiveControl | Returns a reference to the control with focus |
| BackColor | Background color |
| BorderColor | Border color |
| BorderStyle | Border style (fmBorderStyleNone, fmBorderStyleSingle) |
| CanPaste | Defines if paste is allowed from clipboard |
| CanRedo | Defines if redo is possible |
| CanUndo | Defines if undo is possible |
| Caption | Form title |
| Cycle | Focus behavior in container objects (Frame/Page) |
| DrawBuffer | Size of memory used when redrawing an image |
| Enabled | Whether the form is enabled |
| ForeColor | Foreground color |
| Height, Width | Form dimensions |
| HelpContextID | Link to Help file chapter |
| InsideHeight/Width | Dimensions excluding title bar and border thickness |
| KeepScrollBarsVisible | Visibility of scrollbars |
| Left, Top | Coordinates of the form’s upper-left corner |
| MouseIcon | Custom mouse pointer |
| MousePointer | Type of mouse pointer |
| Picture | Bitmap used as background |
| PictureAlignment | Bitmap alignment |
| PictureSizeMode | Image scaling behavior |
| ScrollHeight/Width | Scrollable area size |
| ScrollLeft/Top | Coordinates of scrollable area |
| SpecialEffect | Form appearance |
| StartUpPosition | Initial form position |
| Tag | Identifier string |
| VerticalScrollbarSide | Side where scrollbars appear |
| Visible | Form visibility |
| WhatsThisButton | Show “?” help button |
| Zoom | Zoom level |
UserForm Methods
| Method | Description |
|---|---|
| Copy | Copies the object to clipboard |
| Cut | Cuts and copies to clipboard |
| Hide | Hides the form without unloading it |
| Load | Loads the form into memory |
| Move | Moves the form |
| Paste | Pastes from clipboard |
| PrintForm | Prints an image of the form |
| RedoAction | Repeats the last redo command |
| Repaint | Refreshes the form’s image |
| Scroll | Scrolls the image |
| SetDefaultTabOrder | Sets default tab order for controls |
| Show | Displays the form |
| UndoAction | Repeats the last undo command |
| Unload | Unloads the form from memory |
| WhatsThisMode | Shows “?” pointer |
UserForm Events
| Event | Description |
|---|---|
| Activate, Deactivate | Triggered when form gains/loses focus |
| AddControl | When a control is added |
| BeforeDragOver | When dragging data |
| BeforeDropOrPaste | Before inserting dragged data |
| Click | When the form is clicked |
| DblClick | When the form is double-clicked |
| Error | When an error occurs |
| Initialize | When form is initialized |
| Layout | When layout changes |
| KeyDown, KeyUp | On key press/release |
| KeyPress | On key press (non-function/service keys) |
| MouseDown, MouseUp | Mouse button pressed/released |
| MouseMove | Mouse moves over form |
| QueryClose | Before the form is closed |
| RemoveControl | When a control is removed |
| Resize | When form is resized |
| Scroll | When scrolling |
| Terminate | When form is terminated |
| Zoom | When zoom level changes |
Animating a UserForm
Displaying a UserForm
To display a UserForm, you run the Show method with the syntax:
FormName.Show
For example, if you followed the steps described earlier and created the frmEmployees UserForm, you could use the following macro to call the form:
Sub EmployeeFormulaire()
    frmEmployees.Show
End Sub
If you’d like to see how the UserForm looks when invoked in the actual worksheet environment without writing a macro, you can type:
frmEmployees.Show
into the Immediate window and press Enter. The following figure shows how you and your users will view the example UserForm.

Where Does the UserForm Code Go?
A UserForm is a VBA object class that has its own code module. Just as each worksheet has its own module, every UserForm you add to your workbook automatically comes with its own module.
To access a UserForm’s module in the VBE:
- Double-click the UserForm in the design pane,
- Or right-click the UserForm name in the Project Explorer and choose View Code.

Closing a UserForm
You can close a UserForm in two ways: using the Unload method or the Hide method.
Though both seem to make the UserForm disappear, each performs different instructions. This can confuse beginners, so it’s important to understand the distinction between Unload and Hide.
Unloading a UserForm
When you unload a UserForm, the form closes and its contents are removed from memory. In most cases, this is the desired behavior: entered data is saved or passed to public variables, and then the form closes.

To unload a UserForm, use:
Unload Me
Typically, this is triggered by a CommandButton, such as a Cancel button. Suppose you want to unload the UserForm when clicking Cancel. A quick way to do this is to double-click the command button in the form designer, which creates:
Private Sub CommandButton2_Click()
End Sub
Complete the Click procedure by adding:
Private Sub CommandButton2_Click()
    Unload Me
End Sub
Now, clicking the Cancel button will unload (i.e., close and free memory) the UserForm.
Hiding a UserForm
The Hide method makes the UserForm invisible, but its contents remain in memory. You might want this behavior if you’re working with multiple UserForms and wish to focus on only one at a time.
To hide a form, use:
Me.Hide
NOTE:
To summarize the difference:
- Use
Unloadwhen you want to clear the form from memory. - Use
Hidewhen you want to preserve the form’s data in memory for reuse later.
If the workbook is closed while the form is hidden, it is automatically unloaded.
How to Run a UserForm?
To test the form’s code, you don’t need to create controls on a sheet. After building the form and writing code in its module, simply:
- Choose
Run > Run Sub/UserFormfrom the menu, - Or press
<F5>, - Or click the Run Macro button on the Standard toolbar.
The form will then appear over the active worksheet.
Closing the Form with the Key <Escape>
It is possible to close a UserForm using a keyboard key such as <Escape>. To do this, handle the KeyDown event, check if the correct key is pressed, and unload the form using Unload or End.
The KeyDown event has two parameters:
KeyCode: The key that was pressedShift: Modifier keys (Shift, Ctrl, Alt)
VBA has a special constant for <Escape>: vbKeyEscape
Here’s an example that closes the form when <Escape> is pressed:
Private Sub UserForm_KeyDown(ByVal KeyCode As MSForms.ReturnInteger, _
    ByVal Shift As Integer)
        If KeyCode = vbKeyEscape Then
            Unload Me
        End If
End Sub
Comments:
KeyDownandKeyUpare triggered when a key is pressed and released.- Syntax for KeyDown and KeyUp:
Private Sub Object_KeyDown(ByVal KeyCode As MSForms.ReturnInteger, ByVal Shift As fmShiftState)
Private Sub Object_KeyUp(ByVal KeyCode As MSForms.ReturnInteger, ByVal Shift As fmShiftState)
Table: Shift Parameter Constants
| Constant | Value | Description |
|---|---|---|
| fmShiftMask | 1 | Shift key was pressed |
| fmCtrlMask | 2 | Ctrl key was pressed |
| fmAltMask | 4 | Alt key was pressed |
You can use the following KeyCode constants anywhere in your code:
| Constant | Value | Description |
|---|---|---|
| vbKeyLButton | 0x1 | Left mouse button |
| vbKeyRButton | 0x2 | Right mouse button |
| vbKeyCancel | 0x3 | Cancel key |
| vbKeyMButton | 0x4 | Middle mouse button |
| vbKeyBack | 0x8 | Backspace |
| vbKeyTab | 0x9 | Tab |
| vbKeyClear | 0xC | Clear |
| vbKeyReturn | 0xD | Enter |
| vbKeyShift | 0x10 | Shift |
| vbKeyControl | 0x11 | Ctrl |
| vbKeyMenu | 0x12 | Alt/Menu |
| vbKeyPause | 0x13 | Pause |
| vbKeyCapital | 0x14 | Caps Lock |
| vbKeyEscape | 0x1B | Escape |
| vbKeySpace | 0x20 | Spacebar |
| vbKeyPageUp | 0x21 | Page Up |
| vbKeyPageDown | 0x22 | Page Down |
| vbKeyEnd | 0x23 | End |
| vbKeyHome | 0x24 | Home |
| vbKeyLeft | 0x25 | Left Arrow |
| vbKeyUp | 0x26 | Up Arrow |
| vbKeyRight | 0x27 | Right Arrow |
| vbKeyDown | 0x28 | Down Arrow |
| vbKeySelect | 0x29 | Select |
| vbKeyPrint | 0x2A | Print Screen |
| vbKeyExecute | 0x2B | Execute |
| vbKeySnapshot | 0x2C | Snapshot |
| vbKeyInsert | 0x2D | Insert |
| vbKeyDelete | 0x2E | Delete |
| vbKeyHelp | 0x2F | Help |
| vbKeyNumlock | 0x90 | Num Lock |
Parfait, voici la suite exacte en anglais à partir de la section 4.8 – Confirmation Before Closing the Window, y compris les codes VBA, sans résumé ni reformulation :
Confirming the Closure of the Window
In projects, it is often necessary to request user confirmation before closing a form. This can be achieved using the QueryClose event procedure, which is triggered just before the form is closed.
This procedure has two parameters:
- If the first parameter (
Cancel) is set to-1, the closure is canceled. - If it is set to
0, the window closes. - The second parameter (
CloseMode) identifies the reason that caused the window to close.
For example, in the following code, when the user tries to close the UserForm, a dialog box appears with two buttons: Yes and No. If the user clicks Yes, the form closes. If No, the closure is canceled.
Private Sub UserForm_QueryClose(Cancel As Integer, CloseMode As Integer)
    Select Case MsgBox("Close the window?", vbYesNo + vbQuestion)
        Case vbYes: Cancel = 0
        Case vbNo: Cancel = -1
    End Select
End Sub
Setting the Location of the Form
The initial location of the form is defined by the StartUpPosition property. The valid values are listed in the following table:
| Value | Description |
|---|---|
| 0 | The coordinates of the top-left corner of the form are set using Top and Left |
| 1 | Center of the window |
| 2 | Center of the screen |
| 3 | Top-left corner of the screen |
For example, the following code sets the form so that its top-left corner is positioned at coordinates (100, 100):
Private Sub UserForm_Initialize()
    Me.StartUpPosition = 0
    Me.Top = 100
    Me.Left = 100
End Sub
Modal Window
A modal window is one that must be closed before accessing another window. By default, a UserForm in VBA is modal.
You can define the form type (modal or modeless) using the optional style parameter of the Show method.
Show style
The style parameter has two valid values:
vbModalor1→ Modal windowvbModelessor0→ Modeless window
Examples:
UserForm1.Show vbModeless  ' User can still access the worksheet
UserForm1.Show vbModal     ' User must close the form before accessing the worksheet
Using Multiple Custom Forms
You can have multiple UserForms in a project. When switching from one form to another, consider whether it is opened as modal or modeless.
For example, suppose your project contains UserForm1 and UserForm2. Create a button on the worksheet named cmdForm1. When clicked, it displays the first form.
Modal Mode – Worksheet Module Code
Private Sub cmdForm1_Click()
    UserForm1.Show vbModal
End Sub
Modal Mode – UserForm1 Code Module
Private Sub UserForm_Click()
    Unload UserForm1
    UserForm2.Show
End Sub
In modal mode, you must close the first form before showing the second. Only one form is visible at a time.
Modeless Mode – Worksheet Module Code
Private Sub cmdForm1_Click()
    UserForm1.Show vbModeless
End Sub
Modeless Mode – UserForm1 Code Module
Private Sub UserForm_Click()
    UserForm2.StartUpPosition = 0
    UserForm2.Top = UserForm1.Top + 20
    UserForm2.Left = UserForm1.Left + 20
    UserForm2.Show
End Sub
In modeless mode, both forms can appear on the screen at the same time, with the second slightly offset.
Some Examples with Images
Form with a Changeable Background
A background image can be embedded in a form using the Picture property. This property displays the image at its original dimensions.
If you want the image to fill the entire client area of the form, or its full width or height, use the PictureSizeMode property. The PictureAlignment property defines how the image is aligned within the form (e.g., centered or aligned to a specific side).
Let’s build a project with a form that displays a background image, which changes between two images each time the form is clicked.
To implement the project, you need two image files:
C:\image1.jpgC:\image2.jpg
Then, create a form and define its property values using the Properties window as shown in the following table:
| Object | Property | Value |
|---|---|---|
| UserForm | Picture | Path to bitmap: C:\image1.jpg |
| PictureSizeMode | fmPictureSizeModeStretch |
|
| Caption | Changeable Backgrounds |
Next, double-click on the UserForm to open its code window, and enter the following code:
Private Sub UserForm_Click()
    Static flag As Boolean
    Dim filename As String
    If Not flag Then
        filename = "C:\image1.jpg"
        Me.Picture = LoadPicture(filename)
        Me.PictureSizeMode = fmPictureSizeModeStretch
        Me.Caption = "Changeable Backgrounds " & filename
    Else
        filename = "C:\image2.jpg"
        Me.Picture = LoadPicture(filename)
        Me.PictureSizeMode = fmPictureSizeModeZoom
        Me.PictureAlignment = fmPictureAlignmentTopLeft
        Me.Caption = "Changeable Backgrounds " & filename
    End If
    Me.Repaint
    flag = Not flag
End Sub
Comments:
- When you click on the form, the images
C:\image1.jpgandC:\image2.jpgalternate as the background. - The image is loaded using the
LoadPicturefunction, whose argument is the file path. - Since
PictureSizeModeis set tofmPictureSizeModeStretchfor image1, it stretches or shrinks disproportionately to fill the entire form. - For image2,
PictureSizeModeis set tofmPictureSizeModeZoom, so the image resizes proportionally to fill either width or height. - The
PictureAlignmentproperty set tofmPictureAlignmentTopLeftaligns the top-left corners of the image and form. - It’s not necessary to define
PictureandPictureSizeModein the properties window. Instead, you can invoke the form’sClickevent from theInitializeevent, like this:
Private Sub UserForm_Initialize()
    UserForm_Click
End Sub
- In the Properties window, you can remove the image by placing the cursor in the
Picturefield and pressing the<Delete>key. - In code, do the same by setting:
Me.Picture = LoadPicture("")
Form with a Tiled Background
An image on a form can also be displayed as a tiled background (repeated across the form). For this, set the PictureTiling property to True.
Also make sure to configure the PictureAlignment property, which determines the starting point of the tile pattern.
These property values can be set either in the Properties window or through code — typically within the Initialize event, which occurs before the form is displayed.
Let’s create a form with a tiled background image and set its properties via code:
In the UserForm’s module, write the following code. Ensure that the default working directory of Excel contains the required image file (e.g., image1.jpg):
Private Sub UserForm_Initialize()
    Me.Caption = "Tiled Background"
    Me.BorderStyle = fmBorderStyleNone
    Dim imageA As String
    imageA = "image1.jpg"
    If Len(Dir(imageA)) > 0 Then
        Me.Picture = LoadPicture(imageA)
        Me.PictureAlignment = fmPictureAlignmentTopLeft
        Me.PictureTiling = True
    Else
        MsgBox "File not found: " & CurDir & "\" & imageA
    End If
End Sub
Comments:
- To check your default directory, go to the File tab in the ribbon, click Options, and in the Save section, look at the Default local file location field. It can be changed if needed.
- The application verifies the existence of the image file using the
Dir()function. - If the image file is not found in the working directory, the form appears without a background.
Dir()returns a filename string if found, or an empty string if not.- Therefore, checking for a file’s existence is simply:
If Len(Dir(filename)) > 0 Then ...