The fill handle is the small black square in the lower-right corner of the active cell or range. This small, versatile tool can do many useful things, including creating a series of text or numeric values and filling, clearing, inserting, and deleting ranges. The following sections show you how to use the fill handle to perform each of these tasks.
Using AutoFill to Create Text and Number Series
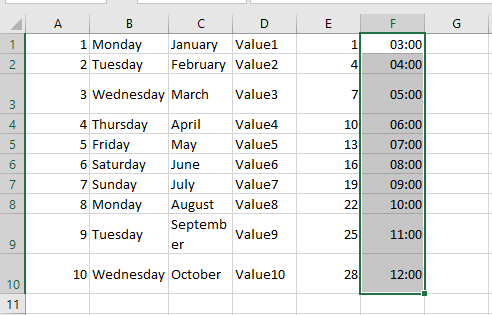
Worksheets often use text series (such as January, February, March, or Sunday, Monday, Tuesday) and numeric series (such as 1, 3, 5 or 2009, 2010, 2011). Instead of entering these series manually, you can use the fill handle to create them automatically. This handy feature is called AutoFill. The following steps show how it works:
- For a text series, select the first cell of the range you want to use and enter the initial value. For a numeric series, enter the first two values, then select both cells.
- Position your mouse pointer over the fill handle. The pointer changes to a plus sign (+).
- Click and drag the mouse pointer until the gray border surrounds the range you want to fill. If you’re unsure where to stop, watch the tooltip near the mouse pointer showing the value of the last selected cell.
- Release the mouse button. Excel fills the range with the series.
When you release the mouse button after using AutoFill, Excel not only fills the series but also displays the Auto Fill Options smart tag. To view the options, move your cursor over the smart tag and click the down arrow to open the list. The options you see depend on the type of series you created. However, you will typically see at least the following four:
- Copy Cells: Click this option to fill the range by copying the original cell(s).
- Fill Series: Click this option for the default series fill.
- Fill Formatting Only: Click this to apply only the formatting from the original cell to the selected range.
- Fill Without Formatting: Click this to fill the range with series data but without copying the formatting.
Keep the following guidelines in mind when using the fill handle to create series:
- Dragging the fill handle down or to the right increments values. Dragging it up or to the left decrements values.
- The fill handle recognizes standard abbreviations like Jan (January) and Sun (Sunday).
- To change the series interval for a text series, enter the first two values, then select both before dragging. For example, entering 1st and 3rd produces the series 1st, 3rd, 5th, and so on.
Creating a Custom AutoFill List
As you saw in the previous sections, Excel recognizes some values such as January, Sunday, or Qtr1 as part of larger predefined lists. When you drag AutoFill from a cell containing one of these values, Excel fills the cells with the appropriate series. However, you are not limited to Excel’s built-in lists. You are free to define your own AutoFill lists as described in the following steps:
- Select File > Options to open the Excel Options dialog box.
- Click Advanced, then click Edit Custom Lists to open the Custom Lists dialog box.
- In the Custom lists box, click New List. A cursor appears in the List entries box.
- Type an item for your list in the List entries box and press Enter. Repeat this step for each item. (Make sure to enter the items in the order you want them to appear in the series.)
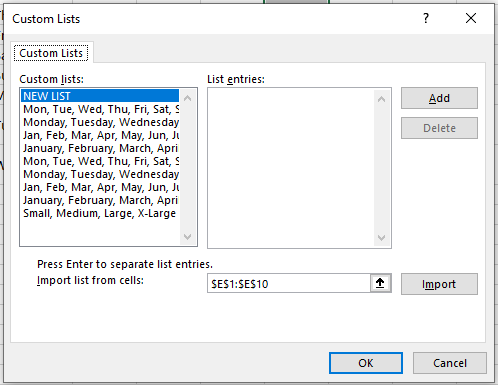
If you need to delete a custom list, select it in the Custom Lists box and click Delete.
If you already have the list in a worksheet range, don’t bother entering each item manually. Instead, open the Import list from cells dialog and enter a reference to the range. You can type the reference or select the cells directly in the worksheet. Click the Import button to add the list to the Custom Lists box.
Using the Series Command
Instead of using the fill handle to create a series, you can use Excel’s Series command to gain a bit more control over the entire process. Follow these steps:
- Select the first cell you want to use for the series and enter the starting value. If you want to create a pattern-based series (like 2, 4, 6, etc.), fill in enough cells to define the pattern.
- Select the full range you want to fill.
- On the Home tab, choose Fill > Series in the Editing group. Excel displays the Series dialog box.
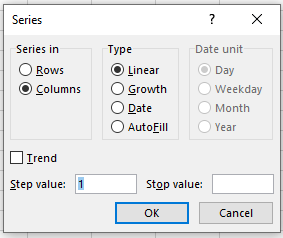
- Click Rows to create the series across rows from the active cell or click Columns to create the series down columns.
- Use the Type group to click your desired series type. You have the following options:
- Linear: This finds the next value in the series by adding the step value (see step 6) to the previous value.
- Growth: This finds the next value by multiplying the previous one by the step value.
- Date: This creates a date series based on the option you select in the Date unit group, such as Day, Weekday, Month, or Year.
- AutoFill: This works similarly to the fill handle. You can use it to extend a numeric pattern or a text series like Qtr1, Qtr2, Qtr3.
If you want to extend a trend, check the Trend box. You can only use this option with Linear or Growth series types.
- If you chose a Linear, Growth, or Date series type, enter a number in the Step value box. Excel uses this number to increment each value in the series.
- To set a limit on the series, enter the appropriate number in the Stop value box.
- Click OK. Excel fills the series and returns you to the worksheet.