Renaming tables in Excel is a best practice that significantly improves the clarity, manageability, and professionalism of your workbooks—especially when dealing with multiple datasets, dashboards, or dynamic reports.
Understanding Excel Table Names
Every table created in Excel is automatically assigned a default name such as Table1, Table2, Table3, etc. These names are functional but not descriptive, which can make your workbook harder to read, especially when using structured references in formulas or VBA code.
Why rename a table?
- To better reflect the content of the table (e.g.,
Sales2024,EmployeeData,Inventory_June) - To make formulas easier to understand
- To avoid confusion when multiple tables exist in the same workbook
- To simplify referencing in Power Query, charts, pivot tables, or macros
Two Main Methods to Rename a Table
Using the Table Design Tab
This method is the most direct and user-friendly.
Steps:
- Click anywhere inside the table to activate the contextual Table Design tab (Excel 2016 and later) or Design tab (earlier versions).
- Look at the left-hand corner of the ribbon, in the group called Properties.

- Locate the field called Table Name.
- Replace the existing name (e.g.,
Table3) with a more descriptive one (e.g.,MonthlyExpenses). - Press Enter to validate the new name.
Tip: If Excel returns an error, it usually means the name is already in use or violates a naming rule (explained below).
Using the Name Manager
This method is more suited for reviewing, managing, and renaming multiple tables and named ranges.
Steps:
- Go to the Formulas tab in the Excel ribbon.
- Click Name Manager in the group called Defined Names.

- In the dialog box, scroll to locate your table (it will appear as
Table1,Table2, etc. under the “Name” column). - Select the table and click Edit.

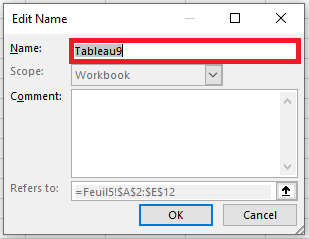
- In the “Edit Name” dialog, you’ll see:
- Name: enter your desired name (e.g.,
Employee) - Refers to: verify that the correct table range is selected (e.g.,
=Sheet1!$A$2:$E$20)
- Name: enter your desired name (e.g.,
- Click OK, then close the Name Manager.
Note: This method is particularly useful when your workbook contains dozens of named objects, and you need to manage them centrally.
Rules & Conventions for Table Naming in Excel
When renaming tables, you must follow Excel’s strict naming rules. Failing to do so will result in an error message.
Rules:
- Unique names: No two tables can share the same name, even if capitalization differs.
Sales2024andsales2024are treated as identical. - No spaces allowed: Use camel case (
SalesReport2023), underscores (Sales_Report_2023), or hyphens (Sales-Report-2023) to separate words. - Length limit: The name must be 255 characters or fewer, though practical names should ideally stay under 30–40 characters for clarity.
- Valid starting character: Must begin with a letter (A–Z), an **underscore (_) **, or a backslash (\).
After the first character, you may use:- Letters
- Numbers
- Underscores (_)
- Periods (.)
- No cell references: A name like
B3orA1is invalid because Excel could interpret it as a cell reference.
Common Errors When Renaming Tables
| Error | Cause |
|---|---|
| « That name is already taken » | You’ve chosen a name already assigned to another table or named range |
| « The name is not valid » | Invalid characters, name too long, or begins with an invalid character |
| Table name turns red | You’ve typed an invalid name but haven’t pressed Enter yet |
Best Practices for Naming Excel Tables
- Use clear, descriptive names that indicate the table’s purpose (e.g.,
CustomerFeedback_Q1,ProductList_2025) - Prefer camel case (
EmployeeRecords) or underscores (Employee_Records) to improve readability - Avoid special characters like
@,#,!,%,?, etc. - Use consistent naming throughout the workbook for easier navigation and troubleshooting