Suppose we need to create a macro that activates a worksheet: for example, if Sheet1 is currently active, we want to record a macro that activates Sheet2.
- Launch Microsoft Office Excel 2010 and make sure the cell pointer is on Sheet1.
- To start the macro recorder, go to the Developer tab on the ribbon and, in the Code group, click Record Macro.
- In the Record Macro dialog box, set the necessary parameters for the procedure being recorded: assign, for example, the macro the name ActivateSheet, enter an appropriate description in the Description field explaining the purpose of this macro, and leave the Store macro in field unchanged. Click OK.

NOTE:
The Macro Name and Description fields are used to set the macro’s name and description. Remember that the macro name should not contain spaces. The description is important for macros used repeatedly because it may be difficult to recall the purpose of a macro after some time. By default, macros are named Macro1, Macro2, etc. To make a macro easier to recognize, it is better to assign it a unique, meaningful name rather than using the default.
The Shortcut key field allows you to assign a key combination to the macro, i.e., specify a character that, in combination with <Ctrl>, will execute the macro. Assigning a shortcut key is optional and is recommended mainly for frequently used macros for quick access. Without a shortcut key, a macro in Excel 2010 can always be run as follows: go to the Developer tab on the ribbon and, in the Code group, click Macros.
The Store macro in dropdown allows you to choose the workbook where the macro will be stored.
- Selecting Personal Macro Workbook saves the macro in a special hidden workbook where macros are stored. This workbook is always open but hidden, and the macros recorded in it are available for other workbooks. To display the personal macro workbook, go to the View tab and, in the Window group, click Unhide.
- Selecting This Workbook (default) saves the macro in a new module sheet of the active workbook.
- Selecting New Workbook saves the macro in a new workbook.
- In macro recording mode , go to Sheet2 (the pointer will be placed in cell A1).

- Click Stop Recording in the Code group on the Developer tab to stop recording the macro.
- Save your workbook in a macro-enabled format:
- Go to the File tab and choose Save As.
- In the Save As dialog box, select the location for your workbook at the top of the window, enter a name for the workbook in the File name field, and select Excel Macro-Enabled Workbook (*.xlsm) in the Save as type dropdown. Click Save.

- Go to the Developer tab and, in the Code group, click Macros. In the Macro dialog box, select the newly created macro from the list and click Edit. The VBA editor window will open, showing the activated standard module with the code (Listing 1.5) of the macro you just recorded (see also the file 2-Activate_Sheet.xlsm on the CD).

Sub Activate_Sheet()
'
' Activate_Sheet Macro
' Activates a Microsoft Excel worksheet
'
     Sheets("Sheet2").Select
End Sub
- Now, without closing this workbook, create another workbook: go to the File tab, select New, and in the Available Templates group, choose Blank Workbook.
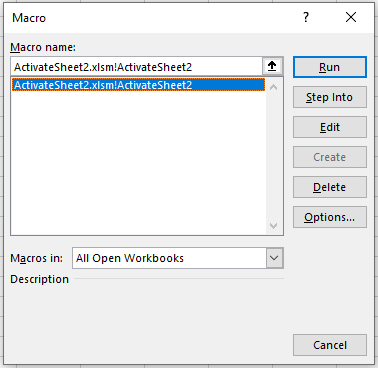
- Go to the Developer tab on the ribbon and, in the Code group, click Macros.
- In the Macro dialog box , select the macro you created and click Run. Make sure that in your new workbook, this macro successfully activates Sheet2.
NOTE:
On the Developer tab, in the Code group, there is a Macro Security button, which opens the Trust Center window in the Macro Settings category . You can always select the desired setting to prevent the execution of potentially harmful code contained in macros from unknown sources.

By selecting Trusted Locations in the Trust Center window and clicking Add new location, you can specify a folder from which your VBA-enabled files will open without blocking the actions in them.

Now, let’s assign our macro to a button on the Quick Access Toolbar:
- Right-click on the Quick Access Toolbar and select More Commands.
- In the opened Excel Options window, under Quick Access Toolbar, choose Macros in the Choose commands from dropdown list.
- In the left column, select your macro Activate_Sheet and click Add >> to move it to the right column. At the bottom of the right column, the Modify button becomes active; click it to assign a button to the macro.

- In the Modify Button dialog , select a symbol for the button and, if needed, change the Display name for the macro, which will appear as a tooltip on the Quick Access Toolbar. Click OK.

- In the Excel Options window, under Quick Access Toolbar, the macro button is now displayed in the right column . Click OK.

- Verify that the button for your macro appears on the Quick Access Toolbar, and that clicking it executes the actions you recorded.
