The Cells object in Excel VBA provides a versatile way to access all cells in a worksheet—whether you’re targeting individual cells or entire cell ranges. Instead of using the familiar column-letter and row-number notation (like in the Range object), the Cells object relies solely on numerical indices: the first number represents the row, and the second number represents the column.
This method becomes especially powerful in programmatic contexts, as both the row and column numbers can easily be generated or manipulated using variables.

Example Procedure: Assigning Values Using the Cells Object
Sub SelectCellsWithCells()
ThisWorkbook.Worksheets("Sheet1").Activate
' Set value in a single cell using Cells
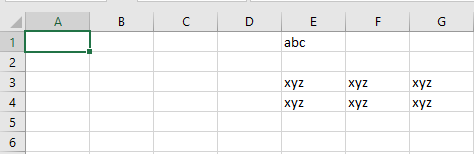
Cells(1, 5).Value = "abc"
' Set value in a range defined by two Cells using the Range object
Range(Cells(3, 5), Cells(4, 7)).Value = "xyz"
End Sub
Explanation of the Procedure:
- Activating the Worksheet
The worksheet « Sheet1 » in the current workbook is activated to ensure that all operations are performed on the correct sheet. - Assigning Value to a Single Cell:
- Cells(1, 5).Value = « abc »
This targets the cell in row 1, column 5, which corresponds to cell E1, and assigns it the value « abc ».
Assigning Value to a Range Defined by Two Cells:
Range(Cells(3, 5), Cells(4, 7)).Value = « xyz »
This defines a rectangular cell block from:
-
- Cells(3, 5) = cell E3
- to Cells(4, 7) = cell G4
All the cells in this rectangular area (E3:F3:G3, E4:F4:G4) are filled with the value « xyz ».
Why Use the Cells Object?
- It allows for dynamic referencing of cells—perfect when looping through rows and columns.
- You can easily integrate row and column variables, e.g.:
- For i = 1 To 10
- Cells(i, 1).Value = i
- Next i
- Compared to Range(« A1 »), Cells(1, 1) is easier to manipulate programmatically—especially in automated or large-scale tasks.