The Offset property allows you to define a cell or range that is shifted relative to another. This offset can be applied to both individual cells and cell ranges — contiguous or non-contiguous.
The result of an Offset is always another Range object, which you can use to write, read, or format data.
Example:
Sub cellOffset()
ThisWorkbook.Worksheets("Sheet3").Activate
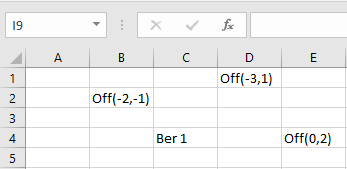
' Base cell = Cells(4, 3) = C4
Cells(4, 3).Value = "Ber 1"
Cells(4, 3).Offset(0, 2).Value = "Off(0,2)" ' E4
Cells(4, 3).Offset(-3, 1).Value = "Off(-3,1)" ' D1
Cells(4, 3).Offset(-2, -1).Value = "Off(-2,-1)" ' B2
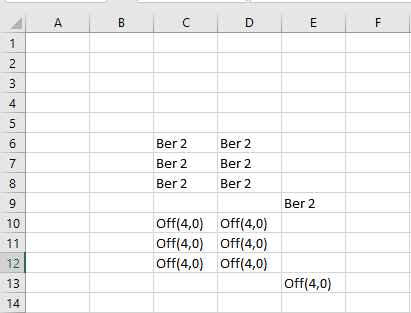
' Offset of a range (non-contiguous: C6:D8 and E9)
Range("C6:D8,E9").Value = "Ber 2"
Range("C6:D8,E9").Offset(4, 0).Value = "Off(4,0)" ' Shifted down by 4 rows
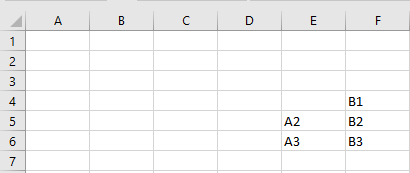
' Offset-relative referencing (within E4, using A1-style notation)
Cells(4, 3).Offset(0, 2).Range("A2").Value = "A2"
Cells(4, 3).Offset(0, 2).Range("A3").Value = "A3"
Cells(4, 3).Offset(0, 2).Range("B1").Value = "B1"
Cells(4, 3).Offset(0, 2).Range("B2").Value = "B2"
Cells(4, 3).Offset(0, 2).Range("B3").Value = "B3"
End Sub
Detailed Explanation:
- Basic Offset Calculation
When using:
Cells(4, 3) ‘ Refers to cell C4 (Row 4, Column 3)
The Offset(rowOffset, columnOffset) method returns a cell (or range) relative to this base:
- Rows are counted first (positive = down, negative = up)
- Columns are counted second (positive = right, negative = left)
Example Calculations:
- Cells(4, 3).Offset(0, 2) → Row 4 + 0, Column 3 + 2 = Cell E4
- Cells(4, 3).Offset(-3, 1) → Row 1, Column 4 = Cell D1
- Cells(4, 3).Offset(-2, -1) → Row 2, Column 2 = Cell B2
- Offset Applied to Ranges
Range(« C6:D8,E9 »).Offset(4, 0)
This example shows that Offset can also be applied to multiple-area ranges (even non-contiguous). It shifts the entire area 4 rows downward but keeps the shape and relative position of the original blocks.
So:
- C6:D8 becomes C10:D12
- E9 becomes E13
- Offset-Relative Cell References (Using A1 Notation)
When you use:
Cells(4, 3).Offset(0, 2).Range(« A2 »)
You’re accessing a cell relative to the top-left cell of the offset (in this case, E4):
- « A2 » refers to the cell 1 row down, same column within the new range (i.e., E5)
- « B3 » refers to 2 rows down, 1 column to the right (i.e., F6)
This technique allows you to work with relative cell references inside a shifted anchor cell — very useful for table structures, templates, and loops.
Summary
- Offset shifts a cell or range by a specified number of rows and columns.
- It returns a new Range object — ideal for positioning content programmatically.
- You can apply it to individual cells, entire ranges, and even multi-area ranges.
- Use .Range(« A1 »)-style references relative to the offset anchor for fine control inside dynamic areas.