Votre panier est actuellement vide !
Catégorie : Excel VBA Course
ComboBox with Excel VBA
The ComboBox control is used to store a list of values. It combines the functionality of a list and a text box.
Unlike the ListBox, only one item is displayed in the ComboBox at a time. It does not support multiple selection.The ComboBox control allows the user to enter a value through its text box, similar to the TextBox control.
Its properties, such as ListIndex, ListCount, List, and its methods Clear, RemoveItem, and AddItem, are analogous to those of the ListBox control.
In addition, the ComboBox has several unique properties, listed in Table.
Table. Properties of ComboBox
Property Description DropButtonStyle Sets the appearance of the drop button. Valid constants: fmDropButtonStylePlain (button without symbols), fmDropButtonStyleArrowDisplays (button with arrow), fmDropButtonStyleEllipsis (button with ellipsis), fmDropButtonStyleReduce (button with line). ListRows Sets the number of items displayed in the drop-down list. MatchRequired Values: True (input must match one of the listed items, i.e. the text box function is disabled) or False (otherwise). MatchFound Values: True (an item in the ComboBox matches the input value) or False (otherwise). ComboBox, alphabetical data entry, and the Collection object
Let us create a simple application where data (e.g., surnames) entered through the ComboBox’s text box is automatically sorted alphabetically.As soon as data is entered and the key is pressed, the items are displayed in the ComboBox in alphabetical order. When the window is closed, all data from the ComboBox is written into the worksheet cells.

For this application, we will use the Collection object, which is a convenient dynamic storage for other objects.
The Collection object has only one property and three methods:
- Count — returns the number of elements.
- Item — returns an element.
- Add — adds a new element.
- Remove — deletes an element.
The code provided serves both as a good example of working with the Collection object (insertion of new items is determined using a binary search algorithm) and as a demonstration of entering data into the ComboBox from its text box.
So, create a form, place a ComboBox on it, and in the form module type the required code.
Adding and deleting data in a ComboBox
Now let us consider an application where new items (different from those already present in the list) can be added to the ComboBox through its text box.Thus, entering a duplicate item (an item already in the list) is not allowed.
This makes the data entry approach different from the one described in the previous section.Additionally, items can be deleted from the ComboBox, and the entire list can be cleared.
Initially, the list is populated with data from a cell range. If a new item is entered in the ComboBox text box, it is also added to the underlying range that fills the ComboBox. When an item is deleted from the list, it is also removed from the range.
In both cases, the size of the range changes, since rows are added or removed. Therefore, the range used to populate the ComboBox must be redefined constantly.
Constructing the application
Create a form with a ComboBox and three buttons. Set their property values in the Properties window as shown in Table.
Table. Property values set in the Properties window
Control Property (Name) ComboBox cboNames Button cmdAdd Button cmdDelete Button cmdClear The list will be filled with data (e.g., surnames) from a column starting at cell A1.
- Clicking the Add button adds a new element from the ComboBox text box to the list.
- Clicking the Delete button removes the selected item from the list.
- Clicking the Clear button clears the entire list.

ListBox with Excel VBA
The ListBox control is used to store a list of values. In the list, the user can select one or more values, which are then used in the program.
Note that at design time, a list visually resembles a text box. Typically, selecting an item from the list is done by clicking on it. A double-click on an item, however, is often used to perform certain actions in the program associated with that item.
Item-by-item population of a list
A list can be populated item by item using the AddItem method.As an example, let us create a simple project), which contains a form with a list. City names are added to the list. Selecting an item from the list does nothing, but double-clicking on an item outputs it into the next free cell of the first column of the active worksheet.
The selected value from the list is returned by the Text property. The number of filled cells in the column is returned by the CountA property of the WorksheetFunction object.

Populating a list from an array and selecting an operation
A list can be populated item by item or in one operation. To do this, assign the List property of the ListBox to a variable that contains an array of values.As an example, let us once again return to the project from the section “Addition of two numbers” earlier in this chapter.
This time, instead of calculating the sum of two numbers, we will perform one of four arithmetic operations listed in the list.So, create a form that contains three labels, three text boxes, a button, and a list.
For all controls except the list, assign property values using the Properties window as described in the section “Addition of two numbers”.
For the list, assign the Name property the value lstOp.In the form module, type the required code.
An item in the list is identified by its index, which is returned by the ListIndex property. Indexing starts from 0.
In this code, the selected item (i.e., the operation) is displayed in the form’s title bar. This is achieved by handling the Click event of the list.Populating a list from a range
The RowSource property allows a list to be populated from a range. The value of this property is a string containing the name of the range.Let us demonstrate the use of this property with an example, considering both the case when the range is known in advance and the case when only a single cell of the range is known.
We will create a simple project for recording business trips of employees of a certain company. The workbook contains three worksheets: Cities, Employees, and Trips.
- On the Cities sheet, the range A1:A5 contains the list of cities where employees are scheduled to travel.
- On the Employees sheet, column A starting from cell A1 contains the list of employee names. The size of this list is not fixed and may change depending on the user.
- On the Trips sheet, two columns display the list of employee trips by cities.
The list on the Trips sheet is populated using the Populate list from array window.

This window contains two lists (with employee names and city names) and a button. The lists are populated from the ranges of the corresponding worksheets.
Clicking the OK button enters the selected data into the next free row of the trip list on the Trips sheet.
Create a form containing two lists and a button, and use the Properties window to assign their values as shown in Table.

Table. Property values set in the Properties window
Object Property Value ListBox Name lstName ListBox Name lstCity Button Name cmdOK Caption OK In the form module, type the required code.
When the form initializes, the lists are populated.
The city list is filled by explicitly specifying the range address.Before populating the employee list—since its size may vary—the program first identifies the range, then determines its address, and only then fills the list.
When the OK button is clicked, the program first checks whether data has been selected from the lists, then determines the first free row in the list on the Trips sheet, and outputs the selected data from the form into that row.
Selecting multiple items from a list
In a list, it is possible to select either a single item or multiple items. The MultiSelect property defines the mode in which such selection is allowed.The valid values of the MultiSelect property are the following constants:
- fmMultiSelectSingle — only one item can be selected.
- fmMultiSelectMulti — clicking an item or pressing the key selects or deselects the item.
- fmMultiSelectExtended — clicking an item while holding the key selects or deselects the item. Clicking an item while holding the key selects a range of items from the previously selected one to the current one.
The Selected property is used to identify the selected items. If its value is True, the item is selected; if False, it is not selected. The List property returns the item at the specified index, remembering that indexing starts at 0. The total number of items in the list is returned by the ListCount property.
As a demonstration, let us create a project in which multiple items can be selected from a list. Create a form with a list and a button, and using the Properties window, set their values as shown in Table.
Table. Property values set in the Properties window
Object Property Value ListBox Name lstNum Button Name cmdOK Caption OK When the form initializes, the list is populated and the mode allowing multiple selection is set. Clicking the OK button then sequentially reads the selected items and composes an information string, which is displayed in a message box.
Coordinated operation of two lists
It is often necessary to coordinate the operation of two lists. For example, a publishing house may cooperate with certain stores in different cities. One list displays a list of cities. When an item is selected from this list, the second list displays the list of stores.

How can this be done? Very simply. Array elements can have the Variant type, and a Variant variable can hold anything, including another array. Therefore, in VBA it is possible to create an array of arrays
Multi-column lists
Lists can be not only single-column but also multi-column. To create a multi-column list, set the ColumnCount property to the desired number of columns.In addition, the ColumnWidths property can be used to set the width of each column in the list.
ColumnWidths = String
Here, String is a text string consisting of numbers representing the widths of the corresponding columns, separated by semicolons. For example, the string « 90;80 » means that 90 points are allocated to the first column and 80 to the second.
Access to list elements is provided by the List property, where the first parameter is the row index and the second is the column index. Both rows and columns are indexed starting at 0:
List(row, column)
As an example, let us create a demo project in which a two-column list displays a given number of random numbers. Create a form with a list, a text box, and a button, and using the Properties window, set their values as shown in Table.
When the form initializes, the list is set to two columns, with 30 points allocated to the first column and 50 to the second. When the OK button is clicked, the list is first cleared with the Clear method and then populated with the specified number of random numbers and their indexes. Selecting an item in the list displays a message box with information about the chosen value.
Table. Property values set in the Properties window
Object Property Value ListBox Name lstRnd TextBox Name txtNum Button Name cmdOK Caption OK Populating a multi-column list from a range and calculating the average value of selected numbers
Like a single-column list, a multi-column list can also be populated from a data range.As an example, let us build an application that calculates the average grade of a selected group of students from a list. The list is populated from a range with its top-left corner at cell A1. The first column contains student names, and the second contains their grades.
Create a form with a label, a text box, a list, and a button. In the form module, enter the necessary code. At form initialization, the list is populated and the Caption properties of the controls and form are set.
When the OK button is pressed, it first checks whether any items have been selected. This is necessary because the average grade equals the sum of the grades divided by their count. If no items are selected, the formula would cause a division-by-zero error.

Hiding data in a multi-column list
If any component in the ColumnWidths property is set to zero, the corresponding column is hidden. This can be used to hide auxiliary information.For example, let us create a demo project called “Human Resources.” In it, a list is filled from range A2:C9 of the Employees worksheet with information about company employees: surname, position, and years of service (Fig. 4.39). Although all this data is loaded into the list, only the surnames are displayed.
When an item is selected, a message box displays the employee’s surname. By setting the required checkboxes (Position and Experience), additional information about the employee can be shown.
To implement this project, create a workbook with a worksheet named Employees and enter employee data into range A2:C9. Create a form with a list and two checkboxes. In the form module, enter the code.

At form initialization, the list is populated and the Caption values of controls and form are set. When an item is selected, a message string is generated depending on the state of the checkboxes and displayed in a message box.
The first column element is returned by the Text property, while the second and third columns are returned by the List property.
Changing the state of a checkbox also triggers the list’s Click event procedure, provided there are selected items. This is checked by the value returned by ListIndex. If no item is selected, ListIndex returns –1.
Displaying selected values from a multi-column list using the Text and Value properties
By default, the Text property returns the selected element from the first column. However, this can be changed using the TextColumn property, which specifies the column whose selected element is returned by Text.In addition to Text, the list also has a Value property that works similarly. The column from which it returns a value is defined by the BoundColumn property. Note that in both TextColumn and BoundColumn, column numbering starts at 1.
The following code is a modification of the previous project, where now the values from the second and third columns are read using the Text and Value properties. Since the list contains three columns (with the last two hidden), the value from the first column is read using the List property.
Displaying selected values from a multi-column list using the Text and Value properties
Private Sub UserForm_Initialize()
    ListBox1.ColumnCount = 3
    ListBox1.ColumnWidths = "80;0;0"
    Me.Caption = "Human Resources"
    ListBox1.RowSource = "Employees!A2:C9"
    CheckBox1.Caption = "Position"
    CheckBox2.Caption = "Experience"
    ListBox1.TextColumn = 2
    ListBox1.BoundColumn = 3
End Sub

Private Sub ListBox1_Click()
    Dim msg As String
    msg = "Last Name: " & ListBox1.List(ListBox1.ListIndex, 0) & vbCr
    If CheckBox1.Value Then
        msg = msg & "Position: " & ListBox1.Text & vbCr
    End If
    If CheckBox2.Value Then
        msg = msg & "Expérience: " & ListBox1.Value & vbCr
    End If
    MsgBox msg
End Sub
Dragging items from one list to another
The DataObject object can serve as a data carrier when programming a drag operation. Its methods allow you to control the drag process from start to finish.Table. Methods of the DataObject object
Method Description Clear Removes the transferred data from the object. GetFormat Returns 1 if the transferred data is in text format. GetFromClipboard Copies the contents of the clipboard into the object. GetText Returns the string stored in the object. PutInClipboard Moves data from the object into the clipboard. SetText Copies a string into the object. StartDrag Initializes the drag operation. The allowed return constants are: fmDropEffectNone, fmDropEffectCopy, fmDropEffectMove, fmDropEffectCopyOrMove. When coding a drag operation, you must handle two events:
- BeforeDragOver — triggered during the drag operation.
- BeforeDropOrPaste — triggered immediately before the object is dropped.
To demonstrate how a drag operation can be programmed, create a form, place two lists on it, and enter the corresponding codeD). The project is ready.
ScrollBar and SpinButton with Excel VBA
The ScrollBar control is used to set a numeric value, but it can only assign non-negative integer values.
The main event of the ScrollBar control is the Change event, and its main properties are Value, Min, and Max, which set the current, minimum, and maximum values, respectively.The SpinButton control is functionally similar to the ScrollBar, but it does not have a slider.
Synchronized operation of a text box and a spin button
A spin button allows you to set an integer value, which can then be displayed in a text box.
How can we make the operation of the text box and spin button synchronized, so that the current value of the spin button appears in the text box, and a number entered in the text box becomes the value of the spin button?In this case, both the spin button and the text box must have their Change events handled in coordination.

So, create a form containing a text box and a spin button.
In the form module, type the necessary code.When reading data from the text box, before assigning it to the Value property of the spin button, you must verify whether the data is numeric. This can be done using the IsNumeric() function.
In addition, you must check whether the number lies within the valid range of values for the spin button, i.e., within the interval defined by the Min and Max properties of the spin button.
In this example, the values of these properties are set to 1 and 5 during form initialization.
OptionButton (Radio Button) with Excel VBA
The OptionButton control (radio button) allows you to select one from several mutually exclusive alternatives.
Option buttons are usually displayed in groups according to the alternatives available. Grouping is carried out using a Frame control or the GroupName property of the OptionButton object.The main events of an option button are the Click and Change events, and its main property is the Value property, which returns or sets its state.
If the property value equals True, the option button is selected; if False, it is cleared.Option button and choosing the resulting operation
As an example of using option buttons, let’s slightly modify the project from the section “Addition of two numbers” earlier in this chapter.
Now, instead of calculating the sum, we will determine the result of the selected operation: addition or subtraction.
The operation to be performed is set by choosing the corresponding option button.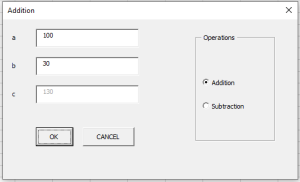
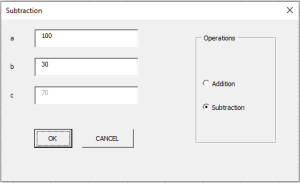
So, create a form that contains three labels, three text boxes, and a button, as well as a frame, which will serve as a container for two option buttons.
Then, using the Properties window, assign the property values shown in Table3.Table. Property values set in the Properties window
Object Property Value Label Caption a TextBox Name txtA Label Caption b TextBox Name txtB Label Caption c TextBox Name txtC Button Name cmdOK Caption OK Button Name cmdCancel Caption Cancel Frame Caption Operations OptionButton Name optAdd Caption Addition OptionButton Name optSub Caption Subtraction In the form module, type the code.
In the Click event procedure of the button, the selected option button is identified, and the calculation is carried out using the corresponding formula.
The Click event procedures of the option buttons display the name of the selected operation in the form’s title bar.CheckBox and ToggleButton with Excel VBA
A checkbox and a toggle button give the user the ability to make a choice.
The main property of these controls is the Value property, which returns their state.
These controls usually have two states:- Checked (the Value property equals True)
- Unchecked (the Value property equals False)
However, they can be configured to allow three alternatives using the TripleState property.
Controlling the visibility of controls
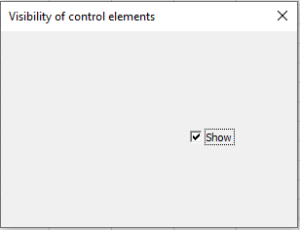
The Visible property controls the visibility of a control. If its value is True, the control is visible, and if it is False, the control is invisible.The following example demonstrates how a checkbox can be used to control the visibility of a control (in this case, a text box).
So, create a form and in the code module of the form, type the code.
If the Show checkbox is checked, the text box is displayed; if unchecked, it is hidden.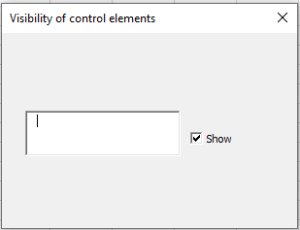
Controlling the availability of controls for the user
The Enabled property controls the availability of controls for the user.
If the property value is True, the control can receive focus and be accessible to the user.
If the value is False, the control cannot.The following example shows how a checkbox can be used to control the availability of a control (in this case, a button).
So, create a form and enter the necessary code in the module.
If the Lock checkbox is checked, the Press button is disabled; if unchecked, it is available.

TextBox (Input Field) with Excel VBA
The TextBox control (input field) is primarily used for user text input, which can later be processed in the program, or to display calculation results from the program.
The text entered into the field can be converted in code into numbers or formulas.
The main event associated with the TextBox is the Change event.
Table. Main Properties of TextBox
Property Description Text Returns the text contained in the field Multiline Boolean parameter that enables multiline text input ScrollBars Defines scroll bar mode. Values: fmScrollBarsNone (none), fmScrollBarsHorizontal, fmScrollBarsVertical, fmScrollBarsBoth SelLength, SelStart, SelText Define the length, starting point, and content of the selected text MaxLength Sets the maximum allowed number of characters. If 0, no limit PasswordChar Specifies the character displayed when entering passwords (instead of actual input) Example: Adding Two Numbers
As a demonstration, let’s create a project where the sum of two numbers entered into TextBoxes is displayed in a third TextBox.
Create a form with three labels, three TextBoxes, and two buttons.

Set their properties in the Properties window as shown in Table.Table. Property Values
Object Property Value Form Caption c = a + b Label Caption a TextBox Name txtA Label Caption b TextBox Name txtB Label Caption c TextBox Name txtC Button Name cmdOK Caption OK Button Name cmdCancel Caption Cancel In the form module, enter the code.
- Clicking OK calculates the sum of a and b and displays it in c.
- Clicking Cancel closes the form.
Button with a « Hot Key »
The Accelerator property assigns a key (letter or digit) that, when pressed with , triggers the button’s Click event.
The key must appear in the button’s Caption and will be underlined.
Example:
Private Sub UserForm_Initialize()
    cmdOK.Accelerator = "O"
    cmdCancel.Accelerator = "C"
End Sub
Now pressing +O = clicking OK, and +C = clicking Cancel.
Keys and
- Setting Default = True on a button assigns it to .
- Setting Cancel = True assigns it to .
Example:
Private Sub UserForm_Initialize()
    cmdOK.Default = True
    cmdCancel.Cancel = True
End Sub
Here, triggers OK, and closes the form.
Blocking the Result Field
- Enabled = False → disables the control completely (no focus).
- Locked = True → prevents editing, but allows focus (so content can be copied).
Example:
Private Sub UserForm_Initialize()
    txtC.Enabled = False
End Sub
Preventing Button from Taking Focus
By default, clicking a button shifts focus to it.
To keep focus on the previous control, set TakeFocusOnClick = False.Example:
Private Sub UserForm_Initialize()
    cmdOK.TakeFocusOnClick = False
End Sub
Moving Focus Bet ween Fields with
To move focus when is pressed, handle the KeyDown event.
Example:
Private Sub txtA_KeyDown(ByVal KeyCode As MSForms.ReturnInteger, _
                         ByVal Shift As Integer)
    If KeyCode = vbKeyReturn Then
        txtB.SetFocus
    End If
End Sub

Private Sub txtB_KeyDown(ByVal KeyCode As MSForms.ReturnInteger, _
                         ByVal Shift As Integer)
    If KeyCode = vbKeyReturn Then
        cmdOK_Click
        txtA.SetFocus
    End If
End Sub

Private Sub UserForm_Initialize()
    txtC.Locked = True
End Sub
Tooltips
The ControlTipText property defines tooltips.
When the mouse hovers over a control, the text appears in a small window.Example: tooltips are added to the three TextBoxes and two buttons.

Password Input Field
TextBox can be used as a password field.
- The displayed echo characters are set by PasswordChar.
Example: a form with a password field and a button.
- The button is locked by default.
- If the correct password (laru) is entered, the button unlocks; otherwise, it locks again.
- Case-insensitivity is achieved using LCase().

Table. Property Values
Object Property Value Form Caption Password TextBox Name txtPass Button Name cmdMsg Caption Press Multiline TextBox
To enable multiline input, set Multiline = True.
Example: Currency Conversion Project
- One TextBox is used for input (amount in rubles).
- One multiline TextBox is used for output (converted to USD).
- Input value is entered, triggers calculation, result displayed in multiline TextBox.
- The multiline box is locked to prevent editing.

Table. Property Values
Object Property Value TextBox Name txtMoney TextBox Name txtResult Exchanging Values Between Forms
If a project contains multiple forms, they can share values using public variables declared in a standard module.
Example:
- Form1: two TextBoxes + button
- Form2: one TextBox
- Button in Form1 → reads values, adds them, closes Form1, opens Form2, and shows the result.
Module of Form1
Private Sub CommandButton1_Click()
    res = CDbl(TextBox1.Text) + CDbl(TextBox2.Text)
    Unload Me
    UserForm2.Show
End Sub
Module of Form2
Private Sub UserForm_Initialize()
    TextBox1.Text = res
End Sub
Standard Module
Public res As Double
Label in Excel VBA
The Label control is used to display text captions — for example, titles for controls that do not have a Caption property.
The user cannot change the text displayed in a label during program execution.
The main property of the Label is Caption, which sets the text displayed inside it.

Example: Different Types of Labels
The following example demonstrates different types of labels:
- a simple label,
- a label with a picture,
- a label with a border,
- and a label with word wrapping.
Steps to implement the project:
- Create a form and place three labels on it.
- Prepare an image file. In this case: D:\flags.jpg.
- In the form module, type the code, which will set the label parameters during form initialization.
Key Properties of Label
- Picture → loads an image into the label.
- PicturePosition → defines the relative position of the image and the text.
- BorderStyle → specifies whether the label is displayed with or without a border.
Controls in Excel VBA
VBA provides a wide range of built-in controls that can be used on a form.
By using these controls, it is easy to create any user interface that meets all the requirements of a Windows environment.Controls are created using the Toolbox, which is displayed either by selecting the View | Toolbox command or by clicking the Toolbox button on the Standard toolbar.
The Toolbox contains buttons for creating controls. All Toolbox buttons, except Select Objects, are used to create new controls. By clicking Select Objects, you can select an already created control on the form in order to edit it (resize or move).
NOTE
The Controls Toolbar in MS Excel (used to create controls on a worksheet) has a smaller set of objects compared to the Toolbox in the Visual Basic Editor. For example, it does not include frames, multipages, or tab strips.Creating Controls
Creating controls on a worksheet or form usually occurs at the initial stage of application design.
Sometimes, controls are created programmatically during runtime — but this approach is used less frequently.Toolbox Controls
Table. Controls from the Toolbox
Control Name (VBA) TextBox 
Label 
CommandButton 
ListBox 
ComboBox 
ScrollBar 
SpinButton 
OptionButton 
CheckBox 
ToggleButton 
Frame 
Image 
MultiPage 
Tab Strip 
Placing a Control on a Form
To place a control on a form:
- Click the corresponding button on the Toolbox.
- Using the mouse, drag the control’s frame to the desired location on the form.
After that, the control can be:
- moved,
- resized,
- copied to the clipboard,
- pasted from the clipboard,
- or deleted from the form.
First Project with a Form with Excel VBA
As the first project with a form, let’s create a UserForm that appears on the screen when a button on the worksheet is clicked.

Step 1. Create the Form
Using the Properties window, set the form’s properties as shown in Table.
Table. Form Properties
Object Property Value Form Name frmFirst Caption First Form Step 2. Create the Button
On the worksheet, create a button and, using the Properties window, set its properties as shown in Table.
Table. Button Properties
Object Property Value Button Name cmdDemoForm Caption Press Step 3. Add the Code
In the Sheet1 module, type the following code.
First Form – Worksheet Module
Private Sub cmdDemoForm_Click()
    frmFirst.Show
End Sub
Now, when you click the button, the form will appear on the screen.
How to Run the Project
A form can be linked to any control placed on the worksheet, as shown in the previous example.
In later examples (where the main objects are the form itself and its embedded controls), we will not repeat how the form is integrated with the worksheet — that task is left to the reader.
⚡ Tip: To test the code associated with the form, it is not actually necessary to place controls on the worksheet and link the form to them. After creating the form and writing the code in its module, simply:
- Select Run | Run Sub/UserForm, or
- Press F5, or
- Click Run Macro on the Standard toolbar.
The form will then be displayed on top of the active worksheet.
The Keyword Me
In code, the keyword Me is often used. It returns a reference to the currently active object (the form itself).
For example, instead of writing:
UserForm1.Caption = "Example"
Unload UserForm1
it is common to write:
Me.Caption = "Example"
Unload Me
Form with a Refreshable Background Image
You can set a picture as a form’s background using the Picture property. By default, the picture is displayed at its original size.
If you want the picture to stretch to fill the client area of the form, or scale proportionally to its width/height, you use the PictureSizeMode property. The PictureAlignment property defines the picture’s alignment within the client area (e.g., centered or aligned to the top-left).
Project: Background Image Switching
Let’s build a project where a form displays a background picture. When you click the form, the picture alternates between two images.
Step 1. Requirements
You need two bitmap images, e.g.:
- D:\1.jpg
- D:\2.jpg
Step 2. Form Properties
Create a form and set its properties as shown in Table.
Table. Form Properties
Object Property Value Form Picture Link to bitmap D:\1.jpg PictureSizeMode fmPictureSizeModeStretch Caption Background Switching Pictures Step 3. Add the Code
Double-click the form and enter the following code in the form’s module.
Form with Refreshable Background Image
Private Sub UserForm_Click()
    Static flag As Boolean
    Dim filename As String
    If Not flag Then
        filename = "D:\1.jpg"
        Me.Picture = LoadPicture(filename)
        Me.PictureSizeMode = fmPictureSizeModeStretch
        Me.Caption = "Background Switching Pictures " & filename
    Else
        filename = "D:\2.jpg"
        Me.Picture = LoadPicture(filename)
        Me.PictureSizeMode = fmPictureSizeModeZoom
        Me.PictureAlignment = fmPictureAlignmentTopLeft
        Me.Caption = "Background Switching Pictures " & filename
    End If
    Me.Repaint
    flag = Not flag
End Sub
Explanation:
- The Static flag variable tracks which picture is currently displayed.
- The LoadPicture function loads an image file.
- PictureSizeMode = fmPictureSizeModeStretch stretches/shrinks the first image (possibly distorting proportions).
- PictureSizeMode = fmPictureSizeModeZoom scales the second image while preserving proportions.
- PictureAlignment = fmPictureAlignmentTopLeft aligns the image to the form’s top-left corner.
Note
It wasn’t strictly necessary to set the form’s Picture and PictureSizeMode properties in advance.
Alternatively, you could add the following initialization code:
Private Sub UserForm_Initialize()
    UserForm_Click
End Sub
This automatically triggers the Click procedure when the form loads, displaying the first image immediately.
Deleting a Picture
In the Properties window, a picture can be deleted by placing the cursor in the Picture field and pressing .
In code, this is achieved by assigning the Picture property to LoadPicture(« »).
Example:Me.Picture = LoadPicture("")Form with a Tiled Background and Setting Properties at Initialization
An image can be displayed on a form not only as a single picture, but also as a tile.
In this case, the property PictureTiling must be set to True.
Naturally, you should also set the PictureAlignment property, which defines the placement of the initial image from which the tiled background is created.Form property values can be set either in the Properties window or in code.
In the latter case, this is usually done in the Initialize event procedure, which is generated when the form is initialized but before it is displayed.Example:
Build a form with a tiled background, with its properties set in code during initialization.- Create the form.cel.
NOTE
- In the form’s module, enter the code.
- Ensure the required bitmap file is located in the default folder used by MS Ex
To check which folder is your default:
- Go to the File tab → Options.
- In the Excel Options dialog box, choose Save on the left.
- On the right, under Save workbooks, check the Default file location field.
The project checks for the existence of the image file in that folder using the Dir() function.
- If the file does not exist, the form will open without a tiled background.
- Dir() returns the name of a file or folder that matches the pattern passed to it (wildcards * and ? allowed).
- If no match is found, Dir() returns an empty string.
Thus, checking whether a file exists is done by checking if Len(Dir(…)) = 0.
Closing a Form with
Clicking the Close button in the form’s upper-right corner closes it.
Question: Is it possible to close the form by pressing a key, such as ?
Answer: Yes.You need to:
- Write code for the KeyDown event,
- Check for the required key code,
- Close the form using Unload or End.
The KeyDown event has two parameters:
- the key code,
- the modifier key identifier.
The constant for the key is vbKeyEscape.
Closing a form with
Private Sub UserForm_KeyDown(ByVal KeyCode As MSForms.ReturnInteger, _
                             ByVal Shift As Integer)
    If KeyCode = vbKeyEscape Then
        Unload Me
    End If
End Sub
Confirming Form Closure
In many projects, it’s useful to request user confirmation before closing a form.
This can be done using the QueryClose event, which is triggered just before a form closes.
It has two parameters:
- Cancel → if set to –1, closure is canceled; if 0, the form closes.
- CloseMode → identifies the reason for closure.
Example:
Private Sub UserForm_QueryClose(Cancel As Integer, CloseMode As Integer)
    Select Case MsgBox("Close window?", vbYesNo + vbQuestion)
        Case vbYes : Cancel = 0
        Case vbNo : Cancel = -1
    End Select
End Sub
Setting Form Position
The initial location of a form is set by the StartUpPosition property.
Table. StartUpPosition Values
Value Description 0 Top-left corner set by Top and Left properties 1 Centered within the Excel window 2 Centered on the screen 3 Top-left corner of the screen Example:
Displays the form with its top-left corner at (100,100):Private Sub UserForm_Initialize() Me.StartUpPosition = 0 Me.Top = 100 Me.Left = 100 End Sub
Modal and Modeless Forms
- A modal window is one that must be closed before the user can access another window.
- By default, UserForms in VBA are modal.
The Show method accepts an optional parameter style:
- vbModal (1) → modal
- vbModeless (0) → modeless
Example:
UserForm1.Show vbModeless   ' User can still interact with the worksheet
UserForm1.Show vbModal      ' Worksheet locked until form closes
Using Multiple Forms
A project may contain multiple forms.
- If one form replaces another in modal mode, the first must be closed before the second appears.
- In modeless mode, both forms can remain open, with the second slightly offset.
Modal – Worksheet Module
Private Sub cmdForm1_Click()
    UserForm1.Show vbModal
End Sub
Modal – UserForm1 Module
Private Sub UserForm_Click()
    Unload UserForm1
    UserForm2.Show
End Sub
Modeless – Worksheet Module
Private Sub cmdForm1_Click()
    UserForm1.Show vbModeless
End Sub
odeless – UserForm1 Module
Private Sub UserForm_Click()
    UserForm2.StartUpPosition = 0
    UserForm2.Top = UserForm1.Top + 20
    UserForm2.Left = UserForm1.Left + 20
    UserForm2.Show
End Sub
“Easter Egg”
An “easter egg” is a hidden dialog in an application — usually a programmer’s joke, often found in games.
Example:
- The easter egg appears only if the user right-clicks in the bottom-right one-ninth of the form’s client area.
- This means only someone who created the application would know how to reveal it.

The MouseDown event is used to identify the click point.
Event Syntax:
Private Sub object_MouseDown(ByVal Button As Long, _
                             ByVal Shift As Long, _
                             ByVal X As Long, _
                             ByVal Y As Long)
Parameters:
- Button – identifies the mouse button. Possible values (XlMouseButton):
- xlNoButton
- xlPrimaryButton
- xlSecondaryButton
- xlMiddleButton
- Shift – identifies pressed modifier keys (, , ):
- 0 = none
- 1 = Shift
- 2 = Ctrl
- 4 = Alt
(Combinations return sums, e.g., Shift+Ctrl = 3).
- X, Y – coordinates of the mouse click relative to the form.
Adding a UserForm to a Project
To add a UserForm to a project, do the following:
- Open the Visual Basic Editor.
- Select the command Insert | UserForm.
A new form is added to the project.

NOTE
The size of the form can be adjusted using the resize handles.The UserForms Collection
The UserForms collection is a family of all loaded forms in the application. Like all collections, the UserForms collection has the following:
- Count – returns the number of components in the collection.
- Item – returns a specific component of the collection.
- Add – adds a new component to the collection.
Form Properties
A form has a wide range of properties that allow you to control both its appearance and its functionality.
Of course, the most frequently used properties are those that define the Name of the form and the Caption (the text displayed in the form’s title bar).
Table. Form Properties
Property Description Name The name of the form ActiveControl Returns a reference to the control that currently has focus BackColor Background color BorderColor Border color BorderStyle Border style. Possible values: fmBorderStyleNone, fmBorderStyleSingle CanPaste Determines whether pasting from the clipboard is allowed CanRedo Determines whether the Redo action is available CanUndo Determines whether the Undo action is available Caption Form’s title text Cycle Specifies how controls inside Frames or Pages behave when losing focus DrawBuffer Defines memory size used for redrawing images Enabled Determines whether the form is available to the user ForeColor Foreground (title text) color Height, Width Height and width of the form HelpContextID Link to a help file topic InsideHeight, InsideWidth Height and width of the user area (excluding title bar and borders) KeepScrollBarsVisible Scroll bar visibility. Possible values: fmScrollBarsNone, fmScrollBarsHorizontal, fmScrollBarsVertical, fmScrollBarsBoth Left, Top Coordinates of the form’s top-left corner MouseIcon Assigns a custom mouse pointer MousePointer Specifies mouse pointer type Picture Link to a bitmap file used as the form’s background PictureAlignment Specifies alignment of the background image PictureSizeMode Defines scaling of the background image ScrollHeight, ScrollWidth Height and width of the scrollable area ScrollLeft, ScrollTop Coordinates of the scrollable area’s top-left corner SpecialEffect Defines the form’s visual effect StartUpPosition Specifies initial position of the form Tag Custom identifier for the form VerticalScrollbarSide Defines which side scroll bars are displayed on Visible Controls whether the form is visible WhatsThisButton Displays the Help (?) button Zoom Defines zoom factor for displayed objects Form Methods
A form has many methods that allow you to perform a wide range of operations—from showing or hiding the form to repainting its contents.
Table. Form Methods
Method Description Copy Copies content to the clipboard Cut Cuts content to the clipboard Hide Hides the form without removing it from memory Load Loads the form into memory without displaying it Move Moves the form Paste Pastes content from the clipboard PrintForm Prints the form RedoAction Repeats the last Redo command Repaint Refreshes/redraws the form Scroll Scrolls the form SetDefaultTabOrder Sets the default tab order for controls Show Displays the form UndoAction Executes the last Undo command Unload Removes the form from memory WhatsThisMode Displays the Help (?) pointer Form Events
Event procedures allow you to control the entire lifecycle of a form—from initialization to termination.
Table. Form Events
Event Description Activate, Deactivate Occur when the form is activated/deactivated AddControl Occurs when a control is added BeforeDragOver Occurs during drag-and-drop BeforeDropOrPaste Occurs before drop or paste Click Occurs when the form is clicked DblClick Occurs when the form is double-clicked Error Occurs when an error is detected but cannot be passed Initialize Occurs when the form is initialized Layout Occurs when the form’s layout changes KeyDown, KeyUp Occur when any key is pressed or released while the form has focus KeyPress Occurs when any non-special key is pressed while the form has focus MouseDown, MouseUp Occur when a mouse button is pressed or released MouseMove Occurs when the mouse is moved over the form QueryClose Occurs before the form is closed RemoveControl Occurs when a control is removed Resize Occurs when the form is resized Scroll Occurs when the form is scrolled Terminate Occurs when the form is closed Zoom Occurs when the form’s zoom changes Displaying and Hiding Forms
When working with forms, a special role is played by one method and two operators that control the start and end of form usage:
- The Show method loads and displays the form.
- The Unload operator removes the form from the screen and memory.
- The End operator ends code execution without triggering Unload or Terminate events.
⚠️ Therefore, ending the application with End ignores cleanup code in those events.
Forms can be displayed and hidden with the Show and Hide methods.