Votre panier est actuellement vide !
Catégorie : Excel VBA Course
Scope of Variables and Procedures with Excel VBA
All procedures, functions, variables, and constants in VBA have their own scope. This means that they can only be used in a specific place in the program code—precisely where they are defined. For example, if variable A is declared with the Dim statement inside the body of the procedure Pro1(), then that procedure is its scope. Thus, if there is another procedure Pro2(), you cannot use the same variable inside it. If you attempt to do so, you will either receive an error message due to the use of an undeclared variable (in case the previously mentioned Option Explicit statement is active), or you will simply get a different variable—with the same name, but completely unrelated to the variable of the same name from the first procedure.
There are three types of variable scope:
- Procedure-level variables are recognized only within the procedure in which they are declared using the Dim or Static statement. Such variables are called local variables.
- Module-level variables are used only within the module in which they are declared, but not in other modules of the given project. They are declared with Dim or Private in the module declaration area, i.e., before the description of procedures.
- Module-level variables declared with Public are accessible to all procedures in the project. Such variables are called public variables.
A private variable retains its value only while the procedure in which it is declared is running. Once the procedure ends, the variable’s value is lost, and it must be reinitialized when the procedure is run again. Variables declared with the Static statement retain their value after the procedure ends, as long as the program continues to run.
Now let us consider the scope of procedures and functions. Procedures and functions have only two levels of scope: module-level and project-level. By default, project-level scope is applied. Thus, a procedure or function can be called by any other procedure or function within the same project. When describing procedures and functions at the project level, the optional keyword Public may also be used. The presence or absence of this word has no effect on the procedure.
If you want to define a procedure that is used only at the module level, the keyword Private is applied. Note that such a declaration not only restricts the scope of the procedure but also prohibits its use as a stand-alone procedure—it can only be called from another procedure.
Finally, when describing procedures or functions, the keyword Static can also be used. It does not affect the scope of the procedure, but it influences all variables declared within that procedure or function. In this case, all local variables acquire the status of Static, which means they remain in memory after the procedure ends and retain their previous values when the procedure is called again.
Let us now look at an example of a module.
Example of a Module
Public A1 As String
Private A2 As Integer
Dim A3 As Single

Sub Pro1()
    Dim A4 As Integer
    Static A5 As Integer
    A1 = "Text string 1"
    A2 = 2
    A3 = 3.14
    A4 = A4 + 4
    A5 = A5 + 5
    MsgBox A4
    MsgBox A5
End Sub

Sub Pro2()
    Pro1
    MsgBox A1
    MsgBox A2
    MsgBox A3
    MsgBox A4
    MsgBox A5
    Proc1
End Sub
In this example, variable A1 is defined at the project level (the keyword Public is used), variables A2 and A3 are defined at the module level, variable A4 is defined at the procedure level inside Pro1(), and variable A5, although defined inside the body of Pro1(), is declared as static.
When procedure Pro2() is called, the following happens: from this procedure, Pro1() is called, which assigns values to all five variables (A1, A2, A3, A4, and A5), and then displays the current values of variables A4 and A5 in message boxes.
After Pro1() ends, the current values of variables A1–A5 are displayed. At this point, it turns out that variables A1–A3 have retained their values, since they are defined at the module level, while variables A4 and A5 have empty values, because their scope is limited to the procedures in which they are used. Any changes to these variables inside one procedure have nothing to do with similarly named variables in another procedure—these are, in fact, different variables that just happen to have the same names.
After that, Pro1() is called once again, and it again modifies and displays the values of variables A4 and A5. In this case, variable A4 once more takes the value 4, because each time the procedure is called, memory is newly allocated for this variable and it is initialized with an empty value. Unlike A4, the variable A5, declared as static, retains its previous value from the earlier call of this procedure. As a result, upon the second call its value becomes 10.
Object References with Excel VBA
In addition to regular variables, Visual Basic often uses variables that represent a reference to an object. It turns out that using variables for object references not only reduces and simplifies the program text but also significantly speeds up its execution.
The use of an object variable differs slightly from that of ordinary variables: it is necessary not only to declare such a variable but also, before using it, to assign it a corresponding object with the special operator Set. The syntax for declaration and assignment is as follows:
Dim <VariableName> As Object
Set <VariableName> = <ObjectReference>
Sometimes, when declaring such a variable, it is convenient to specify in advance a particular type of object—you can use any specific object from the Microsoft Office object model, for example:
Dim MyBase As Database
Set MyBase = CurrentDb()
TIP
If you need to improve the performance of your program, it is recommended to use specific objects of the Microsoft Office model when describing object variables, rather than the universal description Object.An object variable will point to an object until we assign it, with another Set operator, either a reference to another object of the same type or the value Nothing, which means that the variable does not contain any reference, for example:
Set txt = Nothing
After such an operation, the variable continues to exist, although it does not refer to any object. With another Set operator, it can again be assigned a reference to an object.
NOTE
Keep in mind that object variables, unlike ordinary variables containing values, contain only references to objects, not the objects themselves or their copies.Variables, Constants, and Data Types with Excel VBA
In VBA, variables are used to store temporary values, pass parameters, and perform calculations. Usually, before using a variable, it is declared; that is, you specify in advance the exact variable names you will use in your program, and at the same time, you declare the data type that this variable will hold. In VBA, the Dim statement is used to declare a variable:
Dim <VariableName> [As <DataType>]
For example:
Dim i As Integer, j As Integer
Dim x As Double
VBA enforces the following rules for naming variables. A name cannot exceed 255 characters and must begin with a letter, which can be followed by letters, numbers, or an underscore. Uppercase and lowercase letters are not distinguished. The name must not contain spaces, punctuation, or special characters, except for the last character. At the end of the variable name, one of six special characters — type-declaration characters — can optionally be added:
! # $ % & @
These characters are not considered part of the variable name: if both string1$ and string1 are used in a program, they refer to the same string variable.
Additionally, VBA keywords and the names of standard objects cannot be used as variable names. Therefore, it is recommended to start variable names with a lowercase letter rather than an uppercase one.
It is allowed to use letters from alphabets other than Latin, including Cyrillic, which can be convenient for Russian-speaking users.
It should also be noted that in VBA, declaring variables is not mandatory, and undeclared variables can be used. Memory for variables can be allocated dynamically, and the data type of a variable can be inferred from the last character of its name.
Ultimately, the programmer decides how variables will be used in their program. For this purpose, VBA provides the statement:
Option Explicit
If you begin your module with this statement (which must be placed at the very beginning of the module, before the first procedure), VBA will require all variables in this module to be declared and will generate an error message whenever it encounters an undeclared variable. Furthermore, if you enable the Require Variable Declaration option on the Editor tab of the Options dialog box in the VBA editor (accessed via Tools | Options in the Visual Basic integrated development environment), VBA will generate an error message every time it encounters an undeclared variable.
Enabling this option causes the Visual Basic editor to automatically add the Option Explicit statement at the beginning of each newly created module. However, this setting does not affect previously created modules — to add this statement to existing modules, you must do so manually.
A brief list of the VBA data types is given in Table 2.1.
Table 2.1. VBA Data Types
Data Type Description Array An array of variables; an index is used to reference a specific element. Memory required depends on the array size. Boolean Can hold one of two logical values: True or False. Memory required: 2 bytes. Byte Unsigned number from 0 to 255. Memory required: 1 byte. Currency Used for financial calculations with a fixed number of decimal places, useful to avoid rounding errors. Range: –922,337,203,685,477.5808 to 922,337,203,685,477.5807. Memory required: 8 bytes. Default type-declaration character: @ Date Used to store dates and times. Range: January 1, 0100 to December 31, 9999. Memory required: 8 bytes. Double Double-precision floating-point numbers. Negative range: –1.7976939486232E308 to –4.94065645841247E–324. Positive range: 4.94065645841247E–324 to 1.7976939486232E308. Memory required: 8 bytes. Default type-declaration character: # Integer Short integer values. Range: –32,768 to 32,767. Memory required: 2 bytes. Default type-declaration character: % Long Long integer values. Range: –2,147,483,648 to 2,147,483,647. Memory required: 4 bytes. Default type-declaration character: & Object Used to store object references. Memory required: 4 bytes. Single Single-precision floating-point numbers. Negative range: –3.402823E38 to –1.401298E–45. Positive range: 1.401298E–45 to 3.402823E38. Memory required: 4 bytes. Default type-declaration character: ! String Used to store string values. Length: 0 to 64 KB. Memory required: 1 byte per character. Default type-declaration character: $ Variant Can store different types of data: date/time, floating-point numbers, integers, strings, objects. Memory required: 16 bytes plus 1 byte per character for string values. Variant data can have the special value Null, meaning the data is absent, unknown, or not applicable. For example, database table fields are often of type Variant, so an empty field is assigned Null. The IsNull function checks for this value. User-Defined Type (using Type) The purpose and memory allocation depend on the definition. Used to describe data structures. Allows storing multiple different values of various types in a single variable. When declaring a variable, specifying its data type can be omitted. In this case, the variable type will be determined by the last character of the variable name: @, #, %, &, !, or $ (corresponding to Currency, Double, Integer, Long, Single, or String, respectively).
If the last character is not one of these and no explicit type is specified, the variable will be assigned the default data type Variant, which allows it to hold data of any type.
It should be remembered that in the same procedure, you cannot use variable names that differ only by the type-declaration character at the end of the variable name. For example, it is not allowed to use both var$ and var% in the same procedure. Similarly, it is not allowed to explicitly declare a variable that already has a type-declaration character at the end using the syntax:
Dim <VariableName> As <VariableType>
For example, you will get an error message if you attempt to enter any of the following declarations:
Dim var1% As String
Dim var2% As Integer
To define the data types of procedure or function arguments, the data type is specified directly in the procedure or function header. For example, the following procedure header declares its parameters as string variables:
Sub SpSt(str1 As String, str2 As String, str3 As String)
The data type of a function’s return value is specified at the end of the function header. For example, the following declaration specifies that the function returns a short integer:
Function FSpS(str1 As String) As Integer
To make a program run faster and use less memory, it is recommended to use specific variable types whenever possible rather than the universal Variant type. Processing Variant variables requires not only additional memory (see the sizes in Table 2.1) but also additional time: at runtime, VBA determines the exact data type of the variable and, if necessary, converts it to the required type.
However, there are situations where Variant variables are necessary—for example, when you do not know in advance what type of data will be assigned to the variable.
Next, consider the use of named constants. The Const statement, similar to Dim, is used to declare them. Its syntax is as follows:
Const <ConstantName> [As <DataType>] = <Expression>
where <Expression> is any value or formula that returns the value to be used as a constant. For example, the following statement declares an integer constant maxLen:
Const maxLen% = 30
Like variables, constants can hold values of different data types, but they do not change during program execution.
TIP
If you plan to use constants in your program, it is recommended to give them meaningful names and declare them at the very beginning of the module, then use only these named constants throughout the program. This makes the program not only easier to understand but also easier to maintain and debug.In addition to user-defined constants, there are also predefined built-in constants that can be used in programs without prior declaration. Information about predefined built-in constants used for various Microsoft Office and Visual Basic objects can be found in the help documentation—usually in the sections describing object properties (less often in the method descriptions). When naming built-in constants, a standard convention is used to indicate the application to which the constant belongs. For example, built-in constants related to Excel objects start with the prefix xl, while those related to VBA objects start with vb.
A Quick Look at Procedures and Functions with Excel VBA
The main components of a VBA program are procedures and functions, which are fragments of code enclosed between the Sub and End Sub statements or between the Function and End Function statements.
For example, a procedure in VBA can be written as:
Sub <ProcedureName>(<Argument1>, <Argument2>, ... )
    <VBAStatement1>
    <VBAStatement2>
    ...
End Sub
Unlike a procedure, the name of a function also acts as a variable and is used to return a value to the point where the function was called. A function is generally written as follows:
Function <FunctionName>(<Argument1>, <Argument2>, ... )
    <VBAStatement1>
    <VBAStatement2>
    ...
    <FunctionName> = <ReturnValue>
End Function
Typically, a program consists of many procedures and functions, which can be placed in one or several modules. Modules are grouped into projects, and a single project can contain multiple different programs that use shared modules or procedures.
Each procedure within a single module must have a unique name; however, a project can contain several different modules. It is generally recommended to use only unique procedure names within a single project, although exceptions are allowed.
If a project contains several different procedures with the same name, the procedure name should be qualified when calling it, using the following syntax:
<ModuleName>.<ProcedureName>
If the module name consists of multiple words, it should be enclosed in square brackets. For example, if a module is called Mathematical Procedures and the procedure is Secans(), the call can look like this:
[Mathematical Procedures].Secans
It is also permissible to use procedures located in other projects. In this case, an additional level of qualification may be required:
<ProjectName>.<ModuleName>.<ProcedureName>
Note that to use written procedures or functions, they must be called. A procedure with a non-empty list of arguments can only be called from another procedure or function by using its name with the list of actual argument values as one of the VBA statements.
A function can be called not only through a separate VBA statement but also by placing its name with the list of actual argument values directly in a formula or expression in a VBA program or, for example, directly in the formula of an active Excel worksheet cell.
If the called procedure has a unique name and is in the same module as the calling procedure, it is sufficient to specify its name and provide the list of actual argument values without enclosing it in parentheses.
The second way to call a procedure is by using the Call statement. First comes the Call keyword, followed by the procedure name and the list of parameters; in this case, parentheses around the arguments are mandatory.
It must be enclosed in parentheses. Here are examples of calling a procedure named CRC() with two arguments (a constant and an expression):
CRC 7, i + 2
or
Call CRC(7, i + 2)
A function can be called similarly to a procedure; however, a more common way to call functions is to use its name with the list of parameters enclosed in parentheses on the right-hand side of an assignment statement. Here is an example of calling two functions — Left() and Mid() — and using their return values in an expression:
yStr = Left(y, 1) & Mid(y, 2, 1)
There are two different ways to pass variables to a procedure or function: by reference and by value.
- If a variable is passed by reference, the procedure or function receives the address of that variable in memory. This means the formal argument of the procedure is identified with the actual parameter passed to it. Therefore, the called procedure can modify the value of the actual parameter: if the formal argument is changed, the change affects the actual parameter passed in the call.
- If the actual parameter is passed by value, the formal argument of the called procedure or function receives only the value of the actual parameter, not the variable itself. Thus, any changes to the formal argument do not affect the value of the variable used as the actual parameter.
The method of passing parameters to a procedure or function is specified when declaring its arguments: the argument name may be preceded by an explicit specifier. ByRef indicates passing by reference, and ByVal indicates passing by value. If no explicit specifier is given, the default is by reference.
Let’s illustrate this with an example. Suppose we have the following descriptions of two procedures:
Sub Main()
    a = 10
    b = 20
    c = 30
    Call Example1(a, b, c)
    Call MsgBox(a)
    Call MsgBox(b)
    Call MsgBox(c)
End Sub

Sub Example1(x, ByVal y, ByRef z)
    x = x + 1
    y = y + 1
    z = z + 1
    Call MsgBox(x)
    Call MsgBox(y)
    Call MsgBox(z)
End Sub
The helper procedure Example1() uses three formal arguments, declared differently. Within this procedure, each of them is incremented by one, and their values are displayed using MsgBox().
The main procedure Main() sets the values of variables a, b, and c and then passes them as actual arguments to Example1(). In this case:
- The first argument is passed by reference (default),
- The second argument is passed by value,
- The third argument is passed by reference.
After returning from Example1(), the main procedure also displays the values of the three variables passed as arguments. In total, six values are displayed:
- 11, 21, 31 — all incremented by 1 and displayed by Example1(),
- 11, 20, 31 — displayed by Main(), where variables passed by reference were incremented, but the variable passed by value remained unchanged.
Chart Management with Excel VBA
Now imagine that, as a manager of the company “ABC”, you need to create an annual revenue report, building charts for revenue only for January, for January and February, from January to March, and so on — a total of 12 charts (see file 5-ChartManagement.xlsm on the CD).
Of course, you could create all these charts manually, or you could manage with just one. In this case, you need a tool that allows entering a specified time interval, and the chart should automatically adjust accordingly. Here, controls come in handy — either a ListBox or a ComboBox.
Perform the following steps:
- In cells A1 and B1, enter the column headers Month and Revenue, respectively.
- In the range A2:A13, enter the month names, using Excel’s AutoFill function.
- In the range B2:B13, enter the company’s revenues.
- Create a chart based on these two ranges (A2:A13 and B2:B13): select the range A2:B13, go to the Insert tab, in the Charts group click the Column Chart dropdown, and choose the desired chart type from the collection.
- Place a ComboBox control on the worksheet to allow selecting a time interval: go to the Developer tab, in the Controls group click Insert, and in the ActiveX Controls section, select ComboBox. Then, draw the control on the worksheet to the desired size.
- In the Properties window for the ComboBox, set the ListFillRange property to A2:A13. This fills the list with data from the specified range.
- Double-click the ComboBox to open the worksheet module.
- Enter the following VBA code into the worksheet module (Listing 1.8).
- Go back to the worksheet and test the ComboBox to quickly build charts of ABC’s revenues.

Chart Management
Private Sub ComboBox1_Change()
    Dim r As Integer
    ActiveSheet.ChartObjects(1).Activate
    r = ComboBox1.ListIndex + 2
    With ActiveChart
        .SetSourceData Source:=Sheets(1).Range(Cells(2, 2), Cells(r, 2)), PlotBy:=xlColumns
        .SeriesCollection(1).XValues = Sheets(1).Range(Cells(2, 1), Cells(r, 1))
    End With
End Sub
This code dynamically updates the chart based on the month selected in the ComboBox, allowing a single chart to display revenue for any period from January to the selected month.
Creating a Table Template with Excel VBA
Let’s consider another example that automates the work of a commercial company. Suppose, for example, you are the manager of a company called “Boundless Horizons LLC”, and you need to create a monthly expense tracking table. We will create and then edit a macro that allows you to quickly generate a template for a simple tabular report.

To create an unformatted expense tracking table template, perform the following steps:
- Start the macro recorder by going to the Developer tab and clicking Record Macro in the Code group.
- In the Record Macro window, enter the macro name Create_Simple_Table_Template, and in the Store macro in dropdown, select This Workbook.
- Go to cell B1 and enter the word Expenses.
- Fill in cells A1…A7 as shown in Fig. 1.21.
- Then, select cell B7 and enter the formula =SUM(B2:B6).
- Select column A, go to the Home tab, in the Cells group click the Format dropdown, and choose AutoFit Column Width.
- Repeat the previous step for column B: select column B, go to the Home tab, in the Cells group click Format, and choose AutoFit Column Width.
- Place the cell pointer in B2.
- Stop the macro recorder by going to the Developer tab and clicking Stop Recording in the Code group.
As a result, the following macro is recorded in the standard module.
Macro to create the report template
Sub Create_Simple_Table_Template()
' Create_Simple_Table_Template Macro
    ActiveCell.FormulaR1C1 = "Expense Item"
    Range("B1").Select
    ActiveCell.FormulaR1C1 = "Expenses"
    Range("A2").Select
    ActiveCell.FormulaR1C1 = "Telephone"
    Range("A3").Select
    ActiveCell.FormulaR1C1 = "Rent"
    Range("A4").Select
    ActiveCell.FormulaR1C1 = "Depreciation"
    Range("A5").Select
    ActiveCell.FormulaR1C1 = "Insurance"
    Range("A6").Select
    ActiveCell.FormulaR1C1 = "Salary"
    Range("A7").Select
    ActiveCell.FormulaR1C1 = "Total"
    Range("B7").Select
    ActiveCell.FormulaR1C1 = "=SUM(R[-5]C:R[-1]C)"
    Columns("A:A").Select
    Selection.Columns.AutoFit
    Columns("B:B").Select
    Selection.Columns.AutoFit
    Range("B2").Select
End Sub
So, the macro has been recorded, and now let’s discuss how its code can be simplified to create a report template.
The first fifteen lines of the macro enter text into the selected worksheet cells. Starting from the second line, paired instructions are used for input. Therefore, instead of:
Range("B1").Select
ActiveCell.FormulaR1C1 = "Expenses"
it is more reasonable to write:
Range("B1").Value = "Expenses"Similarly, the very first instruction of the macro can be simplified to:
Range("A1").Value = "Expense Item"The next two instructions enter the formula =SUM(B2:B6) into cell B7. In the macro, this formula is recorded in the relative R1C1 format (commonly used in VBA programs):
Range("B7").Select
ActiveCell.FormulaR1C1 = "=SUM(R[-5]C:R[-1]C)"
It is reasonable to replace these two instructions with a single one, using the familiar A1 reference style and the formula in the local language:
Range("B7").FormulaLocal = "=СУММ(B2:B6)"The next four instructions automatically adjust the column widths for columns A and B so that all text fits:
Columns("A:A").Select
Selection.Columns.AutoFit
Columns("B:B").Select
Selection.Columns.AutoFit
This code can be shortened to just two instructions:
Columns("A:A").AutoFit
Columns("B:B").AutoFit
The last instruction sets the cell pointer to B2, which we will leave unchanged.
It is also worth noting that it would be convenient for the user if the worksheet name matched the month for which the report is created. Therefore, it makes sense to add instructions that display a dialog box asking whether the user wants to rename the sheet. If the user agrees, they enter the new sheet name in the input box and press OK, and the procedure automatically renames the sheet.
Thus, the final version of the report template procedure consists of only a few instructions but, importantly, is much more functional than the macro it was based on.
We also recommend, to reinforce the material, creating a macro that formats the table template according to your preferences and a macro that clears the worksheet of any existing data and formatting applied by the formatting macro.
Using a CommandButton Control on a Worksheet
Let us demonstrate the use of a CommandButton control from the ActiveX Controls group on a worksheet. Suppose that when the CommandButton control, which we place on Sheet1, is clicked, it activates Sheet2.
- Start Microsoft Office Excel 2010 and make sure the cell pointer is on Sheet1.
- Go to the Developer tab, and in the Controls group, click the Insert dropdown button.
- Click the CommandButton control from the ActiveX Controls group and move the pointer directly onto the worksheet; the pointer will change to a thin cross.
- Choose the location on the worksheet, press and hold the left mouse button, draw the button to the desired size, and then release the mouse button.
Note that after the CommandButton control appears on the worksheet, the Design Mode button becomes active (enabled). On the surface of the first CommandButton you create, the label CommandButton1 will appear automatically.
If you now create a second CommandButton, the label CommandButton2 will appear on it, and so on.
NOTE
Like any graphical object, you can draw the button while holding the <Shift> key to make it square, or while holding the <Alt> key to snap it to the worksheet grid. You can set the button’s size using the sizing handles, and move it using the move handle.Right-click the created button and from the context menu, select Properties to open the Properties window.

The CommandButton control is an object, meaning that, like any object, it has properties, methods, and events. The label displayed on the surface of the CommandButton is set using the Caption property. Additionally, the CommandButton has a Name property, which identifies it as an object in code. In this case, it is also CommandButton1.
Change the Caption property in the Properties window from CommandButton1 to Sheet2 (to indicate that this button will activate Sheet2). If you like, experiment with other CommandButton properties such as BackColor, Font, ForeColor, and Shadow. Close the Properties window.
NOTE
Another way to open the Properties window is to select the desired control with the mouse and then, on the Developer tab, in the Controls group, click the Properties button.Now, let’s create the procedure that handles the button click event. When this event is triggered, Sheet2 should be activated.
Double-click the button you created (remember that Design Mode is enabled in the Controls group on the Developer tab). The VBA editor opens with the worksheet module active (in this case, Sheet1), and the first and last lines of the Click event procedure are automatically added .
First and last lines of the “button click” event procedure. Worksheet module for Sheet1
Private Sub CommandButton1_Click()
End Sub
Open the file in Windows where you previously created the macro Activate_Sheet; make sure the required module is visible in the Project – VBAProject window. Copy the following instruction from the macro via the clipboard :

Sheets(« Sheet2 »).Select
Paste it into the button click event procedure . Of course, you could type this instruction manually, but doing so is slower and prone to typos.
“Button click” event procedure that activates Sheet2. Worksheet module for Sheet1
Private Sub CommandButton1_Click() Sheets("Sheet2").Select End Sub- Return to Sheet1. The created button will only handle the event (being clicked) after exiting Design Mode. To do this, turn off Design Mode by clicking the Design Mode button in the Controls group on the Developer tab.
- Test the button you created: click it, and if everything is done correctly, Sheet2 will be activated.
As an exercise to reinforce the material, we recommend creating a macro that adds a new worksheet to the Excel workbook and sets the cell pointer to Sheet1. Then, link the created procedure to another button, also placed on Sheet1.
Structure of a Procedure’s Code with Excel Vba
Structure of a Procedure’s Code
So, we have recorded a macro, and the macro recorder we used created a procedure in a module. In general, a procedure has the following form:Sub ProcedureName(ParameterList) Instructions End Sub
- ParameterList — this is a list of parameters on which the function depends. The parameters are separated by commas. The parameter list may also be absent — i.e., empty (see, for example, Listing 1.5).
- Instructions — this is a sequence of instructions executed when the procedure runs. Together, they form what is called the body of the procedure.
NOTE
A procedure may exit early using the Exit Sub instruction. Multiple Exit Sub statements can be present in the body of a procedure.Automating Worksheet Tasks Using Controls with Excel VBA
Microsoft Office Excel 2010 also has a full set of various controls: button, combo box, option button, checkbox, etc., which can be placed on a worksheet as needed (Fig. 1.18). To see the list of available controls, go to the Developer tab, and in the Controls group, click the Insert dropdown button.
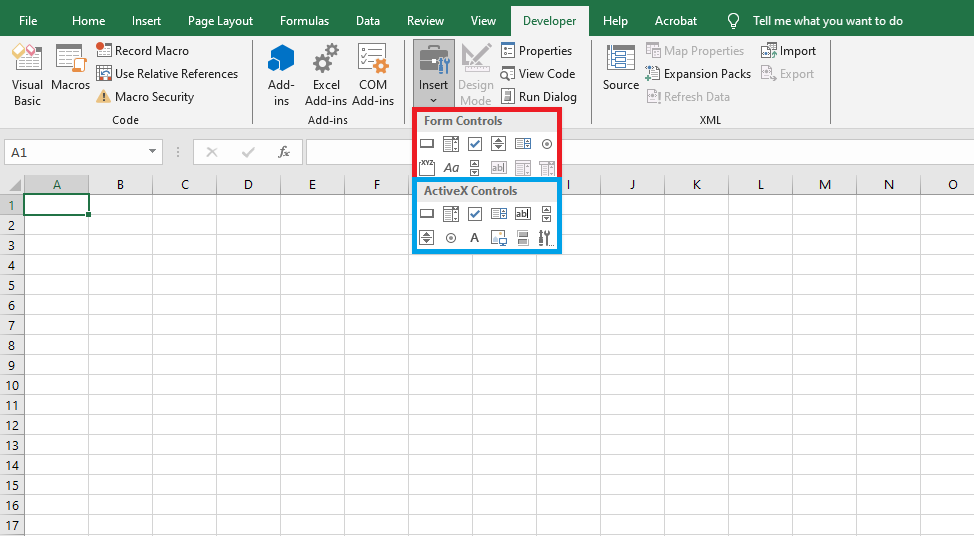
It should be noted that the controls located in the Form Controls group are primarily intended to ensure compatibility with files from older versions of Excel (prior to Excel 97), which use these controls. They have significantly fewer capabilities compared to the controls in the ActiveX Controls group.
Some of these controls cannot be used at all in the latest versions of Excel — these include Edit Box, Combo List-Edit, and Combo Drop-Down Edit. However, these controls also have certain advantages that ActiveX controls do not have — for example, they can be placed on chart sheets.
Controls in the ActiveX Controls group are independent components of various applications and can also be used in Microsoft Excel. This group also includes controls similar to many from the Form Controls group but unavailable in Microsoft Office Excel 2010.
In addition to standard controls, additional controls can be used. Excel comes with a number of such controls, for example, multimedia controls that allow playing audio or video directly from a worksheet. Moreover, it is possible to connect controls used in other programs or separately created custom controls.
In a worksheet module, you can create procedures that handle various events triggered by controls. For example, pressing a button, selecting an item from a list, choosing an option button, or checking a checkbox can automatically lead to calculations, chart creation, changing chart types, and so on.
Later, we will study controls and worksheet automation in detail (see Chapter 6). Here, we will give only a small example using a CommandButton control and its associated Click event, which is triggered when the button is pressed.
Event-Handling Procedure with Excel VBA
Besides regular procedures, VBA has procedures that handle events associated with a particular object. In general, such procedures are written as:
[Private] Sub ObjectName_EventName(ParameterList)
    Instructions
End Sub
The keyword Private is an access modifier that indicates the procedure is visible to other procedures only within the module in which it resides.
For example, a procedure that handles the activation of a worksheet looks like this:
Private Sub Worksheet_Activate()
    Instructions
End Sub