Votre panier est actuellement vide !
Catégorie : Excel VBA Course
Setting the Location of a Custom Form or UserForm, Excel VBA
The initial position of the form is defined by the StartUpPosition property. Valid values are listed in the table below.
StartUpPosition Property Values
Value Description 0 The coordinates of the top-left corner of the form are set using the Top and Left properties 1 Center of the application window 2 Centered on the screen 3 Top-left corner of the screen For example, the following code sets the form so that its top-left corner is at the point (100, 100):
Private Sub UserForm_Initialize() Me.StartUpPosition = 0 Me.Top = 100 Me.Left = 100 End SubConfirming the Closing of a Window in a Custom Form UserForm, Excel VBA
In projects, a situation often arises where user confirmation is required before closing a form. This behavior can be handled by using the QueryClose event procedure, which is triggered just before the window closes. This procedure has two parameters. If the first parameter is set to
-1, the closing does not occur; if it is set to0, the window closes. The second parameter identifies the reason that caused the window to close.For example, in the following code, when you try to close the UserForm, a dialog box appears with two buttons: Yes and No, requiring user confirmation. If the user clicks Yes, the window closes; if No, it does not close.
Private Sub UserForm_QueryClose(Cancel As Integer, CloseMode As Integer) Select Case MsgBox("Close the window?", vbYesNo + vbQuestion) Case vbYes: Cancel = 0 Case vbNo: Cancel = -1 End Select End SubUsing Multiple Custom Forms or UserForms (Modal Window), Excel VBA
Modal Window
A modal window is a window that cannot be closed without interacting with it first. By default, a custom window in VBA is modal. You can define the window type (modal or modeless) using the optional style parameter of the Show method.
Show Style
The
styleparameter has two valid values:vbModalor1for a modal form,vbModelessor0for a modeless form.
For example, with the following statement, the form window is displayed on the worksheet in modeless mode, and therefore, when the window is open, the user has access to the worksheet cells:
UserForm1.Show vbModeless
When the window is launched with the following statement, it is in modal mode, and therefore the worksheet cells are inaccessible to the user until the window is closed:
UserForm1.Show vbModal
Using Multiple Custom Forms
There can be multiple custom forms in a project. When switching from one form to another, it’s important to consider the mode (modal or modeless) in which the form is opened.
For example, add two forms—UserForm1 and UserForm2—to your project. Create a button on the worksheet and set its
Nameproperty tocmdForm1. When you press this button, the first form window will appear on screen.The two macros below show how the code to invoke the second form when the first is clicked must differ depending on whether the window type is modal or modeless.
In Modal Mode
Before displaying the second form, you must close the first one in the code. In this case, only one form is ever shown on screen—either the first or the second.
Worksheet Module Code:
Private Sub cmdForm1_Click()
    UserForm1.Show vbModal
End Sub
UserForm1 Module Code:
Private Sub UserForm_Click()
    Unload UserForm1
    UserForm2.Show
End Sub
In Modeless Mode
It is not necessary to close the first form, and after clicking on the first form, both forms will be displayed on screen. To ensure both forms are visible at the same time, the second form is positioned slightly offset from the first.
Worksheet Module Code:
Private Sub cmdForm1_Click()
    UserForm1.Show vbModeless
End Sub
UserForm1 Module Code:
Private Sub UserForm_Click() UserForm2.StartUpPosition = 0 UserForm2.Top = UserForm1.Top + 20 UserForm2.Left = UserForm1.Left + 20 UserForm2.Show End SubDisplaying a Custom Form or UserForm in Excel VBA
To display a UserForm, you execute the Show method in a statement using the syntax
FormName.Show. For example, if you followed the same steps as shown in the previous sections to create the UserForm frmEmployees, you could have a simple macro like this to call the UserForm:Sub EmployeeForm() frmEmployees.Show End SubIf you want to see what the UserForm looks like when it is called in the actual worksheet environment, without having to write a formal macro yourself, you can type
frmEmployees.Showin the Immediate Window and press Enter. The following figure shows how you and your users will see the example UserForm.
Where does the code go in a custom form or UserForm? Excel VBA
A UserForm is a VBA object class that has its own module. Similar to the concept that each worksheet has its own module, each UserForm you add to your workbook is automatically created with its own module. Accessing the module of a UserForm is easy: in the VBE, you can double-click the UserForm itself in the design pane; or in the Project Explorer, you can right-click on the UserForm name and select View Code, as shown in the following figure.

Closing a Custom Form or UserForm by Pressing the Escape Key, Excel VBA
It is possible to close a custom form by pressing any key, such as . To do this, you simply need to write code that handles the
KeyDownevent, explicitly identify the required key, and close the form using theUnloadorEndstatement. TheKeyDownevent has two parameters: the first returns the code of the pressed key, and the second identifies the modifier key pressed. VBA has a special constantvbKeyEscapefor the Escape key code. The following code, placed in the custom form’s module, closes the window when the Escape key is pressed:Private Sub UserForm_KeyDown(ByVal KeyCode As MSForms.ReturnInteger, _ ByVal Shift As Integer) If KeyCode = vbKeyEscape Then Unload Me End If End SubComments
- The
KeyDownandKeyUpevents occur sequentially when you press and then release a key.- The
KeyDownevent occurs when a key is pressed. - The
KeyUpevent occurs when a key is released.
- The
Syntax:
Private Sub Object_KeyDown(ByVal KeyCode As MSForms.ReturnInteger, ByVal Shift As fmShiftState)
Private Sub Object_KeyUp(ByVal KeyCode As MSForms.ReturnInteger, ByVal Shift As fmShiftState)
These event syntaxes include the following elements:
Element Description ObjectRequired. The name of a valid object. KeyCodeRequired. Integer representing the code of the pressed or released key. ShiftRequired. State of the Shift, Ctrl, and Alt keys.
Table: Shift Parameter Constants
Constant Value Description fmShiftMask1 The Shift key was pressed fmCtrlMask2 The Ctrl key was pressed fmAltMask4 The Alt key was pressed You can use the following KeyCode constants anywhere in your code instead of numeric values:
Constant Value Description vbKeyLButton0x1 Left mouse button vbKeyRButton0x2 Right mouse button vbKeyCancel0x3 Cancel key vbKeyMButton0x4 Middle mouse button vbKeyBack0x8 Backspace key vbKeyTab0x9 Tab key vbKeyClear0xC Clear key vbKeyReturn0xD Enter key vbKeyShift0x10 Shift key vbKeyControl0x11 Ctrl key vbKeyMenu0x12 Menu key vbKeyPause0x13 Pause key vbKeyCapital0x14 Caps Lock key vbKeyEscape0x1B Escape key vbKeySpace0x20 Spacebar vbKeyPageUp0x21 Page Up key vbKeyPageDown0x22 Page Down key vbKeyEnd0x23 End key vbKeyHome0x24 Home key vbKeyLeft0x25 Left arrow key vbKeyUp0x26 Up arrow key vbKeyRight0x27 Right arrow key vbKeyDown0x28 Down arrow key vbKeySelect0x29 Select key vbKeyPrint0x2A Print Screen key vbKeyExecute0x2B Execute key vbKeySnapshot0x2C Snapshot key vbKeyInsert0x2D Insert key vbKeyDelete0x2E Delete key vbKeyHelp0x2F Help key vbKeyNumlock0x90 Num Lock key - The
Properties, Methods, and Events of Custom Forms or UserForms, Excel VBA
UserForm Properties
The form has a wide range of properties that allow you to control both its appearance and operational settings. Of course, the most commonly used form properties are those that specify the name of the form and the text displayed in the title bar. The following table lists the main properties of the form.
Table 1: UserForm Properties
Property Description Name Name of the UserForm ActiveControl Returns a reference to the control that has received the focus BackColor Background color BorderColor Border color BorderStyle Border style. Valid values are: fmBorderStyleNoneandfmBorderStyleSingleCanPaste Defines whether an object can be pasted from the clipboard CanRedo Defines whether a redo operation is possible CanUndo Defines whether an undo operation is possible Caption Form caption (title) Cycle Specifies the behavior of elements in Frame and Page containers when focus is lost DrawBuffer Defines the memory size used when redrawing an image Enabled Determines whether the form is available to the user ForeColor Specifies the foreground color Height, Width Form height and width HelpContextID Link to a chapter in the help file InsideHeight, InsideWidth Height and width of the custom part of the form (excluding title bar and border thickness) KeepScrollBarsVisible Shows scrollbars. Valid values are: fmScrollBarsNone,fmScrollBarsHorizontal,fmScrollBarsVertical,fmScrollBarsBothLeft, Top Coordinates of the top-left corner of the form MouseIcon Assigns a custom mouse pointer MousePointer Specifies the type of mouse pointer Picture Specifies a link to a bitmap file used as a background PictureAlignment Specifies the alignment of a bitmap used as a background PictureSizeMode Determines whether the image should be scaled ScrollHeight, ScrollWidth Sets the height and width of the scrollable area ScrollLeft, ScrollTop Sets the top-left coordinate of the scrollable area SpecialEffect Sets the appearance of the form StartUpPosition Specifies the starting position of the form Tag Specifies a value used to identify a specific form VerticalScrollbarSide Determines which side of the form the scrollbars appear on Visible Sets the visibility of the form WhatsThisButton Specifies whether to show a Help button (?) Zoom Specifies the zoom level of the displayable element UserForm Methods
A form has many methods that allow you to perform a wide range of operations.
Table 2: UserForm Methods
Method Description Copy Copies the contents of the object to the clipboard Cut Copies and removes the object content to the clipboard Hide Hides the form without removing it from memory Load Loads an object into memory without displaying it Move Moves the form Paste Pastes the clipboard contents PrintForm Prints an image of the form RedoAction Repeats the last redo command Repaint Refreshes the image of the form Scroll Scrolls the image SetDefaultTabOrder Sets the default tab order for tab key navigation Show Displays the form UndoAction Repeats the last undo command Unload Removes an object from memory WhatsThisMode Displays a Help pointer with a question mark UserForm Events
Events allow you to create programs that manage the entire lifecycle of a form, from initialization to closing.
Table 3: UserForm Events
Event Description Activate, Deactivate Occurs when the form is activated and deactivated AddControl Occurs when a control is added BeforeDragOver Occurs during data drag BeforeDropOrPaste Occurs before dragged data is inserted Click Occurs when the user clicks the form DblClick Occurs when the user double-clicks the form Error Occurs when the form encounters an error but cannot send a message Initialize Occurs when the form is initialized Layout Occurs when the layout of the form changes KeyDown, KeyUp Occurs when the user presses or releases a key while the form has focus KeyPress Occurs when the user presses a key other than function, arrow, or service keys, while the form has focus MouseDown, MouseUp Occurs when the user presses or releases a mouse button MouseMove Occurs when the user moves the mouse pointer over the form QueryClose Occurs before the form window is closed RemoveControl Occurs when a control is removed Resize Occurs when the form is resized Scroll Occurs during scrolling Terminate Occurs when the form is closed Zoom Occurs when the zoom level of the form changes Creating a UserForm or Custom Form, Excel VBA
The first step in creating a UserForm is to insert one into the Visual Basic Editor. To do this, press Alt + F11 to access the VBE and select your workbook’s name in the Project Explorer, as shown in the following figure.
Accessing the VBE Environment

With the workbook name selected, click on Insert / UserForm from the menu bar, as illustrated in the next figure.

Inserting a UserForm
A new UserForm opens in its design window, as shown in the following figure.

A New UserForm Opens
Customizing a UserForm or Custom Form, Excel VBA
UserForms have a variety of properties. You can display the Properties window for the UserForm by clicking on View / Properties Window, as shown in the following figure, or by clicking its Properties icon.
Accessing the Properties Window
Below the Project Explorer, you will see the Properties window, partially visible in the following figure.

UserForm Properties Window
For the first UserForm in the workbook, VBA assigns a default value of UserForm1 to its Name and Caption properties, as you can see in the previous figure. If you were to create a second UserForm, its default Name and Caption properties would be UserForm2, and so on. To distinguish between the Name and Caption properties, the following figure shows where the Name property has been changed to frmEmployees and the Caption property, which appears in the UserForm’s title bar, has been changed to Employees.

The Name Property of the UserForm Object

Adding Controls to a Custom Form or UserForm, Excel VBA
VBA supports these and other controls, which are accessible to you from the VBE toolbox. To display the toolbox so you can easily input the commands you want, you can click on the Toolbox icon or click View Toolbox, as shown in the following figure.
Displaying the Toolbox
The controls you place on your UserForm depend on its purpose. If you want to design a simple form to collect information about your company’s employees, you will at least want to know the employees’ names and their job titles. It would be helpful to display a text box for entering the employee’s name, then a list of the company’s job titles so the user can easily select one. The following figure shows the toolbox with the mouse hovering over the Label control icon.

Overview of the Toolbox
You place a control on your UserForm by drawing it on the design area of your UserForm. All you have to do is click the control icon in the Toolbox that you want to add to the UserForm and draw it just like you would draw a Shape object on a worksheet. The following figure shows a Label control that has just been drawn, displaying its default caption of “Label1.”
Label Control
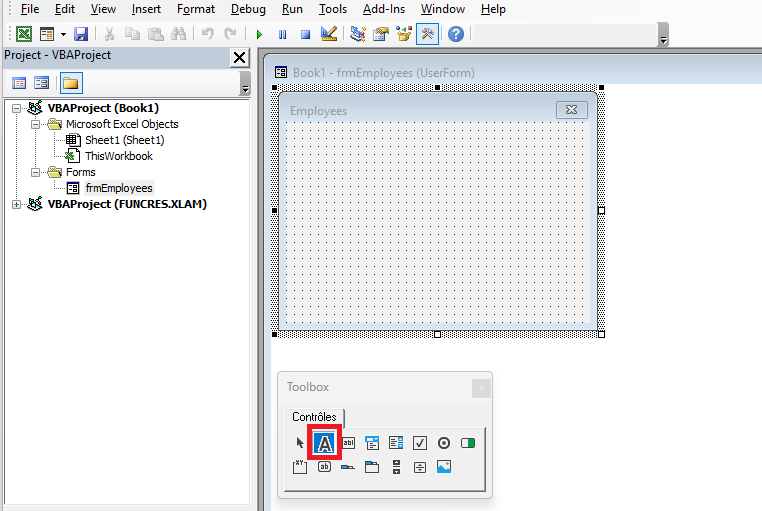

Note in this figure that the Caption property of the Label is selected in the Properties window, so a more meaningful caption can be added to the label. Since the label will be directly above the text box and the purpose of the text box is to enter an employee’s name, the label’s caption is changed to “Employee Name,” as shown in the following figure. Also note in the next figure that the TextBox icon is about to be selected in the toolbox as you prepare to draw a TextBox control on the UserForm beneath the label.
TextBox Control
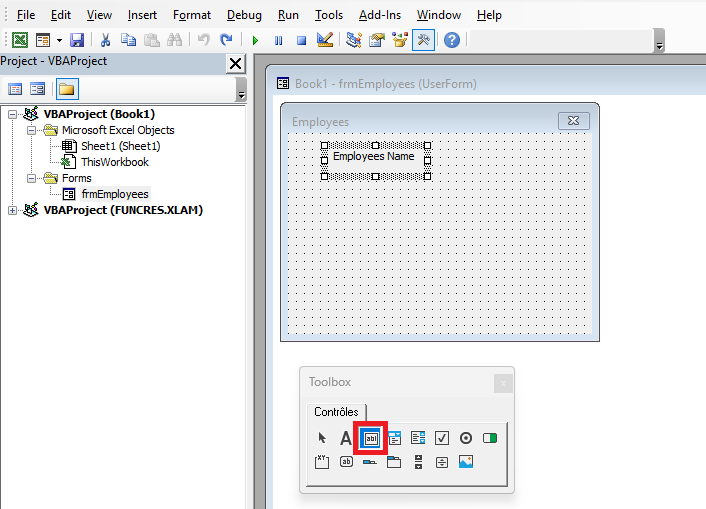
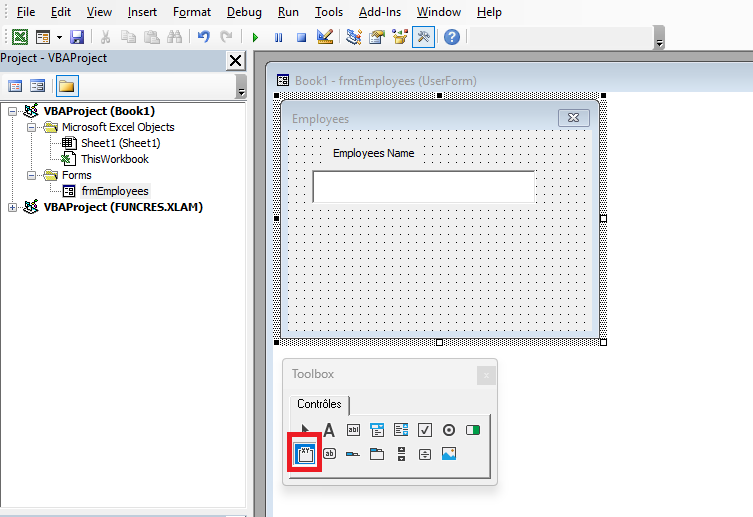
After clicking the TextBox icon in the toolbox, you add a TextBox control by drawing it in the design area of the UserForm, just as you did when you added the Label control. The following figure shows the drawn TextBox, positioned beneath the label, and reasonably wide enough to accept and display a person’s name. Meanwhile, as shown in the next figure, the Frame icon is about to be selected to place a Frame control on your UserForm.
Frame Control
The following figure shows your Frame control that has just been drawn, with its default caption of “Frame1.” Frames are a good way to visually group other controls together by containment, usually with an underlying theme. In the case of this sample UserForm, the company’s job titles will be contained in such a way that the user can only select one.
Overview of the Frame Control
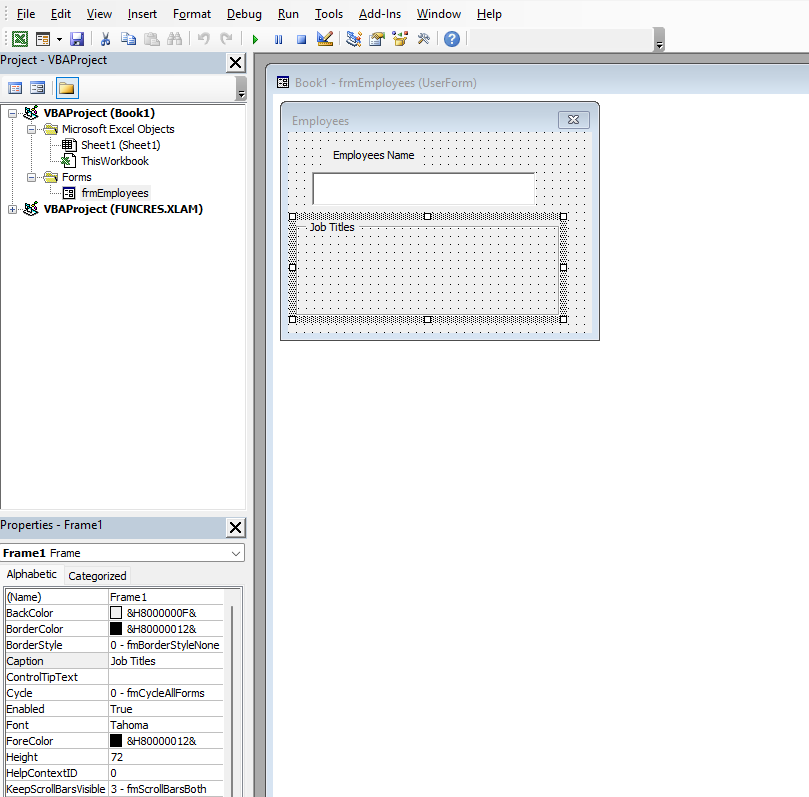
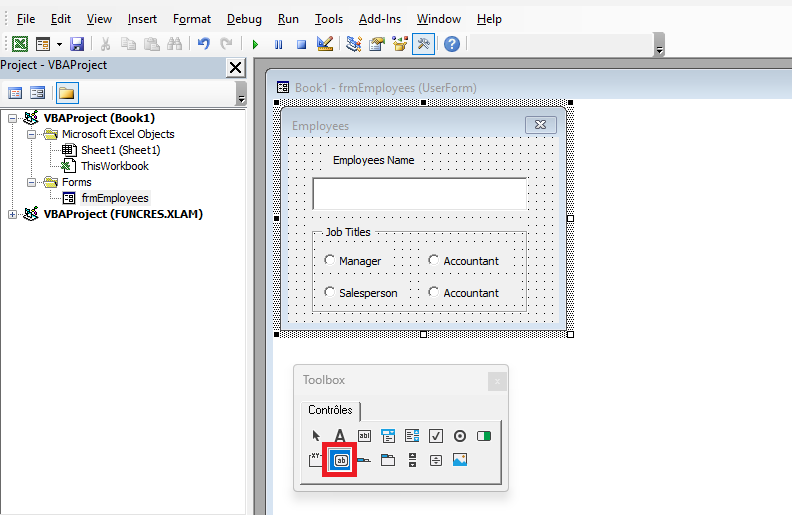
The Caption of a Frame control is an effective way to describe a Frame. In the previous figure, the Caption property of your new Frame is selected so you can change the default caption (“Frame1”) to a more useful description. In the next figure, the default caption “Frame1” has been replaced by “Job Titles.” Now that the frame caption has been taken care of, Figure 14.13 also shows that the OptionButton icon in the toolbox is about to be selected. Since an employee would only hold one job title, you can arrange a series of option buttons inside the frame to represent the different job titles in the company, where only one can be selected.
Option Buttons in the Frame
In the following figure, two CommandButtons have been added, completing the UserForm’s interface design. One of the CommandButtons is labeled “OK,” which is a common and intuitive caption allowing users to confirm their data entries. The other CommandButton is a “Cancel” button to allow users to completely exit the UserForm if they wish.
Adding Command Buttons
