Votre panier est actuellement vide !
Catégorie : Excel VBA Course
Recording a macro and placing it on the Quick Access Toolbar with Excel VBA
Suppose we need to create a macro that activates a worksheet: for example, if Sheet1 is currently active, we want to record a macro that activates Sheet2.
- Launch Microsoft Office Excel 2010 and make sure the cell pointer is on Sheet1.
- To start the macro recorder, go to the Developer tab on the ribbon and, in the Code group, click Record Macro.
- In the Record Macro dialog box, set the necessary parameters for the procedure being recorded: assign, for example, the macro the name ActivateSheet, enter an appropriate description in the Description field explaining the purpose of this macro, and leave the Store macro in field unchanged. Click OK.

NOTE:
The Macro Name and Description fields are used to set the macro’s name and description. Remember that the macro name should not contain spaces. The description is important for macros used repeatedly because it may be difficult to recall the purpose of a macro after some time. By default, macros are named Macro1, Macro2, etc. To make a macro easier to recognize, it is better to assign it a unique, meaningful name rather than using the default.The Shortcut key field allows you to assign a key combination to the macro, i.e., specify a character that, in combination with <Ctrl>, will execute the macro. Assigning a shortcut key is optional and is recommended mainly for frequently used macros for quick access. Without a shortcut key, a macro in Excel 2010 can always be run as follows: go to the Developer tab on the ribbon and, in the Code group, click Macros.
The Store macro in dropdown allows you to choose the workbook where the macro will be stored.
- Selecting Personal Macro Workbook saves the macro in a special hidden workbook where macros are stored. This workbook is always open but hidden, and the macros recorded in it are available for other workbooks. To display the personal macro workbook, go to the View tab and, in the Window group, click Unhide.
- Selecting This Workbook (default) saves the macro in a new module sheet of the active workbook.
- Selecting New Workbook saves the macro in a new workbook.
- In macro recording mode , go to Sheet2 (the pointer will be placed in cell A1).

- Click Stop Recording in the Code group on the Developer tab to stop recording the macro.
- Save your workbook in a macro-enabled format:
- Go to the File tab and choose Save As.
- In the Save As dialog box, select the location for your workbook at the top of the window, enter a name for the workbook in the File name field, and select Excel Macro-Enabled Workbook (*.xlsm) in the Save as type dropdown. Click Save.

- Go to the Developer tab and, in the Code group, click Macros. In the Macro dialog box, select the newly created macro from the list and click Edit. The VBA editor window will open, showing the activated standard module with the code (Listing 1.5) of the macro you just recorded (see also the file 2-Activate_Sheet.xlsm on the CD).

Sub Activate_Sheet() ' ' Activate_Sheet Macro ' Activates a Microsoft Excel worksheet ' Sheets("Sheet2").Select End Sub- Now, without closing this workbook, create another workbook: go to the File tab, select New, and in the Available Templates group, choose Blank Workbook.
- Go to the Developer tab on the ribbon and, in the Code group, click Macros.
- In the Macro dialog box , select the macro you created and click Run. Make sure that in your new workbook, this macro successfully activates Sheet2.
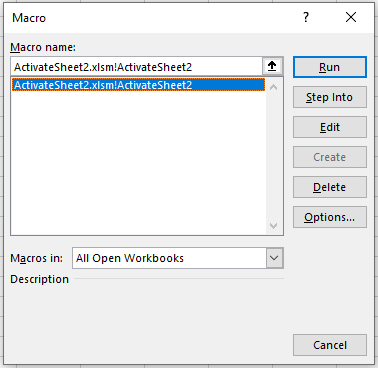
NOTE:
On the Developer tab, in the Code group, there is a Macro Security button, which opens the Trust Center window in the Macro Settings category . You can always select the desired setting to prevent the execution of potentially harmful code contained in macros from unknown sources.
By selecting Trusted Locations in the Trust Center window and clicking Add new location, you can specify a folder from which your VBA-enabled files will open without blocking the actions in them.

Now, let’s assign our macro to a button on the Quick Access Toolbar:
- Right-click on the Quick Access Toolbar and select More Commands.
- In the opened Excel Options window, under Quick Access Toolbar, choose Macros in the Choose commands from dropdown list.
- In the left column, select your macro Activate_Sheet and click Add >> to move it to the right column. At the bottom of the right column, the Modify button becomes active; click it to assign a button to the macro.

- In the Modify Button dialog , select a symbol for the button and, if needed, change the Display name for the macro, which will appear as a tooltip on the Quick Access Toolbar. Click OK.

- In the Excel Options window, under Quick Access Toolbar, the macro button is now displayed in the right column . Click OK.

- Verify that the button for your macro appears on the Quick Access Toolbar, and that clicking it executes the actions you recorded.

Why macros are needed with Excel VBA
Now we will introduce the basics of automating tasks, which is not possible without the use of macros. A macro is a program consisting of a list of commands that an application must execute. A macro serves to combine several different actions into a single procedure. This list of commands mainly consists of macro statements closely related to application commands in Microsoft Office. Most macro statements correspond to menu commands or options set in dialog boxes.
There are three main types of macros:
- Command macros — the most common type of macros, usually consisting of statements equivalent to specific menu commands or dialog box options. The primary purpose of these macros is to perform actions similar to menu commands, i.e., changing the environment and core objects of the application. For example, modifying a worksheet or workspace in Microsoft Excel, saving, or printing, etc. Thus, executing a macro results in changes either to the document being processed or to the overall application environment.
- User-defined functions — work similarly to built-in Microsoft Excel functions. Unlike command macros, these functions use the values of arguments passed to them, perform calculations, and return a result to the calling point, but do not change the application environment.
- Macro functions — a combination of command macros and user-defined functions. Like user-defined functions, they can use arguments and return results, but, like command macros, they can also modify the application environment. Macro functions are often called from other macros and are widely used in modular programming. If a series of identical actions needs to be performed in various macros, these actions are usually separated into a standalone macro function (subroutine).
Typically, macros are used to quickly generate a draft version of code. Keep in mind the sequence of actions involved in macro development:
- Logical procedure design. First, you need to clearly define the result that the macro should produce and the logical sequence of actions required to achieve this result.
- Document preparation. Perform preliminary actions that do not need to be included in the procedure (e.g., creating a new worksheet or moving to a specific part of a worksheet, etc.).
- Recording the macro using the macro recorder. The macro recorder is a translator that creates a program (macro) in VBA language, translating the user’s actions from the moment the macro recorder starts until the recording ends. To record a macro using the macro recorder:
- Go to the Developer tab on the ribbon and, in the Code group, click Record Macro.
- In the Record Macro dialog box, set the parameters of the procedure being recorded (name, description, shortcut key, and which documents the macro will be available for) and enter macro recording mode. The Record Macro button on the Developer tab will change to Stop Recording; the Pause button will also become active (if you want to pause the recording temporarily to perform other actions with the document).
- Perform all necessary actions with the document and its contents as planned in step one.
- Stop the recording (Stop Recording button in the Code group on the Developer tab).
- Viewing and editing the created procedure:
- Click Macros in the Code group on the Developer tab.
- In the Macro dialog box, select the macro name and click Edit. The main Microsoft Visual Basic editor window and the Module window containing the macro code will open.
- Make the necessary edits to the macro code and close the editor window.
- Running the macro:
- Click Macros in the Code group on the Developer tab.
- In the Macro dialog box, select the macro name and click Run.
NOTE:
You can assign a button to a recorded procedure and place it on the Quick Access Toolbar to simplify macro execution.Using range references as parameters for user-defined functions
The previous example of calculating the cost of a batch of books is already quite convincing. VBA can indeed make a user’s life easier.
One question arises from the two examples given. In the user-defined functions created, the parameter values were only cell references. Is it possible to create a user-defined function where the parameter values can be references to a range of cells?
Function MySum(ByVal rng As Range) As Double
    Dim c As Range
    Dim s As Double
    s = 0
    For Each c In rng.Cells
        s = s + c.Value
    Next
    MySum = s
End Function
The code demonstrates the use of range references and solves the task of summing values in a specified range of cells (see also the file 1-UserFunctions.xlsm on the CD).
Calculating the cost of a batch of books using a user-defined function
Let us consider a more complex example of creating a user-defined function. Suppose you are a manager responsible for wholesale book sales in a publishing house. To attract customers, your publishing house has introduced a progressive pricing scale.
- If 100 to 200 copies of a book are sold, the discount from its retail price is 7%.
- If 201 to 300 copies are sold, the discount is 10%.
- If more than 300 copies are sold, the discount is 15%.
In addition, for regular customers, an additional 5% discount is provided.
Let us create a user-defined function named Cost to calculate the cost of a batch of books. The parameters of this function will be called PricePerBook, Quantity, and Discount. For the Discount parameter, only two values are allowed: 1 — for regular customers, and 0 — for all others.
We define the user-defined function Cost with the following code:
Function Cost(PricePerBook, Quantity, Discount)
    If Quantity < 100 Then
        CostWithoutDiscount = PricePerBook * Quantity
    ElseIf Quantity <= 200 Then
        CostWithoutDiscount = PricePerBook * Quantity * 0.93
    ElseIf Quantity <= 300 Then
        CostWithoutDiscount = PricePerBook * Quantity * 0.9
    Else
        CostWithoutDiscount = PricePerBook * Quantity * 0.85
    End If
    If Discount = 0 Then
        Cost = CostWithoutDiscount
    Else
        Cost = CostWithoutDiscount * 0.95
    End If
End Function
So, the user-defined function Cost is created. Since VBA allows English-language names, the program text is clear and easy to understand. This also makes it simple to use the Function Wizard dialog box for this function.

The names of all parameters of the Cost function are displayed in the Function Wizard window, allowing any user to use it, even without knowledge of VBA.
For convenience, it is recommended to predefine the input values for the function parameters (PricePerBook, Quantity, and Discount) on the worksheet. However, this is not mandatory: the required values can also be entered directly in the Function Wizard window.
Your first user-defined function
Now you can proceed directly to writing a user-defined function.
Let’s start by writing code to calculate a simple function, for example:F(x)=x3+x2F(x) = x^3 + x^2F(x)=x3+x2
To implement this task, you need to perform the following steps:
- In the VBA editor window, add a standard module (if you haven’t created one yet) by executing the command Insert | Module.
- In the window of the created module , type the code from:
Function F(x As Double) As Double
    F = x ^ 3 + x ^ 2
End Function
It should be noted that in VBA there is a universal data type Variant, which is assumed by default if the type of a variable or function has not been explicitly declared. Therefore, the same function could also be coded as follows.

Listing 1.2. User-defined function using the Variant type
Function F(x)
    F = x ^ 3 + x ^ 2
End Function
NOTE:
Once again, note that the user-defined function code is entered in a standard module, which is added to the project using Insert | Module. If there are many modules in the project, do not confuse them. The active module is highlighted in gray in the Project – VBAProject window.So, the user-defined function has been created. By default, it appears in the User Defined category in the Function Wizard list. Let’s find, for example, the value of this function when x = 4.7. To do this:
- Go to the Microsoft Office Excel 2010 workbook window.
- Enter the number 4.7 in cell A1 of the worksheet (for example, Sheet1).
- Go to cell B1, where we will find the function value.
- Go to the Formulas tab on the ribbon and in the Function Library group, click Insert Function.
- In the first Function Wizard window, select the category User Defined from the list and choose the function F. Click OK.
- In the second Function Wizard window, enter the reference to cell A1 in the X field (or click the corresponding worksheet cell with the mouse) and click OK (Fig. 1.5). The function value is calculated.

Where Is User Function Code Written
To write a user-defined function, you need to go into the VBA editor. First, make sure that the Developer tab is displayed on the ribbon in Microsoft Office Excel 2010.

If it is not displayed, follow these steps:
- Go to the File tab on the ribbon and click Options.
- In the Excel Options window that opens, select Customize Ribbon from the list on the left, and on the right, in the Customize the Ribbon group, choose Main Tabs from the dropdown list.
- Check the box for Developer and click OK.

Now, on the Developer tab, go to the Code group and click Visual Basic: the Integrated Development Environment (IDE) of the Visual Basic editor will open .

NOTE
To quickly launch the VBA editor, simply press the keyboard shortcut +.The development environment has a standard interface typical of Windows applications: a title bar, a menu bar, a toolbar (in this case Standard), and two windows: Project – VBAProject and Properties.
In the Project – VBAProject window, all the modules and forms that are part of the project are listed. A module is displayed as a Module window, in which the main part is the working area — a sheet (not to be confused with an Excel worksheet), where the code is written. To open a module in the Project – VBAProject window, simply double-click the corresponding icon. The icon for the active module is highlighted in gray.
In VBA, each worksheet has its own module, and the workbook also has its own. Moreover, if user forms are created in the project, each of them also has its own module. You can add class modules to the project to describe custom classes. However, to create a user-defined function, you will need a standard module, which can be added to the project with the command:
Insert | Module.Text Box (TextBox) in a Custom UserForm, Excel VBA
The TextBox control is mainly used for user input, which is then used in the program, or to display the program’s calculation results.
The text entered in a TextBox can be converted into numbers or formulas in the code. The main event associated with the TextBox is the Change event.
Table 1: Basic TextBox Properties
Property Description NameSets the name of the text box TextReturns the text contained in the text box MultilineBoolean setting that defines whether the text box supports multiple lines ScrollBarsSets the display mode of scroll bars in the text box SelLength,SelStart,SelTextThese properties describe the selected text fragment within the TextBox MaxLengthSets the maximum number of characters allowed in the text box PasswordCharDefines the character displayed when entering a password Adding Two Numbers
As an example using text boxes, let’s create a project where the sum of two numbers entered in two TextBoxes is calculated and the result is shown in a third TextBox, as shown in the figure below.

Create a UserForm with three Labels, three TextBoxes, and two CommandButtons. Use the Properties Window to set their values as shown.
Table 2: Property values defined in the Properties Window
Object Property Value UserForm Caption c = a + b Label Caption A TextBox Name txtA Label Caption B TextBox Name txtB Label Caption C TextBox Name txtC CommandButton Name cmdOK Caption OK CommandButton Name cmdANNULER Caption CANCEL In the form module, type the following code:
Private Sub cmdOK_Click()
    Dim a As Double, b As Double, c As Double
    a = txtA.Text
    b = txtB.Text
    c = a + b
    txtC.Text = c
End Sub

Private Sub cmdANNULER_Click()
    Unload Me
End Sub
Comments:
- The two numbers are entered into TextBoxes
txtAandtxtB, and the sum is calculated intxtCwhen the OK button is clicked. - The syntax
Unload Mecloses the form when the CANCEL button is pressed.
Keyboard Shortcut Button
The Accelerator property of a control specifies a letter or number key that, when pressed along with the
<Alt>key, triggers the control’s click event. This key must be part of the Caption string and appears underlined.
For example, to associate<Alt> + Owith OK and<Alt> + Awith CANCEL:Private Sub UserForm_Initialize() cmdOK.Accelerator = "O" cmdANNULER.Accelerator = "A" End Sub<Enter> and <Esc> Keys
- The Default property set to
Truedesignates the button triggered by pressing<Enter>. - The Cancel property set to
Truedesignates the button triggered by pressing<Esc>.
This means
<Enter>finds the sum and<Esc>closes the form.Private Sub UserForm_Initialize() cmdOK.Default = True cmdCancel.Cancel = True End SubLocking the Result TextBox
- The Enabled property set to
Falsedisables the control completely (no focus). - The Locked property set to
Trueprevents editing while still displaying content.
Example:
Private Sub UserForm_Initialize()
    txtC.Enabled = False
End Sub
Prevent Button from Taking Focus
By default, clicking a button gives it focus. To keep focus on the current control, set TakeFocusOnClick to
False:Private Sub UserForm_Initialize() cmdOK.TakeFocusOnClick = False End SubMove Focus with <Enter>
Use the KeyDown event to detect when the
<Enter>key is pressed and move focus accordingly usingSetFocus.Private Sub txtA_KeyDown(ByVal KeyCode As MSForms.ReturnInteger, _ ByVal Shift As Integer) If KeyCode = vbKeyReturn Then txtB.SetFocus End If End Sub Private Sub txtB_KeyDown(ByVal KeyCode As MSForms.ReturnInteger, _ ByVal Shift As Integer) If KeyCode = vbKeyReturn Then cmdOK_Click txtA.SetFocus End If End Sub Private Sub UserForm_Initialize() txtC.Locked = True End SubComments:
- The KeyDown event occurs when a key is pressed.
- The KeyUp event occurs when the key is released.
Syntaxes:
Private Sub Object_KeyDown(ByVal KeyCode As MSForms.ReturnInteger, ByVal Shift As fmShiftState)
Private Sub Object_KeyUp(ByVal KeyCode As MSForms.ReturnInteger, ByVal Shift As fmShiftState)
Parameters:
Element Description ObjectRequired. A valid object name KeyCodeRequired. Integer representing the key code ShiftRequired. Shift, Ctrl, Alt state during the event Table 4: Shift Key Parameters
Constant Value Description fmShiftMask1 Shift key pressed fmCtrlMask2 Ctrl key pressed fmAltMask4 Alt key pressed Common KeyCode Constants:
Constant Value Description vbKeyReturn0xD Enter key vbKeyEscape0x1B Escape key vbKeyTab0x9 Tab key vbKeyBack0x8 Backspace vbKeyLeft0x25 Left arrow vbKeyUp0x26 Up arrow vbKeyRight0x27 Right arrow vbKeyDown0x28 Down arrow … (and many others) To move focus, use
Object.SetFocus.ToolTip Text
Controls can have ToolTips using the ControlTipText property, which displays help text when the mouse hovers over the control.
Example:Private Sub cmdOK_Click() Dim a As Double, b As Double, c As Double a = txtA.Text b = txtB.Text c = a + b txtC.Text = c End Sub Private Sub cmdANNULER_Click() Unload Me End Sub Private Sub UserForm_Initialize() txtA.ControlTipText = "Value of a" txtB.ControlTipText = "Value of b" txtC.ControlTipText = "Value of c" cmdOK.ControlTipText = "Sum of a + b" cmdANNULER.ControlTipText = "Cancel operation" End Sub- The two numbers are entered into TextBoxes
The Label in a UserForm or Custom Form, Excel VBA
The Label control is used to display information or captions. The user cannot modify the text displayed in the caption during program execution. The main property of the Label is the Caption property, which defines the text that is displayed.
A label does not display values from data sources or expressions; it is always unbound and does not change when you move from one record to another.
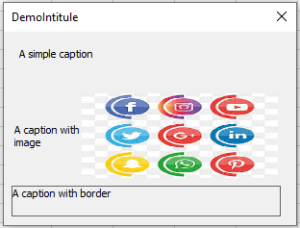
The following example shows different types of Labels: simple, with an image, and with a border. To implement this project, create a form in which you place three Labels. The image file
D:\chiennoir.jpgis used. In the form module, type the following code:Private Sub UserForm_Initialize() Me.Caption = "DemoLabel" Label1.Caption = "A simple caption" Label2.Caption = "A caption with image" Label2.Picture = LoadPicture("logo.jpg") Label2.PicturePosition = fmPicturePositionRightCenter Label3.Caption = "A caption with border" Label3.BorderStyle = fmBorderStyleSingle Label3.WordWrap = True End SubComments
■ In the Property window of
Label2, the image is loaded using the Picture property. The PicturePosition property determines the relative position of the image and the text.■ In the Property window of
Label3, the BorderStyle property defines whether the text box is displayed with or without a border.■ The WordWrap property returns or sets a Boolean value that specifies whether the contents of a control automatically wrap at the end of a line, or whether the control expands to fit the text size.
Custom Form or UserForm with a Tiled Background, Excel VBA
An image in a form can be displayed not only as a whole image but also as a tiled background. In this case, the PictureTiling property must be set to
True. You also need to take care of the PictureAlignment property, which sets the location of the initial image, from which the entire tiling pattern is constructed.Form properties can be set using the Properties Window or in code. In the latter case, this is typically done within the Initialize event procedure of the form, which is triggered when the form is initialized but before it is displayed on the screen.
As an example, let’s build a form with a tiled background and set its properties in code during the form’s initialization phase.
Now, create a form and type the following code into the form’s module. Also, make sure the default folder that Excel uses contains the image file you want to display as a tiled background.
Private Sub UserForm_Initialize()
    Me.Caption = "Tiled"
    Me.BorderStyle = fmBorderStyleNone
    Dim imageA As String
    imageA = "image1.jpg"
    If Len(Dir(imageA)) > 0 Then
        Me.Picture = LoadPicture(imageA)
        Me.PictureAlignment = fmPictureAlignmentTopLeft
        Me.PictureTiling = True
    Else
        MsgBox "No file found at " & CurDir & "\" & imageA
    End If
End Sub
Remarks
- To find out which directory is currently set as default, go to the File tab on the ribbon and click the Options button. In the Excel Options window that opens, select the Save category on the left. On the right, in the Save Workbooks section, the Default local file location field will show the current working directory. You can change it if needed.
- This application checks for the existence of a bitmap file in the given directory using the
Dir()function. If the file is not in the working directory, the form will launch without a tiled background. - The
Dir()function returns the name of a directory or file that matches the pattern passed as its argument. - If no matching directory or file is found,
Dir()returns an empty string. Therefore, checking for the existence of a file simply involves checking whether the length of the string returned byDir()is zero. If it is zero, the file does not exist.
Creating a Custom Form or UserForm with a Changeable Background, Excel VBA
A background image can be incorporated into a form using the Picture property. This property displays the image at its original dimensions. If you want the image to fill the entire client area of the form or to stretch across its full width or height, use the PictureSizeMode property. The PictureAlignment property places the image within the form’s client area—for example, centered or aligned to specific sides of the form.
Let’s build a project with a form where an image is displayed as the background. When you click the form, two images will alternate.
To implement the project, you need two images. In this case:
C:\image1.jpgandC:\image2.jpg.Now, create a form and use the Properties Window to set its property values as shown in the table below:
Table: Property Values Set in the Properties Window
Object Property Value Form/UserForm Picture Link to bitmap file C:\image1.jpgPictureSizeMode FmPictureSizeModeStretchCaption Changeable Backgrounds Then, double-click on the left mouse button inside the form, and in the opened UserForm module, type the following code:
Private Sub UserForm_Click()
    Static flag As Boolean
    Dim filename As String
    If Not flag Then
        filename = "C:\image1.jpg"
        Me.Picture = LoadPicture(filename)
        Me.PictureSizeMode = fmPictureSizeModeStretch
        Me.Caption = "Changeable Background Images " & filename
    Else
        filename = "C:\image2.jpg"
        Me.Picture = LoadPicture(filename)
        Me.PictureSizeMode = fmPictureSizeModeZoom
        Me.PictureAlignment = fmPictureAlignmentTopLeft
        Me.Caption = "Changeable Background Images " & filename
    End If
    Me.Repaint
    flag = Not flag
End Sub
Remarks
Now, when you click the form, the images
C:\image1.jpgandC:\image2.jpgwill alternate as background images.- The image is loaded from a file using the
LoadPicturefunction, whose parameter is the source filename. - Since the value of the PictureSizeMode property for image
C:\image1.jpgisfmPictureSizeModeStretch, it will stretch or shrink without keeping proportions to fill the form’s client area. - The PictureSizeMode value for image
C:\image2.jpgisfmPictureSizeModeZoom, so it will stretch or shrink proportionally to fit either the width or height of the client area. - The PictureAlignment property set to
fmPictureAlignmentTopLeftaligns the top-left corner of the image with the top-left corner of the form’s client area. - In the Properties window, you can remove the image by placing the cursor in the Picture field and pressing the Delete key.
- In code, the image is removed by assigning an empty value to the Picture property, like this:
Me.Picture = LoadPicture("")- The image is loaded from a file using the