Votre panier est actuellement vide !
Étiquette : practical-excel
Pasting Data Using Paste Special Options in Excel
Copy-pasting in Excel is easy. But did you know that in addition to pasting an entire cell, you can also paste only a specific attribute such as a value, a formula, formatting, or a comment? That’s where Paste Special comes in.
Excel Paste Special makes the paste operation more flexible by allowing you to choose whether to keep the formatting (from the source or the destination), or to strip all formatting and paste only values or formulas.
What is Paste Special?
In situations where a standard copy/paste is not appropriate, Excel’s Paste Special offers a wide range of options to paste only specific elements from the copied cells, or to perform a mathematical operation with the copied data.
For example, you can copy data containing formulas and paste only the calculated values into the same or different cells. You can also copy a column’s width and apply it to other columns in your dataset. Or, you can transpose the copied range, meaning you convert rows into columns and vice versa.
The following screenshot shows all available Paste Special options:
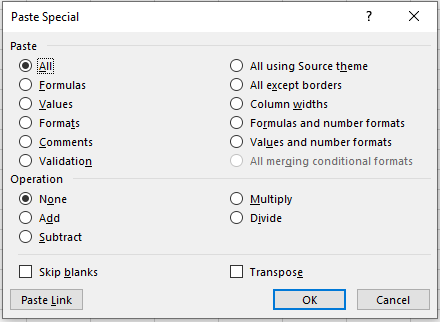
All Paste Special commands work within the same worksheet, across different sheets, and even between different workbooks.
Using Paste Special in Excel boils down to the following steps:
- Copy the source cell or range of cells (the fastest way is to select the cell(s) and press the Ctrl + C shortcut).
- Select the destination cell(s).
- Open the Paste Special dialog box using one of the methods described below (the fastest way is to use the Paste Special shortcut).
- Select the desired paste option and click OK, or press the Enter key.
Ways to Access Paste Special in Excel
As usual, Microsoft Excel offers multiple ways to use the same feature, and Paste Special is no exception. You can access its functions via the ribbon, the context menu, or keyboard shortcuts.
Paste Special Command on the Ribbon
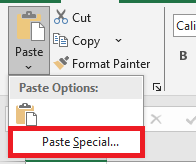
The most obvious way to open the Paste Special dialog box is to click on Paste → Paste Special from the Home tab, in the Clipboard group:
Paste Special in the Context Menu
You can also right-click on a cell where you want to paste the copied data, then click Paste Special from the context menu.
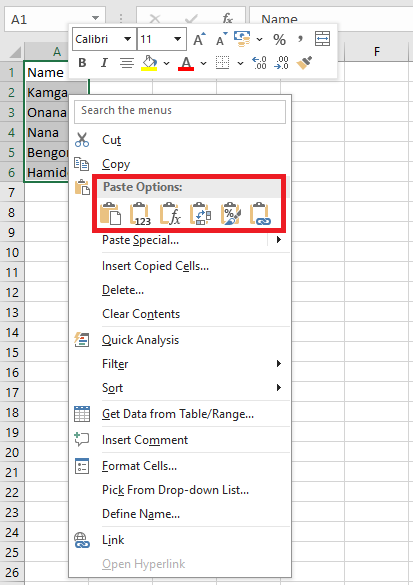
As you may have noticed, the six most popular paste options appear directly in the context menu under Paste Options: Paste All, Paste Values, Paste Formulas, Transpose, Paste Formatting, and Paste Link.
If you hover over the Paste Special… item in the context menu, a dropdown will appear offering 14 additional paste options:

Paste Special Keyboard Shortcut
The fastest way to paste a specific aspect of the copied data in Excel is to use one of the following shortcuts:
■ Paste Special shortcut for Excel 2019 – 2007:
Ctrl + Alt + V
■ Paste Special shortcut for all versions of Excel:Alt + E, thenSBoth of the shortcuts above open the Excel Paste Special dialog box, where you can either select an option using your mouse or press a corresponding shortcut key.
Cutting, Copying, or Pasting Data in Excel
When working with large amounts of data in Excel, you may need to copy and paste something you’ve already written or perhaps move an entire selection. Whether you’re working with data in a single worksheet, across multiple sheets, or even in different workbooks, there are simple shortcuts you can use to cut, copy, and paste.
Copying Data in Microsoft Excel
Copying data in Excel is useful when you need to duplicate functions, formulas, charts, and other data. The new location can be on the same worksheet, a different worksheet, or even a completely different workbook. As in all Microsoft programs, there are several ways to accomplish a task. In Excel, you can copy and move data in three ways:
■ Using a keyboard shortcut
■ Using the right-click context menu
■ Using menu options on the Home tab of the ribbonWhen the copy command is activated, the clipboard temporarily stores a duplicate of the selected data until you paste it into the destination cell(s). Other methods of copying data that do not involve using the clipboard include using the fill handle and dragging and dropping with the mouse.
Copying and Pasting Data in Excel Using Keyboard Shortcuts
The easiest way to cut, copy, and paste data is to use keyboard shortcuts. The keyboard key combinations for copying and pasting data are:
■ Ctrl + C: activates the copy command
■ Ctrl + V: activates the paste commandThe arrow keys on the keyboard can be used instead of the mouse pointer to select both the source and destination cells when copying and pasting data.
■ To select multiple adjacent cells using the arrow keys, press and hold the Shift key.
■ To select multiple non-adjacent cells using the arrow keys, use the Ctrl key.Copying Data in Excel Using the Context Menu
While the options in the context menu generally change depending on the selected object, the cut, copy, and paste commands are always available.
- Click one or more cells to highlight them.
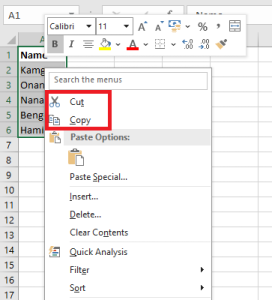
- Right-click the selected cell(s) to open the context menu.
- Choose Copy from the available menu options.
- A moving black border will appear around the selected cell(s).
- Click the destination cell – when copying multiple data cells, click the cell in the top-left corner of the destination range.
- Right-click the selected destination cell(s) to open the context menu.
- Choose Paste from the available menu options.
- The duplicated data should now appear in both the original and destination locations.
Copying Data Using the Ribbon
The Copy and Paste commands are located in the Clipboard section on the left side of the Home tab on the ribbon.
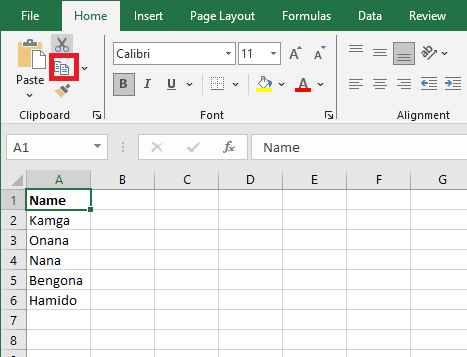
- Click one or more cells to highlight them.
- Click the Copy icon on the ribbon.
- A moving black border will appear around the selected cell(s).
- Click the destination cell – when copying multiple data cells, click the cell in the top-left corner of the destination range.
- Click the Paste icon on the ribbon.
- The duplicated data should now appear in both the original and destination locations.
Moving Data in Excel
There is no specific Move command in Excel. To move data, you must cut and paste it from one location to the new one. You can use cut/paste in Excel to move functions, formulas, charts, and other data. The new location can be on the same worksheet, another worksheet, or even in a completely different workbook.
As with copying, there are three ways to cut data in Excel:
■ Using a keyboard shortcut
■ Using the right-click context menu
■ Using the menu options on the Home tab of the ribbonWhen you cut data in Excel, the clipboard temporarily stores it, just as it does when you copy data.
Moving Data Using Keyboard Shortcuts
The keyboard combinations used to move data are:
■ Ctrl + X: activates the cut command
■ Ctrl + V: activates the paste commandThe arrow keys on the keyboard can be used instead of the mouse pointer to select both the source and destination cells during cut/paste operations.
■ To select multiple adjacent cells using the arrow keys, press and hold the Shift key.
■ To select multiple non-adjacent cells using the arrow keys, use the Ctrl key.Moving Data in Excel Using the Context Menu
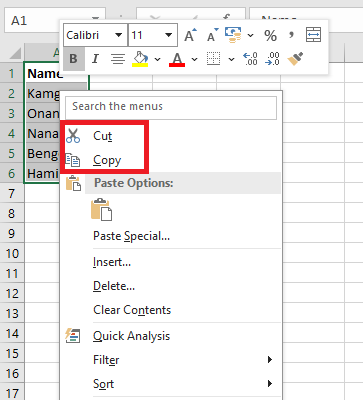
When you right-click on a cell, the context menu always includes the cut, copy, and paste commands.
- Click one or more cells to highlight them.
- Right-click the selected cell(s) to open the context menu.
- Choose Cut from the available menu options.
- A moving border (sometimes called « marching ants ») will appear around the selected cell(s).
- Click the destination cell – when moving multiple data cells, click the cell in the top-left corner of the destination range.
- Right-click the selected destination cell(s) to open the context menu.
- Choose Paste from the available menu options.
- The selected data should now appear only in the destination location.
Moving Data in Excel Using the Ribbon
The Cut and Paste commands are located in the Clipboard section of the Home tab on the ribbon.
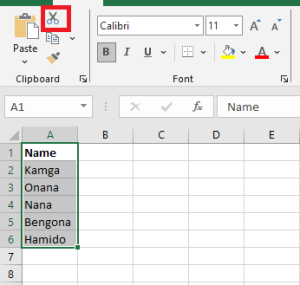
- Click one or more cells to highlight them.
- Click the Cut icon on the ribbon.
- A moving black border will appear around the selected cell(s).
- Click the destination cell – when moving multiple data cells, click the cell in the top-left corner of the destination range.
- Click the Paste icon on the ribbon.
- The selected data should now appear only in the destination location.
Inspecting a Workbook for Accessibility Issues in Excel
Before sending your email or sharing your document or spreadsheet, run the Accessibility Checker to ensure your Microsoft Office content is easy to read and edit for people of all abilities.
To use the Accessibility Checker:
- On the ribbon, select the Review tab.
- Click Check Accessibility.
Figure 1.5.7-a: Accessibility Issues - Excel displays the Accessibility Checker pane.
Figure 1.5.7-b: Accessibility Issues - Click on an item in the Inspection Results section.
Excel uses the Additional Information section to explain why you should fix the issue and the steps to correct it.
Easily Fix Accessibility Recommendations
To quickly resolve accessibility errors and warnings, select a problem to open the Recommended Actions list.
You can apply a fix in one click by selecting an action, or click the arrow next to an action for more options.
Figure 1.5.7-c: Accessibility IssuesMonitor Accessibility as You Work in Excel
To be notified of accessibility issues while you continue working in Excel, check the box Keep Accessibility Checker running while I work.
Figure 1.5.7-d: Accessibility IssuesThis adds the Accessibility button to your status bar and tracks accessibility issues in real time. You can open the Accessibility Checker anytime by selecting the button in the status bar.
Accessibility Checker Not Available?
If the Check Accessibility button is not visible under the Review tab, it may be due to an older version of the application. Here’s how to access the Accessibility Checker in that case:
- Go to File > Info.
- Select the Check for Issues button.
Tip: On the right of the « Check for Issues » button, under the Inspect heading, you’ll see a list of potential problems.
Figure 1.5.7-e: Accessibility Issues
- From the drop-down menu, select Check Accessibility.
Figure 1.5.7-f: Accessibility Issues - The Accessibility Checker pane will open next to your content, showing inspection results.
Figure 1.5.7-f continued: Accessibility Issues - To view information about why a problem should be fixed and how to fix it, select a problem under Inspection Results. The Additional Information section will show the explanation, and Excel will take you to the inaccessible content in your file.
Figure 1.5.7-g: Accessibility Issues