Votre panier est actuellement vide !
Catégorie : Excel VBA Course
Do-Loop Loop In Excel VBA
When the number of loop iterations is unknown or cannot be calculated before the loop starts, use the Do-Loop loop. There are five variations:
- Do While … Loop: Checks the loop continuation condition at the beginning (pre-test loop).
- Do … Loop While: Checks the loop continuation condition at the end (post-test loop).
- Do Until … Loop: Checks the loop exit condition at the beginning.
- Do … Loop Until: Checks the loop exit condition at the end.
- Do … Loop: No automatic condition check; requires branching and Exit Do inside to avoid infinite loops.
Loops that check the condition at the end (Do … Loop While and Do … Loop Until) are called post-test loops and always execute at least once. In contrast, loops that check the condition at the start (Do While … Loop and Do Until … Loop) are pre-test loops and may not execute at all if the condition is false at the outset.
General Syntax:
Do {While | Until} condition
    [statements]
    [Exit Do]
    [statements]
Loop
or
Do
    [statements]
    [Exit Do]
    [statements]
Loop {While | Until} condition
Examples
The following three procedures demonstrate three of the five variations. They sum random numbers until the total reaches 5. Since numbers are generated randomly, the number of loop iterations is unpredictable.
Example 1: Do Loop While
Sub DoLoop1()
    Dim i As Integer
    Dim sum As Single
    ThisWorkbook.Worksheets("Sheet2").Activate
    Range("C1:C20").Clear
    Randomize
    i = 1
    sum = 0
    Do
        sum = sum + Rnd
        Cells(i, 3).NumberFormatLocal = "0.000"
        Cells(i, 3).Value = sum
        i = i + 1
    Loop While sum < 5
    Cells(i, 3).Value = "Done"
End Sub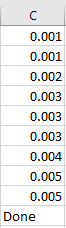
Explanation:
- The output range is cleared initially.
- The random number generator is initialized by Randomize.
- i tracks the output row number.
- sum is initialized to zero for clarity (good practice).
- In each loop iteration, a random number between 0 and 1 is added to sum.
- The new sum is output, and the row number increments.
- The loop continues while sum < 5. When sum >= 5, the loop ends and « Done » is printed.
Example 2: Do Loop Until
Sub DoLoop2()
    Dim i As Integer
    Dim sum As Single
    ThisWorkbook.Worksheets("Sheet1").Activate
    Range("C1:C20").Clear
    Randomize
    i = 1
    sum = 0
    Do
        sum = sum + Rnd
        Cells(i, 3).NumberFormatLocal = "0.000"
        Cells(i, 3).Value = sum
        i = i + 1
    Loop Until sum >= 5
    Cells(i, 3).Value = "Done"
End Sub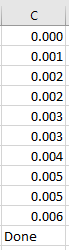
Explanation:
- Same as the first example, but the loop condition is tested after the loop body with Loop Until.
- The loop ends when sum >= 5.
Example 3: Do Loop with Exit Do
Sub DoLoop3()
    Dim i As Integer
    Dim sum As Integer
    ThisWorkbook.Worksheets("Sheet1").Activate
    Range("C1:C20").Clear
    Randomize
    i = 1
    sum = 0
    Do
        sum = sum + Int(Rnd * 6 + 1) ' Random integer 1 to 6, like a dice roll
        Cells(i, 3).Value = sum
        i = i + 1
        If sum >= 30 Then Exit Do
    Loop
    Cells(i, 3).Value = "Done"
End Sub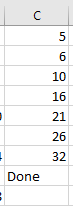
Explanation:
- This example generates random integers from 1 to 6 using Int(Rnd * 6 + 1).
- The loop exits immediately if sum >= 30 using Exit Do.
- This approach shows how to control the loop internally without a condition in the Loop statement.
Additional Notes
- The Rnd() function generates pseudo-random numbers between 0 (inclusive) and 1 (exclusive).
- Multiplying Rnd() by 6 and adding 1 scales this to 1 to less than 7, and Int() truncates to an integer 1 through 6.
- Randomize seeds the random number generator to avoid repeating sequences on each run.
For-Next Loop In Excel VBA
If the number of loop iterations is known or can be calculated before the loop starts, you should use the For-Next loop. Its structure is as follows:
For counter = start To end [Step stepValue]
    [statements]
    [Exit For]
    [statements]
Next [counter]
- The counter variable is initially set to the start value.
- After each iteration, it is increased or decreased by the stepValue. If Step is omitted, the counter increments by 1.
- The new value of the counter is then compared to end:
- If the step is positive and the counter value is not greater than end, the loop continues.
- If the step is negative and the counter value is not less than end, the loop continues.
- Otherwise, the loop terminates.
- The Exit For statement can be used to immediately exit the loop based on a specific condition.

Example 1: Simple For Loop with Step 1
Sub ForNext1()
    Dim i As Integer
    ThisWorkbook.Worksheets("Sheet1").Activate
    Range("B1:B10").Clear
    For i = 3 To 7
        Cells(i, 2).Value = Cells(i, 1).Value * 2
    Next i
End Sub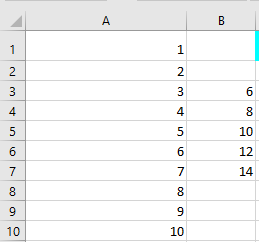
Explanation:
- The values 1 to 10 in column A are assumed to already exist.
- i is the loop counter.
- The target range in column B is cleared before writing new results.
- The loop runs with i starting at 3 and ending at 7, incrementing by 1 (default step).
- For each iteration, the value in column A is doubled and written into column B.
Example 2: For Loop with Step 2
Sub ForNext2()
    Dim i As Integer
    ThisWorkbook.Worksheets("Sheet1").Activate
    Range("B1:B10").Clear
    For i = 3 To 7 Step 2
        Cells(i, 2).Value = Cells(i, 1).Value * 2
    Next i
End Sub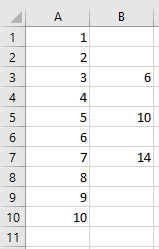
Explanation:
- Step size is 2, so every second cell is processed (i = 3, 5, 7).
Example 3: For Loop with Negative Step and Exit For
Sub ForNext3()
    Dim i As Integer
    Dim result As Integer
    ThisWorkbook.Worksheets("Sheet1").Activate
    Range("B1:B10").Clear
    For i = 9 To 2 Step -2
        result = Cells(i, 1).Value * 2
        If result < 10 Then Exit For
        Cells(i, 2).Value = result
    Next i
End Sub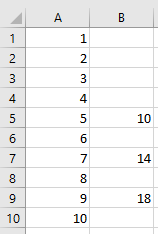
Explanation:
- The loop runs backward from 9 down to 2, decrementing by 2.
- The calculation result is temporarily stored in variable result.
- The loop exits early if result is less than 10 using Exit For.
Select Case Statement In Excel VBA
The Select Case statement can be used as an alternative to the If-Then-Else block. It simplifies multiple-choice branching when only one value needs to be tested. The syntax is as follows:
Select Case testExpression
    [ Case expressionList1
      statements1 ]
    [ Case expressionList2
      statements2 ]
    ...
    [ Case Else
      statementsX ]
End Select
The Select Case statement evaluates a single test expression at the beginning. Its value is then compared sequentially to the values in each case’s expression list.
- An expression list can consist of multiple expressions separated by commas or a range specified with the keyword To.
- An expression can be a value or a condition using the keyword Is.
- When the first match is found, the corresponding block of statements is executed, and control passes to the statement following the End Select.
- The optional Case Else block runs if no previous matches are found.
Example Procedure:
Sub SelectCaseExample()
    ThisWorkbook.Worksheets("Sheet1").Activate
    Select Case Range("C1").Value
        Case 20, 30, 40
            Range("C1").Interior.Color = vbRed
        Case Is < 10, Is > 100
            Range("C1").Interior.Color = vbGreen
        Case 12 To 17
            Range("C1").Interior.Color = vbCyan
        Case Else
            Range("C1").Interior.Color = vbYellow
    End Select
End Sub
Explanation:
- Case 20, 30, 40 means: If the value is 20, 30, or 40…
- Case Is < 10, Is > 100 means: If the value is less than 10 or greater than 100…
- Case 12 To 17 means: If the value is between 12 and 17 inclusive… This is the first matching case in the example.
- Case Else covers all other cases.
If-Then-Else Block In Excel VBA
For simple decisions involving single statements, the single-line If is suitable. However, as soon as multiple statements need to be executed, the code can quickly become confusing. For this purpose, an If-Then-Else block is much better suited.
The structure of the block is as follows:
If condition1 Then
    statements1
[ ElseIf condition2 Then
    statements2 ]
...
[ Else
    statementsX ]
End If
The program branches to the statements following the first true condition (ElseIf). If none of the conditions is true and an Else branch exists, the statements in the Else branch are executed. Otherwise, no statement is executed.
An If-Then-Else block always ends with an End If.
The following procedure tests two different cases. If neither applies, the Else branch is executed:
Sub BlockIf()
    ThisWorkbook.Worksheets("Sheet1").Activate
    If Range("C1").Value > 100 Then
        Range("C1").Font.Size = 14
        Range("C1").Font.Italic = True
        Range("C1").Font.Underline = True
    ElseIf Range("C1").Value < 10 Then
        Range("C1").Font.Size = 11
        Range("C1").Font.Italic = False
        Range("C1").Font.Underline = False
    Else
        Range("C1").Font.Size = 17
        Range("C1").Font.Italic = False
        Range("C1").Font.Underline = True
    End If
End Sub
Explanation:
Depending on the value in the cell, the font properties size, italic, and underline are set accordingly.
In the current case, the value is neither greater than 100 nor less than 10, so the third case (Else) applies.Single-Line If … Then … Else Statement
If condition Then statement1 [Else statement2]
Conditions are formed using comparison operators and evaluated as either True or False.
- If the condition evaluates to True, the code following Then (statement1) is executed.
- If the condition evaluates to False and an Else part exists, the code following Else (statement2) is executed.
The following procedure demonstrates two examples of single-line If usage. Note that the second example’s line is quite long for printing in this book, but it is still a single-line If statement:
Sub SingleLineIf()
    ThisWorkbook.Worksheets("Sheet1").Activate
    If Range("A1").Value > 100 Then MsgBox "Large"
    If Range("A1").Value < 10 Then MsgBox "Small" Else _
        MsgBox "Not small"
End Sub
Explanation:
- In the first example, a message box appears only if the value in cell A1 is greater than 100. Otherwise, nothing happens.
- In the second example, a message box is always displayed: it shows « Small » if the value is less than 10, otherwise it shows « Not small ».
Operator Precedence In Excel VBA
When an expression contains multiple operations, the individual subexpressions are evaluated and resolved in a specific order called the operator precedence or priority.
Precedence Operator(s) Description 1 ^ Exponentiation (power operator) 2 Unary – Negative sign (negation) 3 * and / Multiplication and division 4 \ Integer division 5 Mod Modulo operation 6 + and – Addition and subtraction 7 & String concatenation 8 =, <>, <, >, <=, >=, Like Comparison operators (Note: = means comparison, not assignment) 9 Not Logical NOT 10 And Logical AND 11 Or Logical OR 12 Xor Logical exclusive OR Operators of the same precedence level are evaluated left to right.
As mentioned earlier with arithmetic operators, this precedence can be overridden using parentheses, forcing specific expressions to be evaluated before others. Expressions inside parentheses always have priority, but inside them, normal precedence rules apply again.
Concatenation Operator In Excel VBA
The operator & is used to concatenate (join) strings. It is frequently needed to display results clearly combined with descriptive text.
If one of the expressions is not a string but a number or a date, VBA automatically converts it to a string before concatenation. The overall result is always a string.
Example:
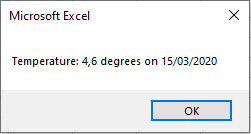
Sub ConcatenationOperator()
    Dim a As String
    Dim s As Single
    Dim d As Date
    d = "15/03/2020"
    s = 4.6
    a = "Temperature: " & s & " degrees on " & d
    MsgBox a
End Sub
Logical Operators In Excel VBA
Logical operators are used to combine multiple conditions. Lists the most important logical operators:
Operator Description Result is True when… Not Not … the expression is False And And … both expressions are True Or Inclusive Or … at least one expression is True Xor Exclusive Or … exactly one expression is True Given the variables a = 1, b = 3, and c = 5, observe the results in Table 3.10:
Expression Result Not (a < b) False (b > a) And (c > b) True (b < a) Or (c < b) False (b < a) Xor (c > b) True Shows the truth tables of these logical operators, where Expression 1 and Expression 2 can each be True or False:
Expr1 Expr2 Not Expr1 Expr1 And Expr2 Expr1 Or Expr2 Expr1 Xor Expr2 True True False True True False True False False False True True False True True False True True False False True False False False Note: The Not operator only applies to Expression 1.
Example Procedure Using Logical Operators:
Sub LogicalOperators()
    Dim a As Integer, b As Integer, c As Integer
    a = 1
    b = 3
    c = 5
    ThisWorkbook.Worksheets("Sheet1").Activate
    Range("G1").Value = Not (a < b)
    Range("G2").Value = (b > a) And (c > b)
    Range("G3").Value = (b < a) Or (c < b)
    Range("G4").Value = (b < a) Xor (c > b)
End Sub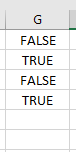
Comparison Operators In Excel VBA
Comparison operators are used in conditions, which are essential for controlling program flow with branching (e.g., If statements) and loops. Branching works on the same principle as Excel’s IF() function.
The result of a comparison is one of the two Boolean values: True or False. lists the common comparison operators:
Operator Description < Less than <= Less than or equal to > Greater than >= Greater than or equal to = Equal to <> Not equal to Examples:
Expression Result 5 > 3 True 3 = 3.2 False 5 + 3 * 2 >= 12 False The Like Operator
In addition, VBA supports the Like operator for pattern matching. You can use wildcards such as:
- * (asterisk) for zero or more characters
- ? (question mark) for exactly one character
Expression Result « abxba » Like « a*a » True « abxba » Like « a?a » False « aba » Like « a?a » True « asdlfigc » Like « a?d?f*c » True The Like operator allows you to perform much more complex pattern matching than shown here.
Example Procedure Using Comparison Operators:
Sub ComparisonOperators()
    ThisWorkbook.Worksheets("Sheet1").Activate
    Range("E1").Value = (5 > 3)
    Range("E2").Value = (3 = 3.2)
    Range("E3").Value = (5 + 3 * 2 >= 12)
    Range("F1").Value = ("abxba" Like "a*a")
    Range("F2").Value = ("abxba" Like "a?a")
    Range("F3").Value = ("aba" Like "a?a")
    Range("F4").Value = ("asdlfigc" Like "a?d?f*c")
End Sub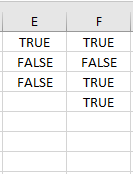
Note: Parentheses around comparison expressions are not necessary for correct evaluation; they are included here only to improve readability.
Arithmetic Operators In Excel VBA
Arithmetic operators are used to perform calculations. Table 3.2 lists the arithmetic operators available in VBA:
Operator Description + Addition – Subtraction or Negation * Multiplication / Division \ Integer Division (see explanation below) Mod Modulo (remainder) operation (see explanation below) ^ Exponentiation (power) Division
The division operator / returns the expected decimal result. However, the data type of the variable that stores the result is important:
- In the first example, the result is stored in a Double variable and will display the exact division result.
- In the second example, the result is stored in an Integer variable, which causes rounding.
Example 1: Division without rounding
Sub DivisionWithoutRounding()
    Dim x As Double
    x = 13 / 5
    MsgBox x  ' Displays 2.6
End Sub
Example 2: Division with rounding
Sub DivisionWithRounding()
    Dim x As Integer
    x = 13 / 5
    MsgBox x  ' Displays 3 due to rounding
End Sub
Integer Division (\ Operator)
Integer division is performed in two steps:
- Both the dividend and divisor are individually rounded.
- The rounded numbers are divided.
- The fractional part (digits after the decimal point) is discarded (truncated).
Excel has no direct equivalent for this operator.
Examples:
Expression Result 19 / 4 4.75 19 \ 4 4 19 \ 4.6 3 19.5 \ 4.2 5 Modulo Operator (Mod)
The Mod operator returns the remainder of a division. The calculation is done in two steps:
- Dividend and divisor are individually rounded.
- The remainder of the integer division is returned.
Excel provides the REST() function, which calculates the remainder without rounding. For example, REST(19.5; 3.2) returns 0.3 instead of 2.
Examples:
Expression Result 19 Mod 4 3 19.5 Mod 3.2 2 Exponentiation (^ Operator)
Exponentiation uses the ^ operator in both Excel and VBA. The function POTENZ() also exists and produces the same results.
Examples:
Expression Result 2 ^ 5 32 3 ^ 2 ^ 3 729 2 ^ 5.4 42.2242531447326 -2 ^ 5 -32 Example Procedure Using Arithmetic Operators
The following VBA procedure demonstrates the use of several arithmetic operators:
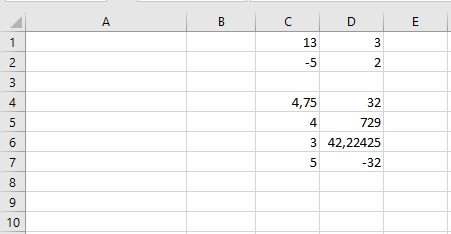
Sub ArithmeticOperators()
    ThisWorkbook.Worksheets("Sheet1").Activate
    ' Basic arithmetic
    Range("C1").Value = 5 * 3 - 6 / 3
    Range("C2").Value = 5 * (3 - 6) / 3
    ' Integer division
    Range("C4").Value = 19 / 4
    Range("C5").Value = 19 \ 4
    Range("C6").Value = 19 \ 4.6
    Range("C7").Value = 19.5 \ 4.2
    ' Modulo operator
    Range("D1").Value = 19 Mod 4
    Range("D2").Value = 19.5 Mod 3.2
    ' Exponentiation
    Range("D4").Value = 2 ^ 5
    Range("D5").Value = 3 ^ 2 ^ 3
    Range("D6").Value = 2 ^ 5.4
    Range("D7").Value = -2 ^ 5
End Sub
Operator Precedence and Associativity
- Multiplication and division have the same precedence and are evaluated from left to right as they appear in an expression.
- The same applies to addition and subtraction.
- Parentheses can override this precedence, forcing specific subexpressions to be evaluated first.
- Operations inside parentheses follow the normal precedence rules again.