Votre panier est actuellement vide !
Catégorie : Excel VBA Course
Dynamic Arrays In Excel VBA
If the number of variables to be stored in an array is unknown at the start of the program, you can use dynamic arrays. These arrays allow their size to be changed during runtime, which is especially useful when processing a large and unknown amount of data (e.g., reading from a text file) and displaying it in a worksheet.
Resizing Dynamic Arrays with ReDim and Preserve:
- The array size can be changed multiple times using the ReDim statement.
- Using Preserve keeps the existing data intact while resizing.
- Without Preserve, resizing will clear all existing data.
Example:
Sub DynamicArrayExample()
    Dim T() As Integer
    Dim i As Integer
    ThisWorkbook.Worksheets("Sheet1").Activate
    Randomize
    ' Initial size
    ReDim T(1 To 3)
    For i = 1 To 3
        T(i) = Rnd * 10 + 20
        Cells(i, 5).Value = T(i)
    Next i
  ' Increase size with Preserve
    ReDim Preserve T(1 To 6)
    For i = 4 To 6
        T(i) = Rnd * 10 + 20
    Next i
    For i = 1 To 6
        Cells(i, 6).Value = T(i)
    Next i
    ' Increase size without Preserve
    ReDim T(1 To 9)
    For i = 7 To 9
        T(i) = Rnd * 10 + 20
    Next i
    For i = 1 To 9
        Cells(i, 7).Value = T(i)
    Next i
End Sub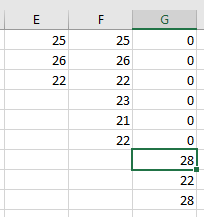
Explanation:
- The array T is initially declared without size.
- ReDim sets its size to 3; the first three elements are assigned random values and output in column 5.
- The array is resized to 6 elements with Preserve; new elements 4 to 6 get values, and the entire array (elements 1 to 6) is output in column 6. Existing values are retained.
- Finally, the array is resized to 9 elements without Preserve; elements 7 to 9 get new values, but elements 1 to 6 lose their previous values (reset to 0), and the full array is output in column 7.
VBA Array() Function
The Array() function creates a one-dimensional array of type Variant that can hold values of different data types and even objects.
Example:
Sub ArrayFunctionExample()
    Dim T() As Variant
    T = Array(2, -14, 3.5, "abc", Range("A2"))
    MsgBox T(2)  ' Displays 3.5, the third element
End Sub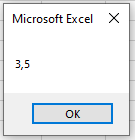
Notes:
- The array created by Array() must be declared as type Variant.
- Using Variant arrays is generally discouraged because they require more memory and offer less type safety, but they are useful for heterogeneous data collections.
Multidimensional Arrays In Excel VBA
If you have not only seven temperature values to store but also measurements taken at three different locations, a two-dimensional array is suitable.
Elements of such an array are addressed via two indices:
- The first index represents the measurement number.
- The second index represents the location where the measurement was taken.
The following procedure demonstrates this, displaying the values for each location in separate columns:
Sub MultiDimensionalArray()
    Dim T(1 To 7, 1 To 3) As Integer
    Dim i As Integer, k As Integer
    ThisWorkbook.Worksheets("Sheet1").Activate
    Randomize
    For i = 1 To 7
        For k = 1 To 3
            T(i, k) = Rnd * 10 + 20
            Cells(i, k).Value = T(i, k)
        Next k
    Next i
End Sub
Explanation:
- The statement Dim T(1 To 7, 1 To 3) As Integer declares a two-dimensional array with 7 rows and 3 columns of type Integer. Both indices start at 1.
- The procedure uses two nested For loops:
- The outer loop variable i runs from 1 to 7 (measurement number).
- The inner loop variable k runs from 1 to 3 (location index).
- The inner loop completes its full cycle for each single iteration of the outer loop, allowing access to all 21 elements.
- Each element T(i, k) is assigned a random value between 20 and 30.
- The entire array is displayed on the worksheet, with each location’s measurements in its own column.
Extending to Higher Dimensions:
- If you have 7 measurements per day at 3 locations for 31 days, you need a 3-dimensional array:
- Dim T(1 To 7, 1 To 3, 1 To 31) As Integer ‘ Or better, As Single
This array has 7 × 3 × 31 elements.
- Further, if you measure not only temperature but also wind direction, wind speed, and humidity, you would need a 4-dimensional array:
- Dim T(1 To 7, 1 To 3, 1 To 31, 1 To 4) As Single
- Arrays provide great flexibility to store and process large amounts of data temporarily during execution.
Persistent Storage Note:
For permanent storage, you need to save data to files (see Section 9.2, Simple Text Files) or better, databases.
Sorting an Array In Excel VBA
The following procedure fills a one-dimensional static integer array with values, sorts it using the popular and relatively efficient Bubble Sort algorithm, and then outputs the sorted array:
Sub SortArray()
    Dim T(1 To 7) As Integer
    Dim i As Integer
    Dim Swapped As Boolean
    Dim Temp As Integer
    ThisWorkbook.Worksheets("Sheet1").Activate
    Randomize
    ' Fill the array with random values
    For i = 1 To 7
        T(i) = Rnd * 10 + 20
    Next i
    ' Sort the array using Bubble Sort
    Do
        Swapped = False
        For i = 1 To 6
            If T(i) > T(i + 1) Then
                Temp = T(i)
                T(i) = T(i + 1)
                T(i + 1) = Temp
                Swapped = True
            End If
        Next i
    Loop While Swapped
    ' Output the sorted array
    For i = 1 To 7
        Cells(i, 1).Value = T(i)
    Next i
End Sub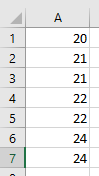
Explanation:
- The Bubble Sort algorithm repeatedly traverses the array from the first to the penultimate element.
- Each element is compared to its immediate next element.
- If two adjacent elements are out of order (in this case, if the current element is greater than the next), they are swapped using a temporary variable.
- This causes smaller elements to « bubble up » toward the start of the array, like air bubbles rising in water—hence the name.
- Here the sorting is ascending, so smaller values rise to the top.
- To sort in descending order, simply change the condition in the If statement to T(i) < T(i + 1).
- When a full pass through the array completes with no swaps, the boolean variable Swapped remains False and the loop ends, indicating the array is sorted.
One-Dimensional Arrays In Excel VBA
The following procedure stores seven temperature measurement values in a one-dimensional static array of type Integer. For better visualization, the values are then output into worksheet cells:
Sub OneDimensionalArray()
    Dim T(1 To 7) As Integer
    Dim i As Integer
    ThisWorkbook.Worksheets("Sheet1").Activate
    Randomize
    For i = 1 To 7
        T(i) = Rnd * 10 + 20     ' Generates values between 20 and 30
        Cells(i, 1).Value = T(i)
    Next i
End Sub
Explanation:
- Values are generated by a random number generator, initialized with Randomize.
- The statement Dim T(1 To 7) As Integer declares a one-dimensional array with seven elements.
- Each element acts like an individual Integer variable.
- Arrays can be declared for any known data type.
- Each element is distinguished by an index, which runs from 1 to 7 in this case.
- Elements are accessed via the syntax T(i) inside a For loop where i is the loop variable.
- The array elements are displayed vertically in cells.
Important Notes:
- Using Dim T(7) As Integer would declare an array with eight elements indexed from 0 to 7 by default.
- To start the array index at 1 by default, you can include Option Base 1 at the top of the module.
- Then Dim T(7) As Integer declares an array with seven elements indexed 1 through 7.
Variable Scopes In Excel VBA
Variables should preferably be declared as local, i.e., within a procedure, so that each procedure can work as independently as possible from others. However, there are situations where variables must be declared with broader scopes.
Types of Scopes:
- Local variables:
Declared inside a procedure (using Dim), these variables are only valid within that procedure. Outside the procedure, neither their name nor value is known. After the procedure finishes, their values are lost. Each time the procedure is called, the variables are newly declared and initialized. - Static variables:
Declared inside a procedure with the keyword Static instead of Dim. They are also only valid inside the procedure, but retain their values between calls to the procedure. - Module-level variables:
Declared at the top of a module (above all procedures) with Dim. These variables are valid throughout the entire module. Their values persist for the duration of the project and can be accessed or modified by any procedure within the module. - Project-level variables:
Declared at the top of a module with Public. These variables are valid throughout the entire VBA project. Their values can be accessed or modified by any procedure in any module during the project runtime.
Naming Conflicts and Shadowing:
- Local or static variables with the same name in the same procedure are not allowed.
- A module-level variable is hidden inside a procedure by a local variable with the same name.
- A project-level variable is hidden inside a module by a module-level or local variable with the same name.
Example: Different Scopes in Practice
Content of Module1:
Option Explicit
Public Px As Integer          ' Project-level variable
Dim Mx As Integer             ' Module-level variable
Sub Scope1()
    Static Sx As Integer      ' Static variable local to this procedure
    Dim Lx As Integer         ' Local variable
    Px = Px + 10
    Mx = Mx + 10
    Sx = Sx + 10
    Lx = Lx + 10
    MsgBox "Project-level Px = " & Px & vbCrLf & _
           "Module-level Mx = " & Mx & vbCrLf & _
           "Static Sx = " & Sx & vbCrLf & _
           "Local Lx = " & Lx
End Sub
Sub Scope2()
    Px = Px + 1
    Mx = Mx + 1
    MsgBox "Project-level Px = " & Px & vbCrLf & _
           "Module-level Mx = " & Mx
End Sub
Sub Scope3()
    Dim Mx As Integer
    Mx = Mx + 1
    MsgBox "Local Mx = " & Mx
End Sub
Content of Module2:
Sub Scope4()
    Px = Px + 5
    MsgBox "Project-level Px = " & Px
End Sub
Explanation:
- Px is project-level, accessible and modifiable from any module or procedure. Its value depends on how often and in what order procedures are called.
- Mx is module-level in Module1, accessible and modifiable by procedures within Module1 only. In Module2, it is unknown.
- In Scope3, the local variable Mx hides the module-level Mx.
- Lx is local to Scope1, recreated with each call, initialized to zero and incremented to 10.
- Sx is static local to Scope1, retains its value between calls, but is unknown outside that procedure.
Best Practices:
- Declare variables as local and non-static whenever possible to avoid unexpected dependencies on procedure call order.
- When broader scopes are necessary, ensure your program flow enforces a clear sequence .
Scope Rules for Constants and Enumerations:
- These same scope rules apply to constants and enumerations.
- Use Public Const for project-wide constants.
- Use Public Enum to define project-wide enumerations.
- Local variables:
Breakpoints In Excel VBA
If stepping through a program line-by-line takes too long, you can use breakpoints to pause execution at a specific point. The program runs normally until it reaches a breakpoint, where it pauses and allows you to inspect the state.
Set a breakpoint near where you suspect the origin of an error.
How to Set a Breakpoint:
- Place the cursor on the line where you want the program to pause.
- Select Debug > Toggle Breakpoint from the menu or press F9.
- A breakpoint is set on the current line.
Running with Breakpoints:
- Start the program by pressing F5 (Run).
- Execution continues until the program reaches the breakpoint and pauses before executing that line.
- From this point, you can resume stepping through the code line-by-line using F8, and inspect variable values as previously described.
Managing Breakpoints:
- You can set multiple breakpoints in your code.
- To remove a breakpoint, place the cursor on its line and press F9 again.
- You can also remove all breakpoints at once via Debug > Delete All Breakpoints.
- Alternatively, click in the gray margin (gutter) to the left of the code line to toggle a breakpoint on or off.
Single-Step Debugging In Excel VBA
You can run a program in single-step mode to examine the current contents of variables and controls after each individual instruction. As an example, consider the previously discussed procedure OnErrorInstruction(). For the first debug run, ensure cells contain the numbers 12 and 3.
Sub OnErrorInstruction()
    Dim x As Integer, y As Integer, z As Integer
    ThisWorkbook.Worksheets("Sheet1").Activate
    On Error GoTo Error  ' Set error handler
    x = Range("A1").Value
    y = Range("A2").Value
    z = x / y
    Range("A3").Value = z
    Range("A4").Value = "Done"
    Exit Sub  ' Exit before error handler
Error:  ' Error handler label
    MsgBox Err.Description
    Resume Next  ' Continue execution with next statement
End Sub
Starting Single-Step Debugging:
- In the VBA Editor (VBE), select the menu Debug > Step Into or press F8.
- A yellow arrow marks the current line where execution is paused, highlighted in yellow. The program waits here for your next action.
Observing Variables:
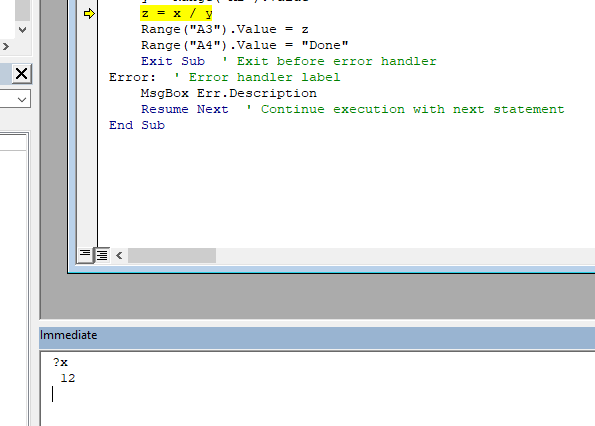
After stepping through several lines (using F8 repeatedly), you will arrive at a specific line, such as shown in
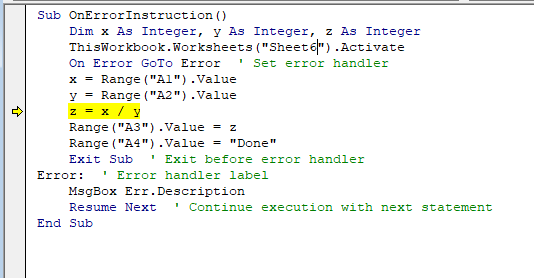
, where the arrow points.
- Hover the cursor over a variable (e.g., x) to see its current value (e.g., 12 for x).
- You will also notice that variable z still has the value 0 because the highlighted statement has not executed yet.
- After the next step, variable z will update to 4.
Using the Immediate Window:
You can also inspect variable values in the Immediate Window, accessible via View > Immediate Window.
- Type ?VariableName and press Enter to see the current value .
Observing Worksheet Changes:
Alongside variables, you can watch how worksheet cells change after each single step. Changes only appear after the respective line in the code executes.
Benefits:
This simple example demonstrates how single-step debugging lets you follow the program execution step-by-step, making it easier to locate the source of logical errors.
Second Debug Run with Error:
For the second debug run, set the cell values to 12 and the text « abc ».
- While stepping through the code, you will clearly see the program jump twice to the error handler:
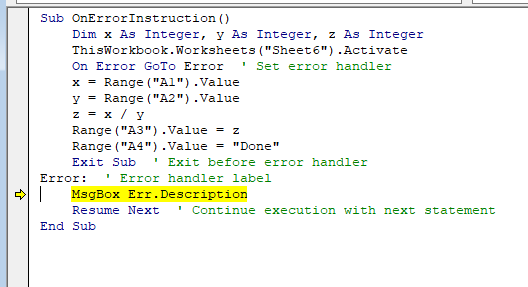
-
- When assigning the text « abc » to the numeric variable y.
- When performing the division.
After each jump, the procedure continues after handling the error.
Catching Runtime Errors: The On Error Statement In Excel VBA
The procedure OnErrorInstruction() is an improved version of the previous RuntimeError() procedure, featuring error handling:
Sub OnErrorInstruction()
    Dim x As Integer, y As Integer, z As Integer
    ThisWorkbook.Worksheets("Sheet1").Activate
    On Error GoTo Error  ' Set error handler
    x = Range("A1").Value
    y = Range("A2").Value
    z = x / y
    Range("A3").Value = z
    Range("A4").Value = "Done"
    Exit Sub  ' Exit before error handler
Error:  ' Error handler label
    MsgBox Err.Description
    Resume Next  ' Continue execution with next statement
End Sub
The output in the case of 12 and 0 ist:
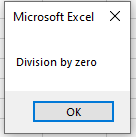
Explanation:
- The statement On Error GoTo Fehler instructs VBA to jump to the line labeled Fehler: if a runtime error occurs anywhere in the procedure.
- The label Fehler: is defined by the name followed by a colon.
- When an error happens, the Err object is populated with information about the error.
- You can display Err.Description to show the error message in a message box.
- Unlike the previous example, the program does not terminate upon encountering the error and continues running.
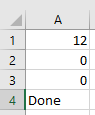
Additional Details:
- The statement Exit Sub is used to exit the procedure early, so the error handler code is not executed unless an error occurs. Without it, the code after the label Fehler: would always run, even if no error happened.
- The statement Resume Next causes execution to continue with the statement immediately after the one that caused the error.
Example of cascading errors:
- If cell A2 contains the text « abc », the first error is a Type Mismatch because the text cannot be assigned to the integer variable y. The error message appears, but due to Resume Next, the program continues with the next line.
- Since y retains its default value of 0, the subsequent division triggers a Division by Zero error, which is also caught and displayed.
Program with Runtime Errors In Excel VBA
The following procedure causes a runtime error. It divides the value in cell A1 by the value in cell A2, and outputs the result in cell A3:
Sub RuntimeError()
    Dim x As Integer, y As Integer, z As Integer
    ThisWorkbook.Worksheets("Sheet6").Activate
    x = Range("A1").Value
    y = Range("A2").Value
    z = x / y
    Range("A3").Value = z
    Range("A4").Value = "Done"
End Sub
Normal case:
If cells A1 and A2 contain the numbers 12 and 3, respectively, the result appears as expected .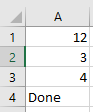
Runtime error case:
If cells A1 and A2 contain 12 and 0, the program crashes with a runtime error. Neither the result nor the text « Done » is output. Instead, a dialog box appears with an error message.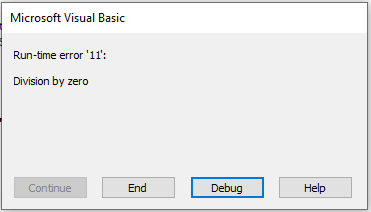
You can choose to either End or Debug. Clicking Debug highlights the line causing the error . In this case, it is the line:
z = x / y
where the division by zero occurs. This helps you locate and fix the problem.
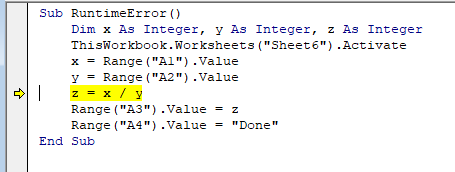
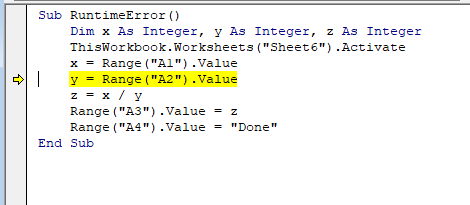
Type mismatch error:
If cells A1 and A2 contain 12 and the text « abc », the program crashes with a different error message .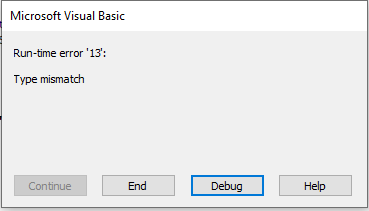
Clicking Debug highlights the line:
y = Range(« A2 »).Value
. This happens because assigning the text « abc » to the integer variable y is incompatible.
After an error occurs:
- Make sure to stop debugging if it hasn’t been stopped yet.
- If debugging is still active, some options and information will not be available, and restarting the program won’t be possible.
- You can stop debugging by selecting Run > Reset in the VBA editor menu or by clicking the corresponding reset button in the toolbar.
Developing an Application In Excel VBA
When developing your own applications with VBA and Excel, it is best to proceed step-by-step, especially if your application consists of more than just a few lines of code in a single procedure.
Start by planning on paper:
Consider how the entire application should be structured. Break it down into parts or modules to be developed sequentially. Avoid the common mistake of trying to write the entire complex application all at once—this often leads to confusion and errors, especially for beginners (and sometimes even advanced programmers).Build incrementally:
- First, write a simple version of the initial part of your application.
- Test this part thoroughly.
- Only after successful testing, add the next part.
- After each addition, test again.
- If an error appears, you will know it arose from the latest change.
By following this process, you will gradually create a basic version of your entire application.
Add complexity gradually:
Next, begin refining parts of your application by making them more complex, step by step, until your application fully matches your original design on paper.Adapt as needed:
Sometimes practical programming reveals the need for adjustments to your initial design. This is normal, as long as the overall structure remains intact. If the structure must change significantly, take a moment to revise your design on paper. This does not mean deleting all your work, but rather making necessary modifications and reorganizing parts.Write clear and readable code:
If you find yourself trying to perform three or four steps at once, split them into individual statements executed sequentially. This makes debugging easier.Facilitate future maintenance:
Clear code structure helps both you and others who might want to modify or expand your application later, making it easier to understand and work with.Use debugging aids:
- Use the MsgBox() function to check values and identify logical errors during development.
- Comment out sections of your code to isolate and identify which parts work correctly and which contain errors.