Votre panier est actuellement vide !
Étiquette : macro_modal_windows
Starting the Vocabulary Test in Excel VBA
In Module1, you will find the procedure
VocabularyTest(). It contains the entire test workflow: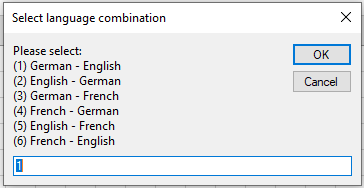
Vocabulary Test Procedure (English version)
Sub VocabularyTest()
    ' Define variables
    Dim UserInput As String
    Dim LanguageCombo As Integer
    Dim Language1 As String
    Dim Language2 As String
    Dim Vocab1 As New Collection
    Dim Vocab2 As New Collection
    Dim RowIndex As Integer, Col1 As Integer, Col2 As Integer
    Dim RandomIndex As Integer
    Dim Feedback As String
    Dim PromptText As String
    Dim TestEnd As Boolean
    ' Select language combination
    Do
        UserInput = InputBox( _
            "Please select:" & vbCrLf & _
            "(1) German - English" & vbCrLf & _
            "(2) English - German" & vbCrLf & _
            "(3) German - French" & vbCrLf & _
            "(4) French - German" & vbCrLf & _
            "(5) English - French" & vbCrLf & _
            "(6) French - English", _
            "Select language combination", 1)
        If IsNumeric(UserInput) Then
            LanguageCombo = Val(UserInput)
        Else
            LanguageCombo = 0
        End If
    Loop Until LanguageCombo >= 1 And LanguageCombo <= 6
    ' Set source and target languages based on selection
    Select Case LanguageCombo
        Case 1
            Language1 = "German"
            Language2 = "English"
            Col1 = 1
            Col2 = 2
        Case 2
            Language1 = "English"
            Language2 = "German"
            Col1 = 2
            Col2 = 1
        Case 3
            Language1 = "German"
            Language2 = "French"
            Col1 = 1
            Col2 = 3
        Case 4
            Language1 = "French"
            Language2 = "German"
            Col1 = 3
            Col2 = 1
        Case 5
            Language1 = "English"
            Language2 = "French"
            Col1 = 2
            Col2 = 3
        Case 6
            Language1 = "French"
            Language2 = "English"
            Col1 = 3
            Col2 = 2
    End Select
    ' Initialization
    ThisWorkbook.Worksheets("Sheet2").Activate
    TestEnd = False
    Feedback = ""
    ' Load vocabulary into collections
    RowIndex = 2
    Do While Cells(RowIndex, Col1).Value <> ""
        Vocab1.Add Cells(RowIndex, Col1).Value
        Vocab2.Add Cells(RowIndex, Col2).Value
        RowIndex = RowIndex + 1
    Loop
    ThisWorkbook.Worksheets("Sheet1").Activate
    ' Begin test loop
    Do
        ' Get random index within collection size
        RandomIndex = WorksheetFunction.RoundUp(Rnd * Vocab1.Count, 0)
        ' Prepare previous question's feedback
        If Feedback <> "" Then
            PromptText = Feedback & vbCrLf
        Else
            PromptText = ""
        End If
        ' Compose question text
        PromptText = PromptText & _
            "Remaining " & Vocab1.Count & " vocabulary items " & _
            "(Abort with '0')" & vbCrLf & vbCrLf & _
            Language1 & ": " & Vocab1(RandomIndex) & vbCrLf & _
            Language2 & ": "
        UserInput = InputBox(PromptText, "Enter your answer")
        ' Evaluate response
        If UserInput = Vocab2(RandomIndex) Then
            Feedback = "Correct"
            Vocab1.Remove RandomIndex
            Vocab2.Remove RandomIndex
            ' Test complete if no vocabulary left
            If Vocab1.Count < 1 Then
                MsgBox "Test successfully completed"
                TestEnd = True
            End If
        ElseIf UserInput = "0" Then
            MsgBox "Test aborted"
            TestEnd = True
        Else
            Feedback = "Incorrect. The correct answer is: " & Vocab2(RandomIndex)
        End If
    Loop Until TestEnd
End Sub
Explanation of Variables and Workflow (English)
- UserInput: Stores the user’s input string.
- LanguageCombo: Stores the selected language combination number (1 to 6).
- Language1 and Language2: StorQSSDe the names of the source and target languages, respectively.
- Vocab1 and Vocab2: Collections that hold vocabulary words from the chosen source and target languages. When a correct answer is given, the corresponding pair is removed from both collections. The test ends when both are empty.
- RowIndex, Col1, and Col2: Used to read vocabulary from the second worksheet.
- RandomIndex: Stores a randomly generated index to select the current vocabulary pair.
- Feedback: Stores feedback such as « Correct » or « Incorrect… » messages.
- PromptText: Holds the complete prompt text shown in the input box, including any previous feedback.
- TestEnd: Boolean flag to indicate when the test ends (either success or abort).
Workflow:
- The user is repeatedly prompted to select a language combination until they enter a valid number between 1 and 6.
- Based on the selection, source and target language names and their corresponding column numbers in the vocabulary worksheet are set.
- The vocabulary worksheet (« Sheet2 ») is activated, and vocabulary pairs are loaded into two collections by reading rows until an empty cell is found.
- The main worksheet (« Sheet1 ») is reactivated to prevent the user from seeing the vocabulary list.
- The test loop starts:
- A random vocabulary pair is selected.
- Any previous feedback is added to the question prompt.
- The user is asked to translate the displayed word.
- If the answer is correct, the pair is removed.
- If no vocabulary remains, a success message is displayed and the test ends.
- If the user enters « 0 », the test aborts.
- If incorrect, feedback is shown and the question will be asked again later.
RefEdit and Toggle Button in Excel VBA
The RefEdit control is used to allow the user to select a cell range from a worksheet. It works similarly to the Application.InputBox() function with the Type parameter set to request a range, but unlike the InputBox, RefEdit is embedded in a UserForm and combined with other controls.
Cell ranges can be entered either by typing directly into the RefEdit box or by selecting the range with the mouse.
Mouse selection is only possible if the cursor is first inside the RefEdit control, as shown in Figure 10.20. After clicking on the worksheet to select a range, the entire dialog box shrinks so that only the RefEdit control remains visible, as illustrated in Figure.

A toggle button is used to switch between or display two possible states. Its most important property is Value, which can be either True or False.
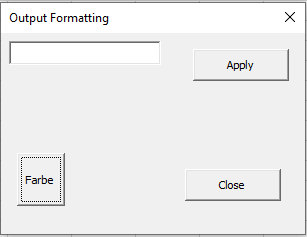
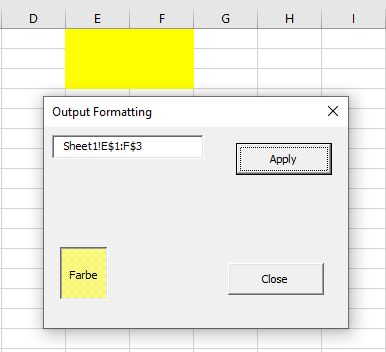
In the following example from the UserForm module frmRefEdit, both controls are used to either highlight or clear the fill color of the selected cell range, as shown in Figure.
Program code:
Private Sub tglFarbe_Click()
    If tglFarbe.Value Then
        tglFarbe.BackColor = vbYellow
    Else
        tglFarbe.BackColor = vbWhite
    End If
End Sub
Private Sub cmdUebertragen_Click()
    On Error GoTo Fehler
    If tglFarbe.Value Then
        Range(rfeZellbereich.Value).Interior.Color = vbYellow
    Else
        Range(rfeZellbereich.Value).Interior.Pattern = xlNone
    End If
    Exit Sub
Fehler:
    MsgBox "No range was selected"
End Sub
Private Sub cmdEnde_Click()
    Unload Me
End Sub
Explanation:
- Clicking the toggle button switches its Value property between True and False. To make the state visually clearer, the toggle button’s background color also changes accordingly: yellow when active (pressed) and white when inactive.
- Clicking the TRANSFER command button applies the yellow fill color to the selected cell range if the toggle button is on, or clears the fill pattern if it is off.
- Since the user can enter text that does not represent a valid cell range into the RefEdit control, error handling with On Error is used to catch such cases and display a message box informing the user that no valid range was selected.
Output Formatting in Excel VBA
When outputting to controls within custom dialog boxes, this function offers additional benefits.
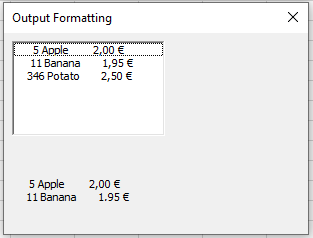
Below is a dialog box example from the UserForm module frmAusgabeformat where a small table is displayed both in a list box and in a label control.
For both controls, the Font property is initially set to Courier New. This is a monospaced font, meaning each character occupies the same width. This uniform spacing is important for tabular formatting.
Additionally, the label control’s SpecialEffect property is set to 2 (fmSpecialEffectSunken), which creates a slightly sunken (3D) appearance to make the label visually distinct.
Application code:
Private Sub UserForm_Initialize()
    Dim ID(1 To 3) As Integer
    Dim Product(1 To 3) As String
    Dim Price(1 To 3) As Single
    Dim Line As String
    Dim i As Integer
    ' Initialize arrays
    ID(1) = 5
    ID(2) = 11
    ID(3) = 346
    Product(1) = "Apple"
    Product(2) = "Banana"
    Product(3) = "Potato"
    Price(1) = 2
    Price(2) = 1.95
    Price(3) = 2.5
    For i = 1 To 3
        ' Compose formatted output line
        Line = Format(ID(i), "@@@@") & " " & _
               Format(Product(i), "!@@@@@@@@@@@@") & _
               Format(Format(Price(i), "0.00 €"), "@@@@@@@")

        ' Add line to list box and label caption
        lstTable.AddItem Line
        lblTable.Caption = lblTable.Caption & Line & vbCrLf
    Next i
End Sub
Result:
Explanation:
First, three arrays of types Integer, String, and Single are declared and populated with values.
The corresponding elements from these arrays are concatenated into a formatted string.
This string is added both to the list box and to the label control.
- The formatting string @@@@ ensures the integer number is output right-aligned with a fixed width of 4 characters (@ represents one character placeholder).
- Using the exclamation mark ! causes left-aligned output. In this case, the formatting string !@@@@@@@@@@@@ outputs the string left-aligned with a fixed width of 12 characters.
- A nested use of the Format() function is applied for the price: the inner format « 0.00 € » converts the number into a string with two decimal places followed by the euro symbol.
- The outer Format() ensures this string is right-aligned with a fixed width of 7 characters using the format string @@@@@@@.
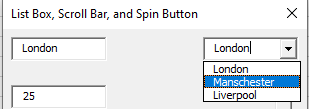
List Box, Scroll Bar, and Spin Button in Excel VBA
A list box allows the user to select an item from a list. A combo box (as discussed in this section) combines a list box and a text box, enabling the user to either select from the list or enter text manually.
If you set the combo box’s Style property to 2 (which corresponds to fmStyleDropDownList), it behaves like a standard Windows list box with a simple dropdown arrow to expand the list.
Both the scroll bar (ScrollBar) and the spin button (SpinButton) controls serve to adjust numeric values within a defined range. Their functionality is similar, but scroll bars offer a more visible and comfortable interface.
The key event for all these controls is the Change event, which triggers when the selection or value is changed.
In the following example from the UserForm module frmListe, the three mentioned controls are demonstrated side-by-side with corresponding text boxes that display the current selected or set value, as shown in Figure 10.15.

All three text boxes have their Locked property set to True, preventing direct user input and ensuring they can only be changed programmatically. For better visual distinction, the background color (BackColor) of these text boxes is set to gray.
Program code for the dialog:
Private Sub UserForm_Initialize()
    cmbStadt.AddItem "Berlin"
    cmbStadt.AddItem "Hamburg"
    cmbStadt.AddItem "Munich"
    cmbStadt.ListIndex = 0
End Sub
Private Sub cmbStadt_Change()
    txtStadt.Text = cmbStadt.Text
End Sub
Private Sub scrZahl1_Change()
    txtZahl1.Text = scrZahl1.Value
End Sub
Private Sub spnZahl2_Change()
    txtZahl2.Text = spnZahl2.Value
End Sub
Private Sub cmdEnde_Click()
    Unload Me
End Sub
Explanation of the combo box cmbStadt:
The Style property of the combo box is manually set at design time to 2 (fmStyleDropDownList) in the Properties window, which makes it look like a standard dropdown list with a simple arrow.
When the dialog box initializes, the combo box is populated with entries using the method .AddItem().
Entries in a list box or combo box are zero-based indexed. You can access a specific entry via the .List(Index) property.
The first entry is selected by setting .ListIndex = 0. This property always reflects the current selection’s zero-based index.
When the Change event fires, the associated event procedure runs.
The .Text property always contains the text of the current selection in the combo box. This value is assigned to the linked text box.
Explanation of the scroll bar scrNumber1:
The scroll bar is oriented horizontally to allow setting values between 1 and 100, initially positioned at 50.
- Clicking the small arrow buttons changes the value by 1 (SmallChange property).
- Clicking the bar area between the arrows changes the value by 10 (LargeChange property).
At design time, the following properties are set:
- Orientation = 1 (fmOrientationHorizontal)
- Min = 1
- Max = 100
- Value = 50
- SmallChange = 1
- LargeChange = 10
When the Change event occurs, the corresponding event procedure runs, updating the linked text box’s value.
The .Value property always reflects the current value of the scroll bar.
Explanation of the spin button scrNumber2 :
Properties and event procedures for the spin button are set similarly to the scroll bar.
However, the spin button only has a SmallChange property (no LargeChange) because of its different user interface.
It is oriented vertically with the property:
- Orientation = 0 (fmOrientationVertical)
Option Buttons and Check Boxes in Excel VBA
Option buttons (also known as radio buttons) allow the user to select one choice from a group of multiple options. The user can toggle between the option buttons within the same group, but only one option can be selected at a time. If your dialog requires multiple independent groups of option buttons, it is recommended to use frames to visually and functionally group them.
A check box represents a binary choice, typically between two states such as On or Off, or for example, Color or Black & White.
In the following example from the UserForm module frmAuswahl, two frames are displayed, each containing three option buttons. Additionally, there are two check boxes and two command buttons.
The recommended order for creating this form is:
- Insert the first frame.
- Set the size and position of the frame.
- Insert one option button inside the frame.
- Set the size and position of this option button.
- Copy the option button twice within the frame to create three option buttons in total.
After this, the form should look like the one.
- Copy the entire frame (including its three option buttons).
- Position the second frame appropriately.
- Create and arrange the remaining controls.
- Set the property values.
- Enter property values for all controls, especially Name and Caption.
Explanation:
The dialog box is designed to allow the user to set properties of a worksheet cell.
- The first group of option buttons lets the user choose the font color.
- The second group lets the user choose the font size.
- The two check boxes let the user decide whether the cell should have a border and/or a pattern fill.
Within each group of option buttons, one option should be pre-selected to avoid an undefined state. You can set this default selection either through the Properties Window or by code.
It is recommended to synchronize the initial state of both the worksheet cell and the dialog box.
The UserForm_Initialize event is a good place to set these initial values:
Option Explicit
Dim Rg As Range
Private Sub UserForm_Initialize()
    Set Rg = ThisWorkbook.Worksheets("Sheet1").Range("B2")
    Rg.Value = "Hello"
    Rg.Font.Color = vbRed
    Rg.Font.Size = 13
    Rg.Borders.LineStyle = xlDouble
    Rg.Interior.Color = xlColorIndexNone
    optRed.Value = True
    opt13.Value = True
    chkBorder.Value = True
End Sub
Explanation:
- The variable Rg of type Range is declared at the module level.
- Inside the UserForm_Initialize procedure, Rg is assigned to cell B2 on the first worksheet.
- The cell receives a value, font color, font size, border style, and interior color (pattern).
- Corresponding control settings are updated accordingly: the option buttons and check boxes use the Value property (True for selected/on, False for unselected/off).
Code for the command button « TRANSFER » that applies the user’s selections to the worksheet cell:
Private Sub cmdTransfer_Click()
    If optRed.Value Then
        Rg.Font.Color = vbRed
    ElseIf optYellow.Value Then
        Rg.Font.Color = vbYellow
    Else
        Rg.Font.Color = vbGreen
    End If
    If opt10.Value Then
        Rg.Font.Size = 10
    ElseIf opt13.Value Then
        Rg.Font.Size = 13
    Else
        Rg.Font.Size = 16
    End If
    If chkBorder.Value Then
        Rg.Borders.LineStyle = xlDouble
    Else
        Rg.Borders.LineStyle = xlLineStyleNone
    End If
    If chkPattern.Value Then
        Rg.Interior.Color = vbBlue
    Else
        Rg.Interior.Color = xlColorIndexNone
    End If
End Sub
Explanation:
- Since the Value property of option buttons and check boxes is a Boolean, it can be used directly in conditional statements without explicit comparison to True.
- The font color and font size are set via multiple conditional branches checking the selected option button.
- The border and pattern fill are set using simple conditional checks on the respective check boxes.
Code for the command button « END » to release the Range object and close the dialog:
Private Sub cmdEnd_Click()
    Set Rg = Nothing
    Unload Me
End Sub
Text Boxes and Label Controls in Excel VBA
Text boxes are used to input text or numeric values. Label controls (commonly called labels) display captions, which are usually text or numbers shown to the user but not editable by them.
In the following example from the UserForm module frmText, there are three labels, three text boxes, and three command buttons.
- The first two text boxes allow the user to enter two numbers.
- The sum of these two numbers is displayed in the third text box when the first command button is clicked.
- When the second command button is pressed, the same sum is written to a worksheet cell.
- The third command button is used to close the application.
The three labels are named lblZahl1, lblZahl2, and lblErgebnis. The three text boxes are named accordingly: txtNumber1, txtNumber2, and txtResult.

Code for the first command button’s event procedure:
Private Sub cmdTextBox_Click()
    If Not IsNumeric(txtNumber1.Text) Or _
       Not IsNumeric(txtNumber2.Text) Then
        MsgBox "Please enter numbers"
    Else
        txtResult.Text = CDbl(txtNumber1.Text) + CDbl(txtNumber2.Text)
    End If
End Sub
Explanation:
The Text property of a text box contains the string entered by the user.First, the VBA function IsNumeric() checks whether the content of both text boxes can be converted into numeric values.
If both entries are numeric, they are converted from strings to numbers using the CDbl() function. The two numbers are then added together.
This approach allows users to input numbers naturally, including decimal numbers separated by a decimal comma.
The result is displayed in the third text box.
Code for the second command button’s event procedure (output to worksheet):
Private Sub cmdTabellenblatt_Click()
    If Not IsNumeric(txtNumber1.Text) Or _
       Not IsNumeric(txtNumber2.Text) Then
        MsgBox "Please enter numbers"
    Else
        ThisWorkbook.Worksheets("Sheet1").Range("A1").Value = _
            CDbl(txtNumber1.Text) + CDbl(txtNumber2.Text)
    End If
End Sub
Explanation:
Again, the text boxes are checked to ensure valid numeric input.The sum is then transferred to cell A1 on the first worksheet of the workbook.
Note:
Remember that values entered in dialog boxes are lost after the dialog is closed and unloaded. Therefore, data must be transferred to the worksheet before closing the dialog.Working with Controls in Excel VBA
The size and position of controls can be easily adjusted using the mouse. When you do this, the following properties change accordingly:
- Width: the width of the control
- Height: the height of the control
- Left: the distance from the left edge of the container (e.g., the UserForm)
- Top: the distance from the top edge of the container
Alternatively, you can modify the size and position by entering exact values directly in the Properties Window.
To achieve a uniform size or consistent alignment of multiple controls, you can use the various commands available under the FORMAT menu. However, before using these commands, you need to select at least two controls simultaneously. This is done by clicking the controls one by one while holding down the Ctrl key.
Controls can also be copied and pasted using familiar keyboard shortcuts such as Ctrl + C and Ctrl + V. This saves you time if you have already set many properties on the original control.
Detecting Control Values and Responding to Changes
Retrieving the value of a control (for example, the content of a text box) and reacting to it can occur at different times, depending on the application’s purpose:
- Immediately after an event occurs on the control, such as:
- After the content of a text box has been changed
- After a checkbox has been checked or unchecked
- After a specific list item has been selected
- Later, when the user confirms or submits the selected or entered values to another part of the application
The timing for processing these values depends entirely on the intended use case of the application.
Dialogfelder Running the First Example in Excel VBA
To test the dialog box within the Visual Basic Editor (VBE), simply press the F5 key. This works whether you are in the Code view or the Object view of the UserForm.
If you want to launch the dialog box from a worksheet or elsewhere in the workbook, you will need an additional procedure. This procedure should be stored in a standard code module:
Sub ShowDialog()
    frmFirst.Show
    MsgBox "Dialog box closed"
End Sub
Explanation:
The method .Show() loads the dialog box into memory and displays it to the user.For example, you can link the dialog box display to the Workbook Open event, so it appears automatically when the workbook is opened:
Private Sub Workbook_Open()
    frmFirst.Show
End Sub
Important Notes
This is a modal dialog box, meaning that no other actions in Excel can be performed while the dialog is open. Additionally, any further VBA code following the .Show method in the calling procedure (e.g., in ShowDialog) will only execute once the dialog box has been closed.
This behavior is advantageous because it guides the user through the application in a controlled manner.
It is also possible, though less commonly used, to display a dialog box as modeless by specifying the optional parameter vbModeless when calling .Show. In this case, the user can still interact with the worksheet even while the dialog box is open. For instance, dialog boxes in Word or Excel are sometimes called this way.
Using a modal dialog box forces the user to provide or select certain data first before interacting further with the workbook sheets.
Exporting and Importing
A UserForm module containing a dialog box can be exported and imported just like a standard code module.
The export/import process is explained in detail in section 5.6, « Exporting and Importing Modules. » The main difference is that two files are generated for the UserForm module: one with the extension .frm and another with .frx, whereas a standard code module exports as a single .bas file.

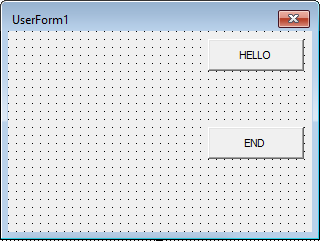
Dialogfelder First Example: Code in Excel VBA
To create an event procedure, simply double-click the corresponding command button in the UserForm designer. This action opens a blank event procedure whose name is composed of the control’s name and the event it handles. The VBA code for the Click event of that specific command button will be written inside this procedure.
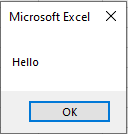
For the command button labeled HALLO, the event procedure is named cmdHallo_Click. This empty procedure is then filled with VBA code as follows:
Private Sub cmdHello_Click()
    MsgBox "Hello"
End Sub
An event procedure can also be created in a manner similar to event procedures for a workbook or worksheet:
- In the Project Explorer, select the dialog box (i.e., frmFirst).
- From the View menu, select Code.
- In the dropdown list above the code window on the left, select the control (command button) for which you want to write an event.
- From the dropdown list on the right, select the desired event (such as Click).
You can switch between the Code view and the Object view anytime using the View menu.
The event procedure for the ENDE command button is:
Private Sub cmdEnde_Click()
    Unload Me
End Sub
Explanation:
The statement Unload unloads an object from memory. As a result, all local or module-level variables associated with the UserForm become unavailable.The keyword Me refers to the current object—in this case, the UserForm itself.
Selecting Font Formatting for a Cell Range in Excel VBA
Similar to selecting a background pattern, you can allow the user to choose font formatting for a selected range of cells.
Example:
Sub SelectFontFormatting()
    Dim success As Boolean
    ' Select the cell range A1:C3 on worksheet "Sheet1"
    ThisWorkbook.Worksheets("Sheet1").Range("A1:C3").Select
    ' Show the built-in Excel "Font" dialog for font formatting
    success = Application.Dialogs(xlDialogFontProperties).Show
    ' If the user cancels without selecting formatting, show a message
    If Not success Then MsgBox "No formatting was selected"
End Sub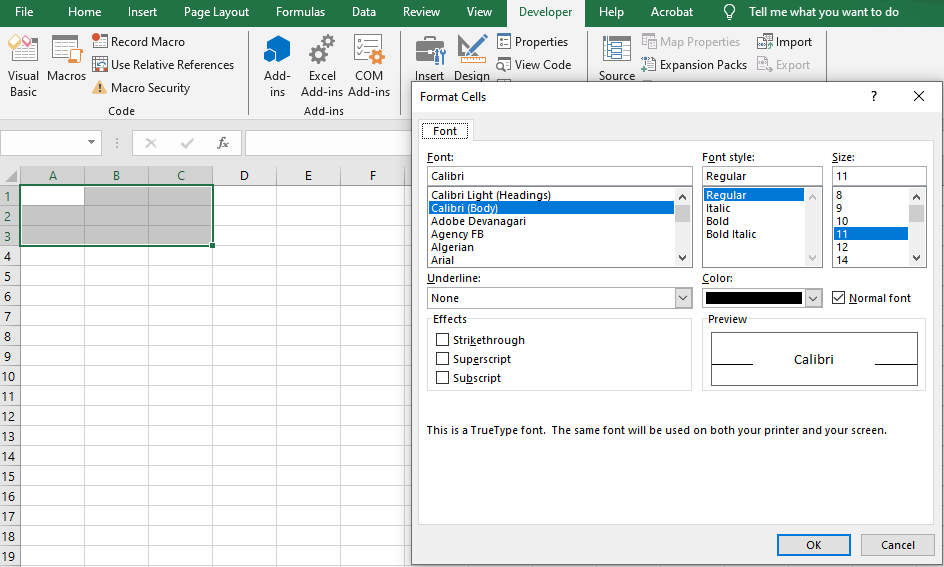
Explanation:
- The constant xlDialogFontProperties opens Excel’s standard Format Cells dialog directly on the Font tab.
- If the user clicks OK, the selected cells are updated with the chosen font properties such as font type, size, style, color, and effects.
- If the user cancels the dialog, the variable success is False, and a message box informs the user that no changes were applied.