Votre panier est actuellement vide !
Catégorie : Excel VBA Course
Calculations with Time Values with Excel VBA
The VBA function DateAdd() adds a time interval to a given time. The function DateDiff() calculates the time interval as the difference between two time values. The time interval can be either positive or negative.
Here is an example:
Sub TimeCalculation()
    Dim t As Date
    Dim interval As Integer
    ' Set the initial time
    t = "06/09/2025 15:38:25"
    ' Activate Sheet1 and apply formatting
    ThisWorkbook.Worksheets("Sheet1").Activate
    Range("E1:E2").NumberFormat = "mm/dd/yyyy hh:mm:ss"
    ' Store initial time in E1
    Range("E1").Value = t
    ' Add 5 minutes
    t = DateAdd("n", 5, t)
    ' Subtract 50 seconds
    t = DateAdd("s", -50, t)
    ' Store modified time in E2
    Range("E2").Value = t
    ' Calculate the interval in seconds between the two times
    interval = DateDiff("s", Range("E1").Value, Range("E2").Value)
    Range("E3").Value = interval
End Sub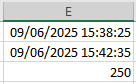
Explanation:
A time value with both the date and time is stored in the time variable.Using the DateAdd() function, a time interval is added to this time value. The first parameter specifies the unit of the time interval. The following options are available:
- yyyy: Year
- q: Quarter
- m: Month
- y: Day of the year
- d: Day
- w: Weekday
- ww: Week
- h: Hour
- n: Minute
- s: Second
The second parameter is the value of the time interval, and the third parameter is the original time value to which the interval will be added.
In this example, 5 minutes are added first, and then 50 seconds are subtracted. The time 15:38:25 is first adjusted to 15:43:25, and then it becomes 15:42:35. The cells with the time values are appropriately formatted.
The DateDiff() function calculates the difference between two time values as a time interval. The first parameter also specifies the unit of the time interval. To calculate the result, the second parameter’s time value is subtracted from the third parameter’s time value.
In this example, the difference is 4 minutes and 10 seconds, which equals 250 seconds.
Splitting Records in Excel VBA
For data import, it is usually necessary to split concatenated records beforehand. The Split() function reverses the operation of the Join() function. It converts a string into a one-dimensional array. The individual parts of the record must be separated by a defined delimiter character to be correctly recognized.

Here is an example:
Sub SplitRecords()
    Dim i As Integer
    Dim arr() As String
    ThisWorkbook.Worksheets("Sheet1").Activate
    arr = Split(Cells(4, 1).Value, "#")
    For i = 0 To 2
        Cells(5, i + 1).Value = arr(i)
    Next i
End Sub
Explanation:
A dynamic array (with variable size) is declared.The Split() function breaks the string into parts and assigns the result to the array. The delimiter used here is the # character. The first element of the array has index 0.
If no delimiter is specified, a space is used by default for splitting.
The individual elements of the array are then written into three adjacent cells in the worksheet. Note that the first element starts at index 0.
Concatenating Records in Excel VBA
For data export purposes, it is often necessary to concatenate records beforehand. This task is handled by the Join() function. It converts a one-dimensional array into a string, separating each element of the array with a specified delimiter.
Here is an example:
Sub ConcatenateRecords()
    Dim i As Integer
    Dim arr(1 To 3) As String
    ThisWorkbook.Worksheets("Sheet3").Activate
    For i = 1 To 3
        arr(i) = Cells(1, i).Value
    Next i
    Cells(2, 1).Value = Join(arr, "#")
End Sub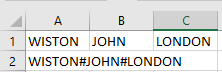
Explanation:
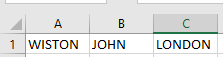
An array with three elements is declared.In this example, the data of one record are located in three adjacent cells in the first row. These values are assigned to the individual array elements.
The Join() function concatenates the elements of the array into a single string, separating them with the # character.
If no delimiter is specified, a space character is used as the default separator.
Output Formatting in Excel VBA
The NumberFormatLocal property, which allows country-specific formatting of numbers and dates in worksheet cells, has already been introduced. Numbers, dates, and texts can also be formatted appropriately for display in dialog boxes using the string function Format().
So far, only the MsgBox() function has been presented as a dialog box, but the following formatting options apply to all types of dialog boxes. These formatting techniques are especially useful for custom dialog boxes.
Here are some examples:
Sub FormatExamples()
    Dim x As Single, y As Single
    Dim d As Date
    ' Decimal places
    x = 13 / 7
    MsgBox "Number: " & Format(x, "0.00")
    ' Percentage values
    x = 1 / 7
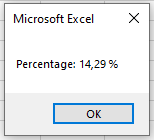
    MsgBox "Percentage: " & Format(x, "0.00 %")
    ' Text and thousand separators
    x = 1399.95
    y = 29.95
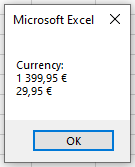
    MsgBox "Currency: " & vbCrLf & Format(x, "#,##0.00 €") & _
           vbCrLf & Format(y, "#,##0.00 €")
    ' Date formatting
    d = "09.06.2025"
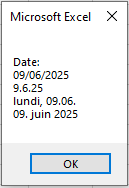
    MsgBox "Date: " & vbCrLf & d & _
           vbCrLf & Format(d, "d.m.yy") & _
           vbCrLf & Format(d, "dddd, dd.mm.") & _
           vbCrLf & Format(d, "dd. mmmm yyyy")
End Sub
Explanation:
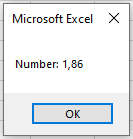
The second parameter of the Format() function is a string specifying the desired format in English notation.- The digit 0 represents a single digit that is always displayed. Decimal places are separated by a period, and the number is rounded to the specified number of decimal places, as shown in Figure.
- The percent sign % multiplies the number by 100 and appends a percent sign, as seen in Figure.
- The # symbol represents a single digit, but only if the number has that digit; otherwise, nothing is displayed. The comma is used as a thousands separator. Text, such as currency symbols, can be included along with the number, as shown in Figure.
Note:
Right-aligned numbers are possible. However, since text in a MsgBox uses a proportional font (characters have different widths), commas in numbers of varying length will not align perfectly under each other. This alignment is possible inside controls in custom dialog boxes.The default date output format (without specifying a format) is dd.mm.yyyy, meaning two digits for day, two for month, and four for the year. Using dddd outputs the full weekday name. The format mmmm outputs the full month name, as shown in Figure.
Strings in Excel VBA
From the large number of string functions available, the following example explains some representative VBA and worksheet functions. It shows how to determine the content and position of a substring and how to replace one substring with another.
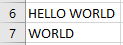
Suppose the two cells A6 and A7 contain the values shown in Figure. The following procedure demonstrates the operations:
Sub StringsExample()
    Dim s As String
    Dim pos As Long  ' Utilisez Long au lieu de Integer pour stocker la position
    Dim searchTerm As String
    Dim lengthSearch As Integer
    ' Active la feuille de calcul
    ThisWorkbook.Worksheets("Sheet1").Activate
    ' Récupère les valeurs dans les cellules
    s = Range("A6").Value
    searchTerm = Range("A7").Value
    lengthSearch = Len(searchTerm)
    ' Vérifie si searchTerm existe dans s
    If Len(searchTerm) > 0 Then
        ' Affiche les premiers caractères
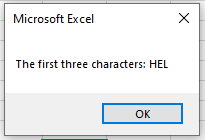
        MsgBox "The first three characters: " & Left(s, 3)
        ' Trouve la position de searchTerm dans s
        pos = InStr(s, searchTerm)
        If pos > 0 Then
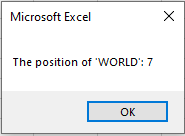
            MsgBox "The position of '" & searchTerm & "': " & pos

            ' Utilise WorksheetFunction.Replace
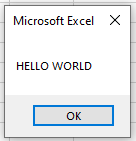
            MsgBox WorksheetFunction.Replace(s, pos, lengthSearch, "WORLD")
        Else
            MsgBox "Search term not found."
        End If
    Else
        MsgBox "Search term is empty."
    End If
End Sub
Explanation:
- The variable s stores the string to be examined, taken from the first worksheet cell.
- The variable searchTerm stores the substring to be found, taken from the second worksheet cell.
- The VBA function Len() returns the length of a string, including all spaces.
- The VBA function Left() returns a substring starting from the first character, with the specified length. Similarly, you can use the VBA functions Right() and Mid() to extract substrings from the end or middle of a string.
- The VBA function InStr() returns the position of the searched substring within the string. Positions start at 1.
- The worksheet function Search() performs the same task as InStr(). It also has an optional third parameter specifying the starting position for the search.
- The worksheet function Replace() replaces a substring with another substring (see Figure 8.22). It requires the following parameters:
- The original string
- The position at which to start the replacement
- The number of characters to replace
- The new substring to insert in place of the old substring
Three Buttons Including a Default Button in Excel VBA
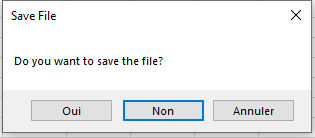
The following example shows a message box with Yes, No, and Cancel buttons — this time, the second button (No) is set as the default, as shown in Figure.
The corresponding code is:
Sub MsgBoxYesNoCancel()
    Dim response As Integer
    response = MsgBox("Do you want to save the file?", _
                      vbYesNoCancel Or vbDefaultButton2, "Save File")
    If response = vbYes Then
        MsgBox "You chose to save the file"
    ElseIf response = vbNo Then
        MsgBox "You chose not to save the file"
    Else
        MsgBox "You chose to cancel the operation"
    End If
End Sub
Explanation:
The three buttons Yes, No, and Cancel are combined with the vbDefaultButton2 behavior. If the user presses the Enter key, this corresponds to selecting the second button, which is No in this case.Because the user has three choices, the response must be stored in a variable. The response is then evaluated using a multiple-branch conditional structure to execute different actions based on the selection.
Yes and No Buttons in Excel VBA
An example code featuring Yes and No buttons is:
Sub MsgBoxYesNo()
    If MsgBox("Do you want to save the file?", _
              vbYesNo Or vbQuestion, "Save File") = vbYes Then
        MsgBox "You chose to save the file"
    Else
        MsgBox "You chose not to save the file"
    End If
End Sub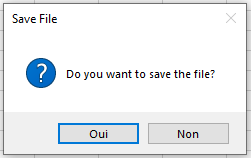
Explanation:
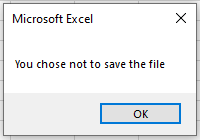
The Yes and No buttons are combined with the question mark icon. The user must answer the question, and the response is evaluated using a conditional statement. Because the MsgBox() function now returns a value, its parameters must be enclosed in parentheses.In this example, two different messages are displayed depending on the user’s choice. You can use the evaluation of these responses to initiate different program flows.
A possible response where the No button was pressed is shown:
Information Icon in Excel VBA
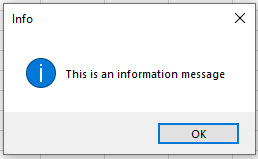
The example demonstrates a message box displaying the information icon.
Sub MsgBoxInformation()
    MsgBox "This is an information message", vbInformation, "Info"
End Sub
Explanation:
An icon (in this case, the letter “i” for “Information”) can be displayed on its own. In this scenario, a simple message box with only the OK button is shown.Buttons – An Overview in Excel VBA
The following examples in this section use various options to control the appearance and behavior of the dialog box.
Buttons Description AbortRetryIgnore Three buttons: Abort, Retry, and Ignore Critical Displays an icon that visually emphasizes a critical warning DefaultButton1 (or 2/3) Specifies which button is activated when the user presses the Enter key — usually button 1 Exclamation Displays an icon with an exclamation mark to visually highlight a warning Information Displays an information icon to visually highlight a simple message Question Displays a question mark icon to visually indicate a question RetryCancel Two buttons: Retry and Cancel SystemModal Makes the dialog box stay on top, even if the user switches to another application YesNo Two buttons: Yes and No YesNoCancel Three buttons: Yes, No, and Cancel You can combine a button set with an icon and a default button behavior using the Or operator. For example, you can combine AbortRetryIgnore with Exclamation and DefaultButton2. Alternatively, you can use the + operator instead of Or.
When multiple buttons are displayed, the return value of the MsgBox() function (i.e., the user’s choice) must be evaluated using conditional branching. This return value is an integer. To avoid memorizing these numbers, predefined constants are provided that represent them. Their names are self-explanatory: vbAbort, vbCancel, vbIgnore, vbNo, vbOK, vbRetry, and vbYes.
OK Button in Excel VBA
First, the code example:
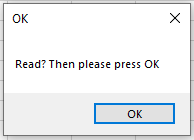
Sub MsgBoxOkOnly()
    MsgBox "Read? Then please press OK", vbOKOnly, "OK"
End Sub
Explanation:
The first parameter is the message text displayed in the message box, which you are already familiar with.The second parameter is optional and controls the appearance and behavior of the dialog box. In this example, the constant vbOKOnly is used to display only the OK button — this is also the default setting.
The third parameter is also optional and specifies the title of the dialog box window. If omitted, the title defaults to the name of the application.