Votre panier est actuellement vide !
Étiquette : vba
Decision Structures (Conditions) in Excel VBA
We can create four types of decision structures using the If statement:
■ If…Then;
■ If…Then…Else;
■ Nested If;
■ If combined with And and Or operators.
If…Then
In an If…Then block, the structure always begins with
Ifand ends withEnd If. When the entered condition is true, all the statements between these two clauses are executed. If the condition is false, the code is executed from the line after theEnd Ifclause, and all previous instructions are skipped. The syntax is as follows:If Condition Then Statement if condition is true End IfThe following example contains a condition that checks if the variable
ProduitAis greater than 15; if so, its value will be entered in cell A5:Sub ExempleConditionIf() Dim ProduitA As Integer ProduitA = InputBox("Enter the product value: ") If ProduitA > 15 Then Range("A5").Value = ProduitA End If MsgBox "See you soon!" End SubComments:
■ Once executed, this code will display an InputBox. If you enter a value greater than 15 and click OK, the condition will be true, and cell A5 will be filled with the entered value.
■ If a value less than 15 is entered, the cell will remain empty; no action will be taken.
■ Since the
MsgBoxcommand is placed after theEnd Ifstatement, the message “See you soon!” will be displayed regardless of whether the condition is true or false.It is possible to structure the If function in a single line of code. In this case, we do not use the
End Ifclause:If ProduitA > 15 Then Range("A5").Value = ProduitAWe can enter multiple procedures to execute if the condition is true. To do this, we must add one instruction per line, ending the block with the
End Ifstatement.The following example contains instructions to insert the value of the variable
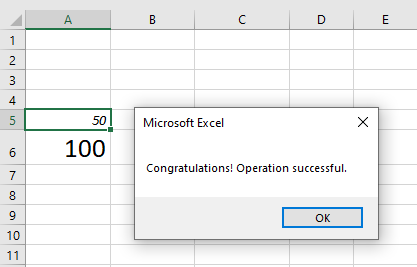
ProduitAinto cell A5 and apply italic font style to it. Then it adds 50 to the variableProduitAand enters the result into cell A6, changes the font size of this cell to 20, and displays a message indicating that the operation was successful.Sub ExempleConditionIf() Dim ProduitA As Integer ProduitA = InputBox("Enter the product value: ") If ProduitA > 15 Then Range("A5").Value = ProduitA Range("A5").Font.Italic = True Range("A6") = ProduitA + 50 Range("A6").Font.Size = 20 MsgBox "Congratulations! Operation successful." End If End Sub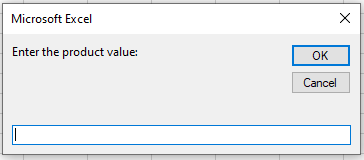
Comments:
■ The following image shows the result of this code if the value entered by the user is 50.
■ Cell A5 is filled with the number 50, cell A6 with 100 (the result of 50 + 50), and a success message is displayed.
If…Then…Else
The
If…Then…Elsestructure allows you to enter instructions to be executed not only when the condition is true but also when it is false. The block also starts withIfand ends withEnd If, but includes anElseclause after the instructions for the true condition. All instructions betweenElseandEnd Ifare executed only if the condition is false.Structure:
If Condition Then
    Instructions for true condition
Else
    Instructions for false condition
End If
Comments:
This structure is divided into three parts:
■ Condition (Required): An expression that returns either True or False. The value is considered True if the expression is correct, and False if not.
■ Instructions for the true condition: One or more instructions (separated by colons) executed if the condition returns True.
■ Instructions for the false condition: One or more instructions executed if the condition returns False.
To illustrate, we’ll use
MsgBoxto create a message box with OK and Cancel buttons. Depending on the button clicked, a different action will occur: OK deletes all cells and data from a worksheet; Cancel cancels the operation and displays a message.Basic deletion code:
Sub SuppressionFeuilles()
    Cells.Delete
End Sub
Now with decision logic:
Sub SuppressionFeuilles()
    Dim Decision As String
    Decision = MsgBox("This operation will delete all cells and data on the worksheet. Do you want to continue?", _
        vbOKCancel + vbCritical, "Warning")
    If Decision = vbOK Then
        Cells.Delete
        MsgBox "Cells and data deleted."
    Else
        MsgBox "Operation cancelled."
    End If
End Sub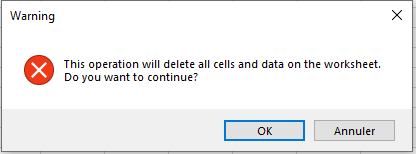
Comments:
■ If the user clicks OK,
DecisionstoresvbOK, making the condition true.■ All cells and data will be deleted.
■ If Cancel is clicked, the condition is false, and only the cancellation message is shown.
You can use the
ElseIfclause to test multiple conditions. The code checks each in order and executes the first that is true; if none are true, it executes theElseclause.Structure:
If Condition1 Then
    Instructions for Condition1 = True
ElseIf Condition2 Then
    Instructions for Condition2 = True
Else
    Instructions if all conditions are False
End If
Example:
Sub ExempleIfElseif()
    Dim paiement As String
    paiement = UCase(InputBox("Specify the payment method"))
    If paiement = "D" Then
        MsgBox "Cash"
    ElseIf paiement = "C" Then
        MsgBox "Check"
    ElseIf paiement = "CC" Then
        MsgBox "Credit Card"
    Else
        MsgBox "Undefined payment. Cancel the sale!"
    End If
End Sub
Comments:
■ The message depends on the acronym entered. If the user types something else, the
Elseclause is executed.■ Only uppercase values D, C, or CC are valid here. VBA is case-sensitive, so lowercase entries would not match.
■ The
UCase()function is used to convert user input to uppercase to handle this case.Nested If
You can nest
Ifblocks—placing oneIfinside another. Each must end withEnd If.Structure:
If Condition1 Then
    If Condition2 Then
        Instructions
    End If
End If
Example:
Sub ModeDePaiement()
    Dim commentP As String
    Dim paiement As String
    commentP = MsgBox("Cash payment?", vbYesNo)
    paiement = InputBox("Specify payment method")
    If commentP = vbYes Then
        If UCase(paiement) = "CASH" Then
            MsgBox "Offer 10% discount"
        End If
    End If
End Sub
Comments:
■ If the user clicks “Yes”, the second
Ifis evaluated.Combining Conditions with And and Or
Using
AndandOroperators allows you to check multiple conditions.With And (all conditions must be true):
If Condition1 And Condition2 Then
    Instructions
Else
    Instructions if any condition is false
End If
Example:
Sub OperationAnd()
    Dim number As Double
    number = 10
    If number > 5 And number < 15 Then
        MsgBox "Value within range!"
    End If
End Sub
Comments:
■
number > 5= True,number < 15= True → Message is shown.With Or (at least one condition must be true):
If Condition1 Or Condition2 Then
    Instructions
Else
    Instructions if all conditions are false
End If
Example:
Sub OperationOr()
    Dim amount As Byte
    Dim payment As String
    amount = 50
    payment = "cash"
    If amount > 200 Or payment = "cash" Then
        MsgBox "Offer 15% discount"
    End If
End Sub
Comments:
■ The message is shown if either the amount is above 200 or the payment method is cash.
Select Case
The
Select Casestatement allows decision-making where a single expression is compared against multiple possible values.Structure:
Select Case expression
    Case value1
        Instruction 1
    Case value2
        Instruction 2
    Case Else
        Default instruction
End Select
Example:
Sub Fabricant()
    Dim Modele As String
    Modele = InputBox("Enter the car model:")
    Select Case UCase(Modele)
        Case "COROLLA"
            MsgBox "The manufacturer is Toyota."
        Case "CIVIC"
            MsgBox "The manufacturer is Honda."
        Case "FUSION"
            MsgBox "The manufacturer is Ford."
        Case Else
            MsgBox "Unable to identify the manufacturer."
    End Select
End Sub
Comments:
■ Compares the model entered by the user and displays the corresponding message.
■ If no match is found, the
Case Elseis triggered.Another example with ranges:
Sub QuantiteStock() Dim stock As Integer stock = InputBox("Enter quantity:") Select Case stock Case 0 To 10 MsgBox "Insufficient" Case 11 To 30 MsgBox "Warning" Case Is > 30 MsgBox "OK" End Select End SubRepetition Structures (Loops) in Excel VBA
The Loop instruction is used to repeat the execution of VBA code blocks a predetermined number of times. Three types of structures can be created with the Loop instruction:
■ Do…Loop;■ Do While…Loop;
■ Do Until…Loop.
Do…Loop
The Do…Loop structure uses the keyword While to indicate that a set of instructions will run as long as a condition is true or the keyword Until to indicate that a set of instructions will run as long as a condition is false. The syntax of this structure is as follows:Do {While | Until} Condition Instructions Exit Do Instructions LoopThis structure is divided into two parts:
■ Condition (optional): A numeric or string expression equal to True or False (Null conditions are treated as False).
■ Instructions: One or more instructions that will be executed repeatedly while the condition is True or until it becomes True.We can use the Exit Do statement to stop the flow of the Do…Loop structure. In this case, execution continues from the line following the Loop statement. In the case of nested Do … Loop structures, an Exit Do statement transfers execution to the immediately higher level structure.
Do While…Loop
The Do While loop structure allows a set of instructions to be executed while a condition is true. This structure has two possible syntaxes.Condition tested at the beginning of the loop
With the syntax illustrated below, the instructions are executed only if the condition is true (if the condition is false, execution starts at the line following the Loop instruction):Do While condition Instructions LoopLet’s take an example of a counter from 0 to 10:
Sub BoucleDoWhile()
    Dim n As Long
    Do While n <= 10
        MsgBox n
        n = n + 1
    Loop
End Sub
Comments
■ The variablenis declared as type Long (Integer) as it is used as a counter.
■ The Do While loop structure counts from 0 to 10 as long asnis less than or equal to 10.
■ The MsgBox function is the fastest, simplest, and most used method to display a message.Let’s consider the following worksheet, which should calculate the total number of car sales for the brand TOYOTA:
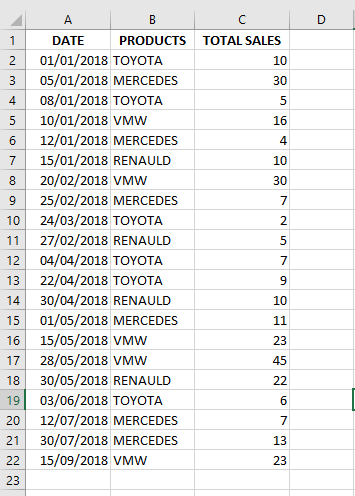
The following code describes the procedure that will start in cell B2 and execute the instructions within the Do While loop as long as the active cell is filled, i.e., not empty. In each selected cell, it will check whether the content equals TOYOTA and, if so, the corresponding value (in the adjacent column C) will be added to the variable
toy. Regardless of whether the cell contains TOYOTA, the pointer moves to the next row to repeat the process.The loop ends only when the active cell (in column B) is empty. Example:
Sub ExempleBoucleDoWhile()
    Dim toy As Integer
    Range("B2").Select
    Do While ActiveCell <> ""
        If ActiveCell = "TOYOTA" Then
            toy = toy + ActiveCell.Offset(0, 1)
        End If
        ActiveCell.Offset(1, 0).Select
    Loop
    MsgBox "Total sales (TOYOTA) = " & toy
End Sub
Comments
■ The Select method is used to select cell B2, which is then considered the active cell.
■ The ActiveCell property returns a Range object representing the active cell in the active workbook.
■ As long as the active cell is not empty, if it contains « TOYOTA », the value from the adjacent column is added to the variabletoy.
■ The Offset property shifts a cell or range. For example,ActiveCell.Offset(0, 1)shifts the active cell one column to the right.
■ It then moves to the next cell down (ActiveCell.Offset(1, 0).Select) to check for TOYOTA again.When the macro is executed, the following result is obtained:

Condition tested after the instructions
The following syntax executes all instructions first, then tests the condition. As long as the condition is true, the loop repeats:Do Instructions Loop While ConditionIn the example below, the commands in the Do structure will be executed at least once because the instructions are executed before checking the condition.
Sub BoucleDoWhile2()
    Dim n As Long
    n = 10
    Do
        MsgBox n
        n = n + 1
    Loop While n <= 20
End Sub
Comments
■ A message with the value ofnis displayed, and 1 is added ton, making it 11.
■ As long asnis less than or equal to 20, the loop continues.Do Until…Loop
The Do Until…Loop structure executes instructions when a condition is false.
Like the Do While…Loop, this structure has two possible syntaxes:Condition tested at the beginning
Do Until Condition
    Instruction
Loop
As in the previous example using the Do…While structure, the example below counts from 0 to 10. Here, the condition is
n > 10, i.e., the loop runs untilnexceeds 10.Sub BoucleDoUntil() Dim n As Long Do Until n > 10 MsgBox n n = n + 1 Loop End SubUsing Do..Until, let’s revisit the car sales example already demonstrated with Do..While. Note that the condition in Do..Until is the opposite of that in Do..While, but both codes produce the same result.
Sub ExempleBoucleDoUntil()
    Dim toy As Integer
    Range("B2").Select
    Do Until ActiveCell = ""
        If ActiveCell = "TOYOTA" Then
            toy = toy + ActiveCell.Offset(0, 1)
        End If
        ActiveCell.Offset(1, 0).Select
    Loop
    MsgBox "Total sales (TOYOTA) = " & toy
End Sub
Comments
■ Until the active cell (B2) is empty, the value next to it is added to the variabletoy.Condition tested at the end
Do
    Instruction
Loop Until Condition
Example:
Sub BoucleDoUntil()
    Dim n As Byte
    n = 8
    Do
        MsgBox n
        n = n + 1
    Loop Until n > 10
End Sub
Comments
■ The loop continues untilnexceeds 10.While … Wend
The While … Wend structure is similar to Do While…, except the condition is tested only at the beginning, as in:While Condition Instruction WendExample:
Sub WhileWend()
    Dim n As Long
    While n <= 10
        MsgBox n
        n = n + 1
    Wend
End Sub
Comments
■ The condition is repeatedly checked, and instructions are executed while it’s True.
■ If False, execution resumes after the Wend instruction.For…Next and For Each…Next
The For…Next loop defines the number of repetitions for a set of instructions. It uses a counter variable with a start value, end value, and step:
For counter = start To end [ Step step ]
    [ statements ]
    [ Exit For ]
    [ statements ]
Next [ counter ]
Comments
■ counter: Numeric variable used as the loop counter.
■ start: Initial value.
■ end: Final value.
■ step: Increment (default is 1).
■ statements: Instructions to be executed.Each time the code between For and Next runs, the counter increases by step. For example, from 10 to 20 with step 2:
Sub BoucleForNext()
    Dim n As Long
    For n = 10 To 20 Step 2
        MsgBox n
    Next
End Sub
Comments
■ If step is omitted, it defaults to 1.Example for counting TOYOTA sales:
Sub ExempleBoucleForNext()
    Dim toy, ligne As Integer
    Range("B2").Select
    For ligne = 2 To 22
        Cells(ligne, 2).Select
        If ActiveCell = "TOYOTA" Then
            toy = toy + ActiveCell.Offset(0, 1)
        End If
    Next
    MsgBox "Total sales (TOYOTA) = " & toy
End Sub
For Each…Next works similarly but iterates through a collection or array:
For Each element In group
    [ statements ]
    [ Exit For ]
    [ statements ]
Next [ element ]
Comments
■ element: Variable for each item in the group. Must be Variant or Object.
■ group: A collection or array (not user-defined types).
■ statements: Executed for each element.You can nest For Each…Next loops, but each loop variable must be unique.
Example: highlight all cells containing « TOYOTA » in red:
Sub BoucleForEach()
    Dim CelluleX As Object
    For Each CelluleX In Range("B2:B22")
        If CelluleX.Value = "TOYOTA" Then
            CelluleX.Interior.ColorIndex = 3
        End If
    Next
End Sub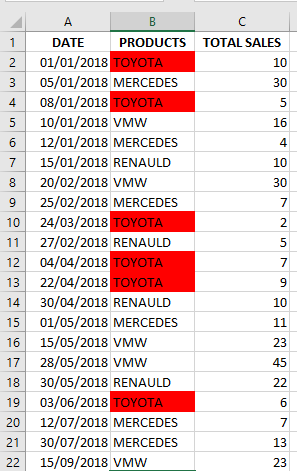
Comments
■ The ColorIndex property sets the color of borders, fonts, or interior fill.
■ UsexlColorIndexAutomaticorxlColorIndexNonefor automatic or no fill.GoTo
The GoTo instruction jumps to a line labeled with a name, skipping others. You define a label using an alphanumeric name followed by a colon (
:).Example:
Sub GoToTest()
    Dim NomUtilisateur As String
    NomUtilisateur = InputBox("Enter your name: ")
    If NomUtilisateur <> "eliechan" Then
        GoTo ErreurLogin
    End If
    MsgBox ("Hello, Elie!")
    Exit Sub
ErreurLogin:
    MsgBox "Access denied. Only Elie Chancelin is authorized."
End Sub
Comments
■ If the name entered is not “eliechan”, the code jumps toErreurLogin:.
■ If the name is correct, the first message is shown and the sub ends.
■ Excessive use of GoTo can make code hard to read. Use it only when necessary, such as for error handling.Common Dialog Boxes (MsgBox and InputBox) in Excel VBA
In this article, we will learn how you can use dialog boxes to create user-friendly applications. You have the option to use the built-in dialog boxes (MsgBox and InputBox) in Excel—also known as common dialog boxes—or to create your own custom dialog boxes, called UserForms. In the previous two chapters, we displayed a message several times using the MsgBox function. However, the use of this function remained simple. Did you know that it is possible to modify the title, style, and buttons in the MsgBox function? We will also look at the function that allows you to retrieve information entered by the user.
MsgBox Dialog Box
The MsgBox function is one of the most useful VBA functions. Many examples in this chapter use this function to display the value of a variable. This function is often a good substitute for a simple custom dialog box. It is also an excellent debugging tool, as you can insert MsgBox functions at any time to pause your code and display the result of a calculation or assignment.
Most functions return a single value, which you assign to a variable. The MsgBox function not only returns a value but also displays a dialog box to which the user can respond. The value returned by the MsgBox function represents the user’s response to the dialog box. You can use the MsgBox function even if you are not interested in the user’s response but simply want to display a message.
The official syntax of the MsgBox function has five arguments (those in brackets are optional):
= MsgBox(prompt[, buttons][, title][, helpfile, context])
- prompt: This is a required argument that specifies the text displayed in the message box.
promptis a String argument, which means you must type your desired text; it can contain up to 1023 characters, although it is usually a good idea to be more concise. (Any prompt longer than 1023 characters is truncated without warning.) Line breaks are inserted by using the carriage returnvbCr, line feedvbLf, or both combinedvbCrLf.Reminder: the constantsvbCr,vbLf, andvbCrLfrepresent the following values respectively:Chr(13),Chr(10), andChr(13) + Chr(10).
Constant Equivalent Description vbCrLf Chr(13) + Chr(10) Combination of carriage return and line feed vbCr Chr(13) Paragraph break character vbLf Chr(10) Line break character - buttons: This optional argument controls the type of message box VBA displays by specifying the buttons it contains. For example, as you will see in a few pages, you can display a message box with just an OK button; with OK and Cancel; with Abort, Retry, and Ignore buttons; and so on. You can also add parameters to this argument to control the icon and modality of the message box.
- title: This optional argument controls the title bar of the message box. If you do not specify a title, VBA uses the application title: Microsoft Excel. In general, it is better to specify the title as the application name alone is not useful.
- helpfile: This optional argument controls the help file that VBA displays when the user presses F1 in the message box (or clicks the Help button in a message box with one).
- context: This optional argument controls the help topic in the help file. If you specify the
helpfileargument, you must also specifycontext.
Values accepted by the
buttonsargument (second argument of MsgBox):Constant Value Description vbOKOnly 0 
vbOKCancel 1 
vbAbortRetryIgnore 2 
vbYesNoCancel 3 
vbYesNo 4 
vbRetryCancel 5 
vbCritical 16 
vbQuestion 32 
vbExclamation 48 
vbInformation 64 
vbDefaultButton1 0 Default button: Button 1 vbDefaultButton2 256 Default button: Button 2 vbDefaultButton3 512 Default button: Button 3 vbApplicationModal 0 Forces the user to respond before continuing in Excel vbSystemModal 4096 Forces the user to respond before continuing in other applications (topmost window) Note:
- First group (0 to 5): defines the number and type of buttons.
- Second group (16, 32, 48, 64): defines the icon style.
- Third group (0, 256, 512): sets the default button.
- Fourth group (0, 4096): sets the message box modality (usually not applicable in VBA).
You can only choose one value per group. The final value for the
buttonsargument will be the sum of one value from each group.
Example: For a MsgBox with Yes/No buttons (value 4), a Question icon (value 32), and the second default button (value 256), enter292(4 + 32 + 256).
Alternatively, use the expressionvbYesNo + vbQuestion + vbDefaultButton2, which is more readable.Return values from MsgBox buttons:
Constant Value Corresponding Button vbOK 1 
vbCancel 2 
vbAbort 3 
vbRetry 4 
vbIgnore 5 
vbYes 6 
vbNo 7 
Example: Delete a selected range using MsgBox
Sub DeleteSelectedRange()
    Dim i As Integer
    i = MsgBox("Do you want to delete the selected range?", _
               1 + vbQuestion, "Delete Request")
    If i = 2 Then Exit Sub
    Selection.Clear
End Sub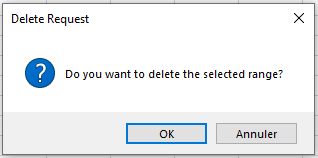
Comments:
- Variable
iis declared as Integer and assigned to the MsgBox dialog box. - The value of
iis used to determine which button the user clicked. - If Cancel is clicked, the macro exits. Otherwise, the selected range is cleared using the
Clearmethod.
Example: Display multiple pieces of information
Sub MultipleInfo()
    MsgBox _
    " Hello user " & Application.UserName & Chr(13) & _
    " Today is " & Date & Chr(13) & " Exactly " & _
    Time & " o'clock!", vbInformation, "Information"
End Sub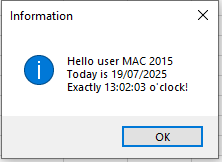
Comments:
- To display multiple lines, concatenate text segments using
&. - Use underscore
_at the end of a line to continue the command. Chr(13)is used to insert line breaks.
Macro: Check if a specific workbook exists
Sub FileExists()
    Dim s As String
    Const File = "C:\my files\myworkbook.xls"
    s = Dir(File)
    If s <> "" Then
        MsgBox "The file exists!", vbExclamation
    Else
        MsgBox "File " & File & " is not available here!", vbCritical
    End If
End Sub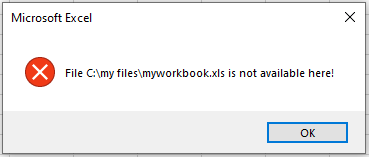
Comments:
- Use the
Dirfunction to check if a file exists. - If the file name is returned, it exists; otherwise, it doesn’t.
Using Text Boxes for Messages
If you run a long macro, inform the user that the macro is still running by displaying a temporary text box. This helps avoid the impression that Excel has crashed.
Private Sub Workbook_Open()
    ActiveSheet.OLEObjects.Add _
    (ClassType:="Forms.TextBox.1", _
    Left:=70, Top:=60, Width:=150, Height:=25).Activate
    ActiveSheet.OLEObjects _
    (ActiveSheet.OLEObjects.Count).Name = "Message"
    ActiveSheet.OLEObjects("Message").Object.Text = _
    " Please wait..."
    Application.Wait (Now + TimeValue("0:00:05"))
    ActiveSheet.OLEObjects("Message").Delete
End Sub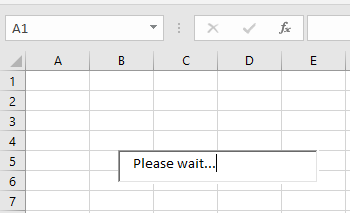
Comments:
OLEObjectsis the collection of all ActiveX/OLE controls.Addadds a textbox; specify ClassType like"Forms.TextBox.1".- Set position and size using
Left,Top,Width,Height. - Use
.Activateto activate and.Nameto rename. - Use
.Object.Textto set the message. - Use
.Deleteto remove the object after 5 seconds (Waitmethod).
Control to Insert Description CheckBox Forms.CheckBox.1 ComboBox Forms.ComboBox.1 CommandButton Forms.CommandButton.1 Frame Forms.Frame.1 Image Forms.Image.1 Label Forms.Label.1 ListBox Forms.ListBox.1 MultiPage Forms.MultiPage.1 OptionButton Forms.OptionButton.1 ScrollBar Forms.ScrollBar.1 SpinButton Forms.SpinButton.1 TabStrip Forms.TabStrip.1 TextBox Forms.TextBox.1 ToggleButton Forms.ToggleButton.1 InputBox Dialog Box
The InputBox function is a simple dialog that allows users to enter data (text, number, or a range).
= InputBox(prompt[, title][, default][, xpos][, ypos][, helpfile, context])
- prompt: Required; text shown in the input box (up to 1024 characters). Use
vbCrfor new lines. - title: Optional; title bar text. If omitted, defaults to Excel.
- default: Optional; pre-filled text in the input field.
- xpos, ypos: Optional; screen coordinates for box position.
- helpfile, context: Optional; link to Help topic.
Example: VAT Calculation
Sub CalculateVAT()
    Dim Amount As Double
    Dim Total As Double
    Const VAT = "1.1925"
    Amount = Application.InputBox("VAT Calculation", "Please enter the Amount")
    If Amount = 0 Then Exit Sub
    Total = Amount * VAT
    MsgBox "Sales tax is: " & Total - Amount & " Euros"
End Sub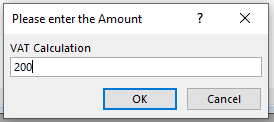
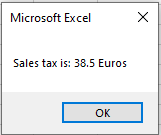
Comments:
- Define the VAT rate in a constant.
- Ask the user for an amount using InputBox.
- If Cancel is clicked, exit. Otherwise, compute and show VAT.
Example: Capture Multiple Entries
Sub CaptureMultipleEntries()
    Dim i As Long
    Dim i2 As Long
    For i2 = 1 To 5
        i = Application.InputBox(prompt:="Enter a number:", Type:=1)
        If i <> False Then
            Sheets("Sheet1").Cells(1, i2).Value = i
        Else: Exit Sub
        End If
    Next
End Sub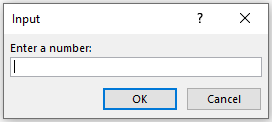
Comments:
- InputBox is called five times using a
For Nextloop. - If Cancel is clicked, the macro exits; otherwise, values are written to Sheet1.
Example: Select a Range of Cells
Sub SelectCellRange()
    Dim cellRange As Range
    On Error Resume Next
    Set cellRange = Application.InputBox(prompt:="Cell Range", Type:=8)
    If cellRange Is Nothing Then
        MsgBox "You did not select a cell range", vbExclamation
    Else
        cellRange.Select
    End If
End Sub
Comments:
- Declare a Range variable.
- Use Type:=8 to allow range selection.
- If no range selected, show a warning; otherwise, select it.
Example: Entering Functions via InputBox
Sub EnterFunction()
    Dim s As String
    s = InputBox("Enter the function", "Function", "=")
    If s = "" Then Exit Sub
    ActiveCell.FormulaLocal = s
End Sub
Comments:
- Default input is
=since all Excel functions begin with it. - Use
FormulaLocalto insert the function properly in the cell.
- prompt: This is a required argument that specifies the text displayed in the message box.
Operators in Excel VBA
The type of calculation performed with the elements of a formula is defined by the operator used. VBA has four categories of operators:
■ Arithmetic operators
■ Comparison operators
■ Logical operators
■ Concatenation operatorsArithmetic Operators
Arithmetic operators, described and illustrated in the table below, are used to perform mathematical calculations:
Operator Description Example + Adds two values. 7 + 7 results in 14. – Subtracts two values. 7 – 2 results in 5. * Multiplies two values. 3 * 3 results in 9. / Divides two values. 8 / 2 results in 4. \ Returns the integer portion of a division. 17 \ 2 results in 8. Mod Returns the remainder of a division. Non-integer values used in the division are rounded. 17 Mod 2 results in 1. 19 Mod 4 results in 3. 19 Mod 4.2 results in 3. ^ Calculates exponentiation. 3 ^ 3 results in 27. Comparison Operators
Comparison operators, described and illustrated in the table below, allow you to compare the values of two expressions, returning a result of True (for true comparisons), False (for false comparisons), or Null (if one of the expressions in the comparison contains invalid data):
Operator Description Examples = Equal to. 20 = 15 + 15 results in False. <> Not equal to. 25 <> 20 + 20 results in True. > Greater than. 50 > 70 – 25 results in True. < Less than. 20 < 10 + 10 results in False. >= Greater than or equal to. 50 >= 10 * 7 results in False. <= Less than or equal to. 30 <= 15 + 15 results in True. Is Compares two object reference variables. Object Is Var returns True, assuming Object equals X and X equals Var. Like Compares two strings. « FnnnF » Like « F*F » returns True. Logical Operators
Logical operators, like comparison operators, return a result of True, False, or Null. The table below describes these operators:
Operator Description Examples And Adds conditions to a logical test. Returns True if all conditions are true, False if any are false, and Null if one is null. 12 > 5 And 8 < 7 results in False. 12 > 5 And 8 > 7 results in True. Or Adds conditions like And, but returns True if at least one condition is true, False if all are false, and Null if one is null. 12 > 5 Or 8 < 7 results in True. Not Reverses the logic of an expression, creating a logical negation. Not 12 > 5 results in False. Eqv Tests for logical equivalence and returns True if both expressions are either true or false, False or Null otherwise. 12 > 5 Eqv 8 > 5 results in True. 12 < 5 Eqv 8 < 5 results in True. Xor Performs logical exclusion, returning True if one expression is true and the other is false. If both are true or both are false, returns False. If one expression is null, returns Null. 9 > 7 Xor 7 < 5 results in True. 9 > 7 Xor 7 > 5 results in False. Concatenation Operators
The VBA concatenation operator is &. Concatenation is used to create a single text string by combining two or more text strings. For example:
Sub ConcatenationOperator()
    MsgBox ("Welcome" & " Elie Chancelin")
End Sub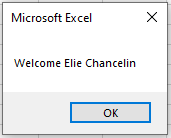
We can say that the concatenation operator is also used to join separate values, such as a text string with the system-defined date, or even to display in a single message box a string that includes the value of a variable.
NOTE
String concatenation can also be represented by a plus sign (+). However, many programmers prefer to limit the plus sign to numeric operations to avoid ambiguity.Order of Operations
The order in which operations are performed in VBA is the same as in Excel: first, all exponentiations are executed, then multiplications and divisions, and finally additions and subtractions. Any operation within parentheses is resolved before anything else. For example, the expression
5 + 3 * 2equals 11, while the expression(5 + 3) * 2equals 16.The Elements of VBA Language in Excel
Comments
A comment is descriptive text embedded in your code and ignored by VBA. It is a good idea to use comments generously to describe what you are doing. Any text following an apostrophe (‘) in the program until the end of the line is ignored by the compiler and is a comment.
You can use an entire line for your comment, or insert a comment after a statement on the same line.The following example shows a VBA procedure with two comments:
Sub DemoCommentaires()
  ' This is my first comment
  ValeurF = 12 ' This is my second comment
  MsgBox ValeurF
End Sub
NOTE
Excel VBA colors the line in green to indicate that it is a comment.Although the apostrophe is the preferred comment indicator, you can also use the keyword
Remto mark a line as a comment. The keywordRem(short for Remark) is essentially a legacy from older BASIC versions and is included in VBA for compatibility reasons. Unlike the apostrophe,Remcan only be written at the beginning of a line, not on the same line as another statement.Some general tips for using comments effectively:
- Use comments to briefly describe the purpose of each procedure you write.
- Use comments to describe changes you make to a procedure.
- Use comments to indicate that you are using functions or designs in an unusual or non-standard way.
- Use comments to describe the purpose of variables so that you and others can decipher otherwise cryptic names.
- Write comments while you code, rather than after.
Line Break
To split a single statement into multiple lines, use the line continuation character, which is an underscore (_) at the point where you want the line to break. The underscore must be immediately preceded by a space. In short, to insert a VBA line break, you can follow these steps:- First, click at the character where you want to break the line.
- Then, type a space.
- After that, type an underscore (
_). - Finally, press Enter to break the line.
To create a line break, the following conditions must be met:
- You cannot break keywords, properties, or methods.
- The maximum number of allowed line breaks is seven.
Here is a code snippet without a line break:
ActiveCell.Offset(rowoffset:=0, columnoffset:=1).Value = Somme
Here is the same code with a line break:
ActiveCell.Offset(rowoffset:=0, _
columnoffset:=1).Value = Somme
You can use the line continuation character before or after:
- Operators (e.g.,
&,+,Like,NOT,AND) - A comma
- An equal sign
- An assignment operator (
:=)
You cannot use the line break between a colon and an equal sign. For example, the following usage is not recognized by Visual Basic:
Range("B1").Cut Destination: _
=Range("D1")
Additionally, you cannot use the line continuation character inside text enclosed in quotes. For example, the following is not valid:
MsgBox "To continue a long statement, use the line _ continuation character."
Instead, split it as follows:
MsgBox "To continue a long statement, use the " & _
"line continuation character."
Placing Multiple Statements on One Line
Using the colon (:) character allows you to place multiple statements on the same line. Thus, the two following constructions are equivalent:maVariable = 5 ' maVariable contains 5 maVariable = maVariable + 5 ' maVariable now contains 10 ' or maVariable = 5: maVariable = maVariable + 5The With / End With Statement
For each property we define in Excel, we need to reference the object to which it will be applied, even when the object is the same for multiple properties. The following example clearly shows the need to reference the object for each property:Sub FormatCell() Range("B3").Value = 58.7 Range("B3").Font.ColorIndex = 4 Range("B3").NumberFormat = "0.00" Range("B3").Font.Bold = True Range("B3").Interior.ColorIndex = 6 End SubComments
- The value 58.7 is set in cell B3 (
.Value = 58.7) - The font color is set to green (
.Font.ColorIndex = 4) - The number format is changed (
.NumberFormat = "0.00") - The content is bolded (
.Font.Bold = True) - The background color is set to yellow (
.Interior.ColorIndex = 6)
To avoid repeating the same object, we can use
WithandEnd With. The referenced object must be placed right after theWithstatement. Syntax:With Object Statement End WithExample using
With:Sub FormatCell() With Range("B3") .Value = 58.7 .Font.ColorIndex = 4 .NumberFormat = "0.00" .Font.Bold = True .Interior.ColorIndex = 6 End With End SubNested
Withstatements are also possible:Sub AlterSheet() With Sheets("Feuil2") With Range("B6") .Value = 12 .Font.Bold = True .Font.ColorIndex = 4 End With .Name = "mafeuille" .Move Before:=Sheets("Plan1") .Visible = True End With End SubNOTE
Always consider proper indentation: the first and last lines of each block should align to the left. To refer to properties or methods in a hierarchy, start each statement with a period (.) to indicate continuation.Avoid the Select Method When Possible
Accessing individual objects should be as direct as possible, without many intermediate steps. In many VBA applications, objects are accessed as follows:- A workbook is activated.
- A worksheet is activated.
- A range or cell is selected.
- Properties/methods are applied to the selected item.
This approach is easy to understand but slower and more error-prone.
Example:
Sub ActivationSelection()
  ThisWorkbook.Activate
  Worksheets("Feuil1").Activate
  Range("A1:A10").Select
  Selection.Interior.Color = vbYellow
End Sub
Better approach with direct referencing:
Sub ActivationSelection()
  ThisWorkbook.Worksheets("Feuil1"). _
  Range("A1:A10").Interior.Color = vbYellow
End Sub
Another example (copy B1 to D1):
With Select:
Sub MethodeSelect()
  Range("B1").Select
  Selection.Cut
  Range("D1").Select
  ActiveSheet.Paste
End Sub
Better referencing:
Sub MethodeSelect()
  ThisWorkbook.Worksheets("Feuil1"). _
  Range("B1").Cut Destination:=ThisWorkbook. _
  Worksheets("Feuil1").Range("D1")
End Sub
Assignment Operator
This is the first operator you’ll use in any programming language. The assignment operator assigns the value of an expression to a variable, constant, or property of an object. It always includes an equal sign (=):variable = expressionIt acts like a bridge; the value on the right is transferred to the element on the left.
Example:
Sub AssignmentOperator()
  a = 10
  Range("A1").Value = a
End Sub
Comments
- The value
10is assigned to variablea. - Then,
ais assigned to cell A1.
RGB() and QBColor() Functions
Color codes in VBA are often given as hexadecimal numbers. Instead of specifying a color directly using hexadecimal, it’s more practical to useRGB()orQBColor().RGB(red, green, blue)
- Red: integer from 0 to 255
- Green: integer from 0 to 255
- Blue: integer from 0 to 255
Color Red Green Blue Black 0 0 0 Blue 0 0 255 Green 0 255 0 Cyan 0 255 255 Red 255 0 0 Magenta 255 0 255 Yellow 255 255 0 White 255 255 255 QBColor(color)
Returns one of 16 standard colors based on a numeric argument between 0 and 15:Number Color Number Color 0 Black 8 Gray 1 Blue 9 Light Blue 2 Green 10 Light Green 3 Cyan 11 Light Cyan 4 Red 12 Light Red 5 Magenta 13 Light Magenta 6 Yellow 14 Light Yellow 7 White 15 Bright White Understanding Events with Excel VBA
There are several ways to run a procedure. One of them is to have it run automatically through events. Events are « triggers » for macros, meaning you can assign VBA code to execute when an event is triggered either by the user (workbook opening, value change in a cell, etc.) or by Excel itself (refreshing PivotTables, etc.).
Characteristics of Events
An event is always associated with a specific object or collection of objects. Suppose you have a worksheet-level event attached to the first sheet of the workbook. If you want that event to trigger when the user selects new cells on any sheet in the workbook, you must create a workbook-level event that applies to all sheets. The worksheet here is the object associated with the event. It can be either an existing object created by the user or one created through programming.
In Excel, five main types of objects are associated with events:
- Worksheet
- Chart sheet
- Workbook
- Application (Excel instance)
- Dialog box (UserForm)
The first four types are specific to Excel, while UserForms can be used in other applications (Access, Word, etc.) that integrate VBA.
To these object types, you can add those created and defined by programming using class modules.
Why Write an Event?
Suppose you have a workbook in which you enter values in column A. Your manager tells you he needs to know when each number was entered. Entering data is an event, specifically an event called
Worksheet_Change. You can write a macro that responds to this event.NOTE
TheWorksheet_Changeevent does not occur when cells are changed during a recalculation. Use theCalculateevent for sheet recalculation.This macro will be triggered each time the worksheet is modified. If the change occurs in column A, it will write the date and time in column B, right next to the modified cell. Here is an example of what such a macro might look like:
Private Sub Worksheet_Change(ByVal Target As Range)
  If Target.Column = 1 Then
     Target.Offset(0, 1) = Now
  End If
End Sub
Comments
- As mentioned, the
Worksheet_Changeevent occurs when a user modifies worksheet cells. Its syntax is:
Private Sub Worksheet_Change(ByVal Target As Range) ' Code here End Sub- If the target is column A (
Target.Column = 1), in other words, if the changes occur in column A, then column B (Target.Offset(0, 1)) is updated with the date and time of the change (Now).
NOTE
Macros that respond to events are very sensitive to where they are placed. For example, thisWorksheet_Changemacro must be placed in the code module associated with the worksheet. Place it elsewhere, and it won’t work.Workbook Events
The
Workbook_Openevent is commonly used in practice to display messages, set up user-defined work environments, perform checks, or execute various preparatory tasks.To enable the
Workbook_Openevent:- Press Alt + F11 to open the VBA editor.
- In the Project Explorer, double-click
ThisWorkbook. - In the code window, click the left dropdown list and select
Workbook. Excel will automatically create a ready-to-use event macro for you:
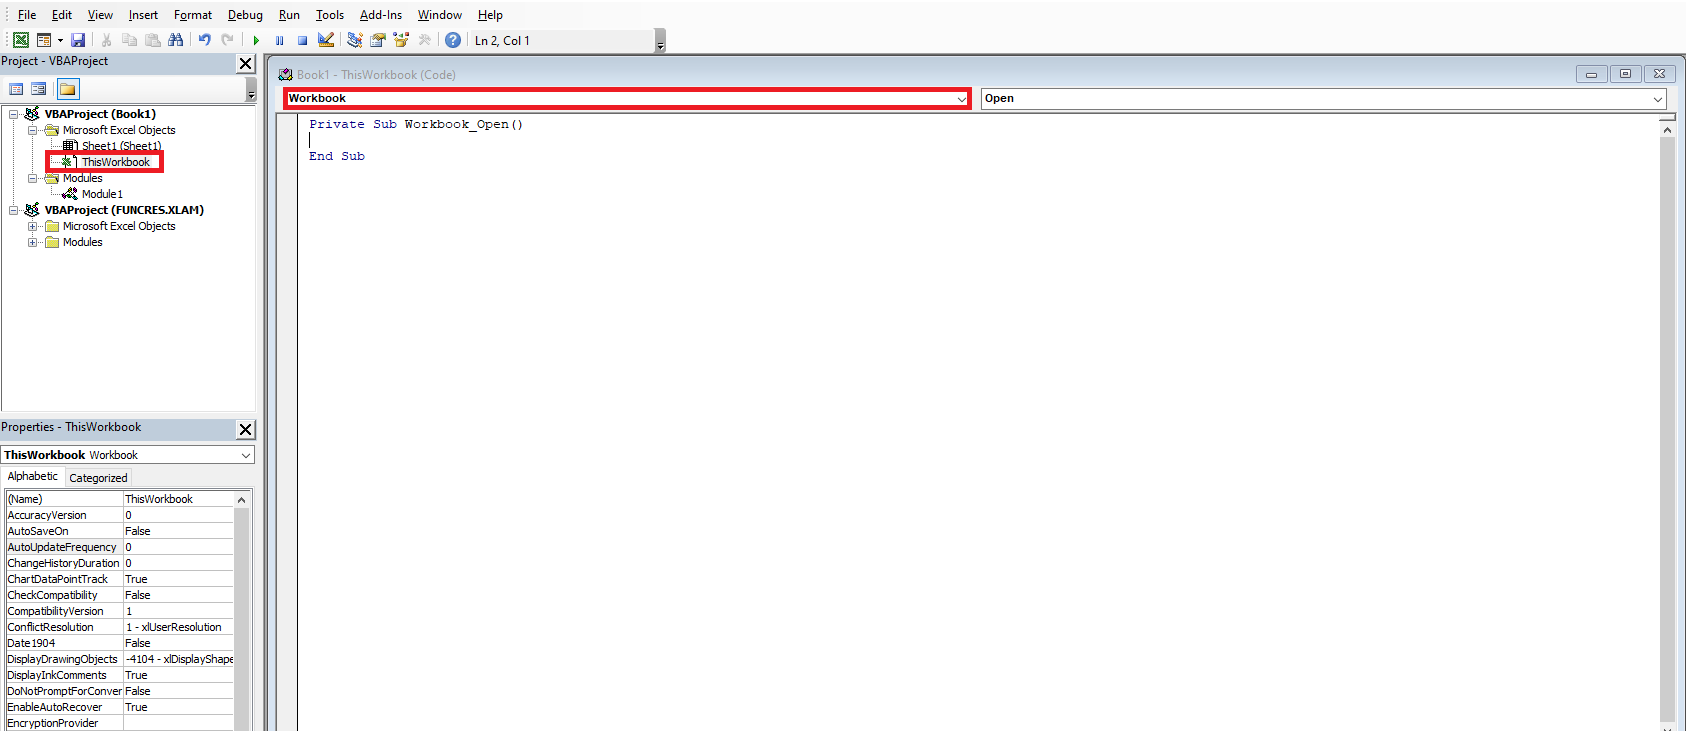
Private Sub Workbook_Open()
End Sub
In the second dropdown, you will see all available events that can be used with the workbook. You just need to fill in the empty macro with commands that will be executed immediately when the workbook opens.
Commonly used Workbook events:
Event When It Is Triggered Workbook_Activate When the workbook is activated Workbook_BeforeClose Before the workbook is closed Workbook_BeforePrint Before the workbook is printed Workbook_BeforeSave Before the workbook is saved Workbook_Deactivate When the workbook is deactivated Workbook_NewSheet When a new sheet is added Workbook_Open When the workbook is opened Workbook_SheetActivate When a sheet is activated Workbook_SheetBeforeRightClick Right-click on a sheet Workbook_SheetBeforeDoubleClick Double-click on a sheet Workbook_SheetCalculate When a sheet is recalculated Workbook_SheetChange When a sheet cell is changed Workbook_SheetDeactivate When a sheet is deactivated Workbook_SheetFollowHyperlink When a hyperlink is clicked Workbook_SheetSelectionChange When a cell selection is changed Workbook_WindowActivate When the workbook window is activated Workbook_WindowDeactivate When the workbook window is deactivated Workbook_WindowResize When the workbook window is resized Workbook_Open Example:
Private Sub Workbook_Open()
    Dim Message As String
    If Weekday(Now) = 6 Then
        Message = "Today is Friday."
        Message = Message & " Don’t forget to save your work."
        MsgBox Message
    End If
End Sub
Comments
- The
Workbook_Openfunction runs automatically each time the workbook opens. - It uses the
Weekdayfunction to check the day. If it’s Friday (day 6 in Anglo-Saxon systems), a reminder appears. - The
&operator is used to concatenate strings.
Workbook_BeforeClose Event:
This procedure runs just before the workbook closes. It is located in the
ThisWorkbookcode window:Private Sub Workbook_BeforeClose(Cancel As Boolean) Dim Message As String Dim Response As Integer Dim FName As String Message = "Would you like to save a backup of this file?" Response = MsgBox(Message, vbYesNo) If Response = vbYes Then FName = "F\BACKUPS\" & ThisWorkbook.Name ThisWorkbook.SaveCopyAs FName End If End SubComments
- This routine asks if the user wants to save a backup copy of the workbook.
- If the user clicks Yes, the code uses
SaveCopyAsto save it to the F drive (you must adapt this to your environment).
Even if the user cancels the Excel closing process, this event will still have run — which is a limitation of
Workbook_BeforeClose.Workbook_BeforeSave Event:
Triggered before the workbook is saved. It occurs when using Save or Save As commands.
Example to increment a counter in cell A1 of Sheet1:
Private Sub Workbook_BeforeSave(ByVal SaveAsUI As Boolean, Cancel As Boolean)
 Sheets("Sheet1").Range("A1").Value = _
 Sheets("Sheet1").Range("A1").Value + 1
End Sub
To prevent users from saving under a different name:
Private Sub Workbook_BeforeSave(ByVal SaveAsUI As Boolean, Cancel As Boolean)
  If SaveAsUI Then
    MsgBox "You cannot save a copy of this workbook!"
    Cancel = True
  End If
End Sub
Comments
- Disabling macros bypasses these restrictions, which is logical since event procedures are also macros.
Worksheet Events
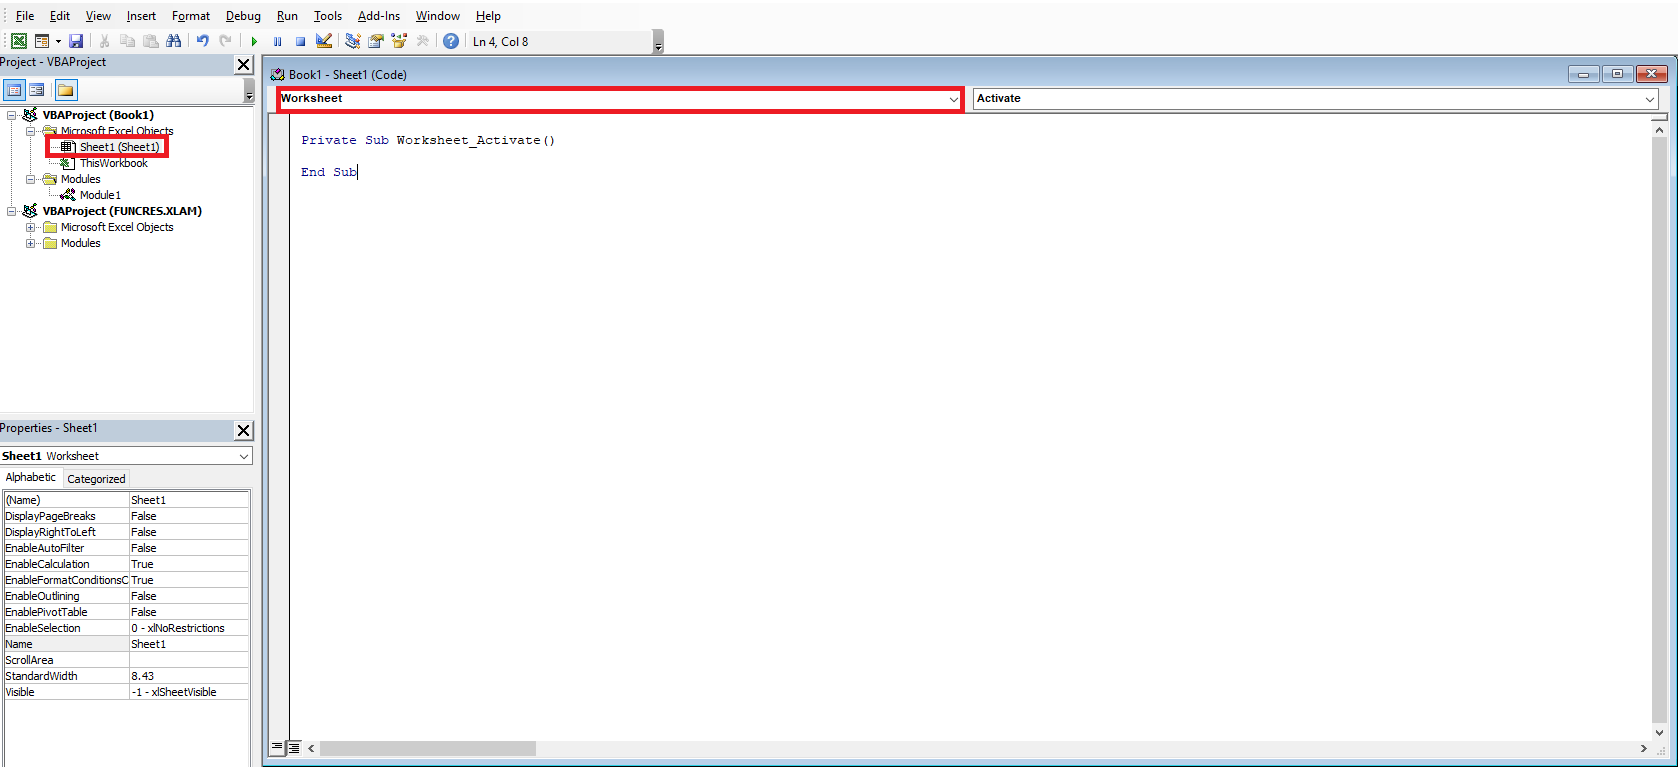
To define a worksheet event:
- Press Alt + F11 to open the VBA editor.
- In the Project Explorer, double-click the desired sheet.
- In the code window, select
Worksheetfrom the left dropdown and the desired event from the right.
Commonly used Worksheet events:
Event When It Is Triggered Worksheet_Activate When the sheet is activated Worksheet_BeforeRightClick On right-click Worksheet_BeforeDoubleClick On double-click Worksheet_Deactivate When the sheet is deactivated Worksheet_Calculate When the sheet is recalculated Worksheet_Change When a cell is changed Worksheet_SelectionChange When the selection changes Worksheet_BeforeDoubleClick Example:
Private Sub Worksheet_BeforeDoubleClick(ByVal Target As Range, Cancel As Boolean)
   Target.Font.Bold = Not Target.Font.Bold
   Cancel = True
End Sub
Worksheet_Activate Example:
Private Sub Worksheet_Activate()
   MsgBox "You just activated the sheet " & ActiveSheet.Name
End Sub

Private Sub Worksheet_Activate()
   Range("A1").Activate
End Sub
To prevent navigating away from Sheet1:
Private Sub Worksheet_Deactivate() MsgBox "You must stay on Sheet1." Sheets("Sheet1").Activate End SubWarning: Avoid using such macros to block Excel’s default behavior. It’s frustrating for users and easily bypassed by disabling macros.
Worksheet_Change Event Example:
Preventing non-numeric input in A1:
Private Sub Worksheet_Change(ByVal Target As Range)
  If Target.Address = "$A$1" Then
    If Not IsNumeric(Target) Then
      MsgBox "Please enter a number in cell A1."
      Range("A1").ClearContents
      Range("A1").Activate
    End If
  End If
End Sub
Accessing Properties, Methods, and Events More Easily
Welcome to the world of objects, properties, methods, and events. You will learn more in the following chapters. Meanwhile, three tools can help:
- VBA Help System
- Object Browser
- Auto List Members
The VBA Help System explains every object, property, and method. Press
F1on a keyword in the editor to get help instantly.The Object Browser, accessible via the View menu or by pressing
F2, shows all available VBA commands. You can identify objects, properties, methods, or events by their icons. You can also filter by libraries.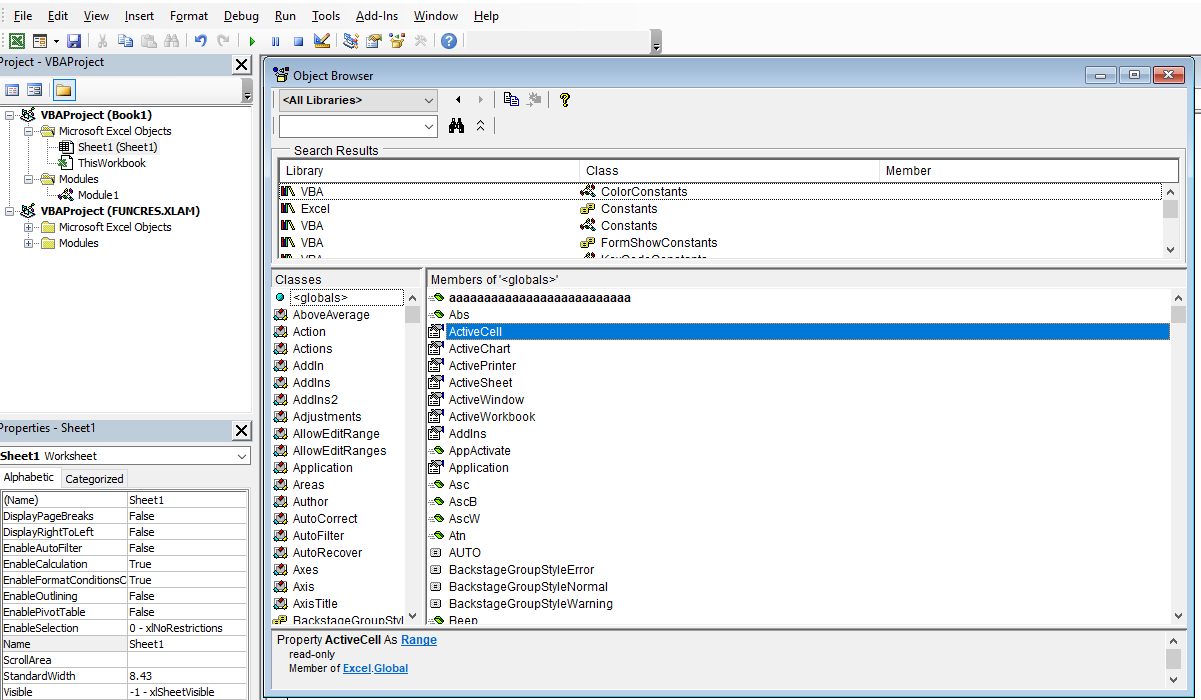
Understanding Object Properties and Methods in Excel VBA
While it’s important to know how to reference objects, simply referring to an object doesn’t accomplish anything useful. To do something meaningful, you need to be able to:
■ read or modify an object’s properties.
■ specify an action method to use with an object.With thousands of properties and methods available, it’s easy to feel overwhelmed. But you’ll never need to use most of the available properties and methods.
Object Properties
A property is information associated with an object. A property can provide information about the object or define some aspect of the object’s appearance or behavior. Using a car as an example, its properties would include its color, the radio station it’s tuned to, and the amount of fuel in the tank. Some object properties are read-only, meaning you can check their value but not change it (for example, the number of doors). Others are read-write and can be read or modified, such as the radio station.
Properties are essentially characteristics of an object. Similarly, an object in Excel, such as the Worksheet object, has a Name property that can be modified, and a Rows.Count property that cannot be changed.
You refer to an object’s property by referencing the object, followed by the property, separated by a period:
Object.Property
For example, you can rename your worksheet by modifying its Name property. In this example, you rename “Sheet1” to “MySheet”:
Sheets("Sheet1").Name = "MySheet"Some properties take arguments that further specify the property’s value.
NOTE
To set a property’s value, follow the object reference with a dot, the property name, an equal sign (=), and the new value.Understanding Methods
A method, on the other hand, is something the object can do—an action it can perform. Continuing with the car analogy, its methods would include “accelerate,” “turn,” and “stop.” Many methods take arguments, which are pieces of information specifying exactly how the method should behave. For example, the “turn” method might have a “direction” argument that can be “right” or “left.”
NOTE
It helps to think of methods as verbs. You can paint your house, so in VBA this translates to something like:house.paint
Methods are actions that can be performed on an object.The syntax for using methods is:
Object.Method
A simple example of an Excel method is the Select method of the Range object:
Range("A1").SelectThis selects cell A1.
Another example is the Copy method of the Range object:
Range("A1:B10").CopyThis copies the contents of the range A1:B10.
You can find all the properties and methods associated with an object. For example, for the Workbooks object (a collection of workbooks), a dropdown menu appears when you type the period.
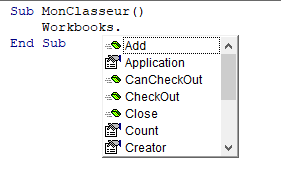
Sometimes, pressing the period (
.) may not show the list of properties and methods. In that case, press Ctrl + Space.In the dropdown menu, properties are identified with one icon, and methods with another.
Some properties and methods take arguments that may define how they are applied. There are three ways to provide arguments:
- Positional arguments with parentheses:
Include the arguments in parentheses, in the correct order, after the method name:
ObjectName.Method(argument1, argument2, ...)
In the rare case of a property that takes arguments, this syntax must also be used. The arguments must be in the precise order.
- Positional arguments without parentheses:
Omit the parentheses but still provide the arguments in the correct order:
ObjectName.Method argument1, argument2, ...
- Named arguments (recommended):
Use the argument name, as defined in the method, followed by:=and the value:
ObjectName.Method ArgumentName1:=ArgumentValue1, ArgumentName2:=ArgumentValue2
For example, the Paste method can be used more efficiently by explicitly defining the Destination argument:
Range("A1").Paste Destination:=Range("D1")This example copies the content of cell A1 and pastes it into cell D1.
There are two advantages to using named arguments. First, they make your code clearer. The name of each argument describes its purpose, helping you (or others) understand previously written code. Second, they add simplicity. Many methods have numerous optional arguments. You might want to call the method while leaving most arguments at their default values. Without named arguments, the method identifies arguments only by their position in the list, so you’d have to include placeholders (commas) for all the optional arguments you skip. A placeholder is a comma followed by another comma—an omitted argument would go between them. With named arguments, this is unnecessary—you only include the optional arguments you wish to override.
- Positional arguments with parentheses:
Excel VBA: Object-Oriented Programming
You’ve been using Excel for some time, but you probably never thought of it as an object. The more you work with VBA, the more you start seeing Excel in those terms. You’ll understand that Excel is an object and that it contains other objects. These objects, in turn, contain even more objects. In other words, VBA programming involves working with an object hierarchy.
At the top of this hierarchy is the Application object, which is essentially Excel itself. The Application object contains other objects such as Addin, Window, Workbook, etc. Each object contained within the Application object may contain other objects. For example, a Workbook object contains objects like Chart, Name, and Worksheet. In turn, each of these can also contain more objects. Consider a Worksheet object contained in a Workbook object, which is itself within the Application object. Some of the objects that can be found within a Worksheet are Comment, Hyperlink, Name, PivotTable, and Range.
Object Collections in VBA Programming
Collections are another key concept in VBA programming. In object-oriented programming, a collection is an object that contains a group of similar objects. To add to the confusion, a collection is itself an object.
Here are some examples of commonly used collections:
- Workbooks: A collection of all currently open Workbook objects.
- Worksheets: A collection of all Worksheet objects within a specific workbook.
- Charts: A collection of all Chart (chart sheets) objects in a particular workbook object.
- Sheets: A collection of all sheets contained in a particular workbook object.
Whichever collection you want to work with, you can perform the following actions:
- Refer to a specific object in a collection using an index value. For example, to refer to the second object in the worksheet collection, use one of the following statements:
Worksheets(2).Select 'or Worksheets("Sheet2").Select- Determine the number of items in a collection using the Count property. For example, in the Immediate Window, the instruction:
?Worksheets.Count
will return the total number of worksheets in the current workbook.
- Insert new items into a collection using the Add method. For example, in the Immediate Window:
Worksheets.Add
VBA will insert a new worksheet into the current workbook. The Worksheets collection now contains one additional item.
- Loop through all objects in a collection using the For Each…Next loop. Suppose you’ve opened a workbook containing five worksheets named: “Daily Salary”, “Weekly Salary”, “Monthly Salary”, “Yearly Salary”, and “Bonus”. To delete all worksheets whose names contain the word “Salary”, you can write the following procedure:
Sub DeleteSheets()
    Dim ws As Worksheet
    Application.DisplayAlerts = False
    For Each ws In Worksheets
        If InStr(ws.Name, "Salary") Then
            ws.Delete
        End If
    Next
    Application.DisplayAlerts = True
End Sub
Comments
- The line
Application.DisplayAlerts = Falseis used to suppress prompts and alerts that Excel normally displays during code execution. In this case, it prevents the confirmation message when deleting sheets. - The
InStrfunction is useful for string comparisons because it allows you to find a string within another string. The expressionInStr(ws.Name, "Salary")tells Excel to check whether the worksheet name (stored in the variablews) contains the string « Salary ».
NOTE
Collection names are always plural.Working with Collections
Declaring and Using a Custom Collection
To create a user-defined collection, begin by declaring an object variable of type
Collection:Dim myCollection As Collection Set myCollection = New Collection 'or Dim myCollection As New Collection
Adding Items to a Custom Collection
After declaring the Collection object, you can insert new items using the Add method. The syntax is:
object.Add item[, key, before, after]
You only need to specify the object (collection name) and the item to add. The optional arguments (key, before, after) are also very useful.
Items in a collection are automatically assigned index numbers starting from 1. However, each item can also be assigned a unique key. Instead of accessing an item by index (1, 2, 3, etc.), you can assign a custom key when adding it. For example, when creating a custom collection of worksheets, you could use the sheet name as the key. In a student or employee collection, you could use their ID number as the key.
If you want to specify the position of the object in the collection, use the
beforeorafterargument. Thebeforeargument specifies the object before which the new object is added;afterspecifies the object after which it is added.Removing Items from a Custom Collection
To remove an item, use the Remove method:
object.Remove item
The object is the name of the collection. The item is the object you want to remove from the collection.
Referring to Objects in a Collection
Referring to an object is essential because you need to identify which object you’re working with. To reference a single object in a collection, use the object’s name or index inside parentheses after the collection name:
Worksheets("Sheet1")Note that the sheet name must be enclosed in quotation marks. If you omit them, Excel won’t recognize the object. If “Sheet1” is the first (or only) sheet, you can also write:
Worksheets(1)
In this case, the number is not quoted. Use quotes for names, no quotes for index numbers.
Another collection, Sheets, contains all types of sheets (worksheets and chart sheets). If “Sheet1” is the first sheet in the workbook, you can also refer to it as:
Sheets(1)
DIFFERENCE BETWEEN WORKSHEET AND SHEET
- Worksheet represents a worksheet only.
- Sheet represents any sheet (either worksheet or chart sheet).
So, if your workbook has three worksheets and one chart sheet, you have:
- 3 Worksheets
- 4 Sheets
The Worksheets collection is a subset of the Sheets collection.
Navigating the Hierarchy
The object model in any VBA-enabled application is hierarchical. This hierarchy determines the proper syntax for your VBA macros.
For example, to enter the word “Bonjour” in cell A1 of Sheet1 in the currently open workbook, the full line of code would be:
Application.Workbooks("Workbook1.xlsx").Worksheets("Sheet1").Range("A1").Value = "Bonjour"NOTE
In Excel versions prior to 2007, the file name in the code should be:
Workbook1.xls instead of Workbook1.xlsx
Workbook, Worksheet, Range, and Value are English terms meaning respectively: Classeur, Feuille de calcul, Plage de cellule, and Valeur in French.
This code literally means that we are entering the value “Bonjour” in cell A1 (
Range("A1")), which is on the sheet “Sheet1” (Worksheets("Sheet1")), inside workbook “Workbook1.xlsx” (Workbooks("Workbook1.xlsx")), which itself is part of Excel (Application).If you were to fully qualify every object reference, your code would become lengthy and harder to read.
Fortunately, VBA is smart. It knows you’re working in Excel, so you don’t always need to specify the
Applicationobject. The above code can be simplified as:Workbooks("Workbook1.xlsx").Worksheets("Sheet1").Range("A1").Value = "Bonjour"If you’re sure that « Workbook1.xlsx » is the active workbook, you can omit this reference:
Worksheets("Sheet1").Range("A1").Value = "Bonjour"And if you’re currently working in « Sheet1 » when the code is executed, you can simplify it further. If the parent Worksheet object is not specified, VBA assumes you are referring to the active sheet:
Range("A1").Value = "Bonjour"NOTE
Excel does not have a Cell object. A cell is an element of the Range object, which represents a cell or group of cells.
Arrays in Excel VBA
With variables and constants, you can store values. However, the limitation of using variables is that each variable can only store a single value at a time. Consider a situation where you want to store 20 values in variables. Declaring 20 variables and assigning values would be tedious and time-consuming. Therefore, variables are not a good option when a large number of values need to be stored. You can use arrays in such situations.
An array is a set of indexed data values stored sequentially. The values are stored in adjacent memory locations. Each set of data values stored as an array is treated as a separate variable. For the previous example, you can declare an array that can store 20 values. The values in an array can be referenced individually at any time in the program. All values in an array can be referenced by the same name (but with a different index number) and have the same data type. Just like variables, you must declare an array before using it.
Declaring Arrays
You can declare arrays the same way you declare variables using the
Dimstatement. When declaring an array, you must add a pair of parentheses to the array name. You can also specify the number of data values the array can store, i.e., the size of the array.The syntax for declaring an array is:
Dim ArrayName(size1, size2, ...) As DataType
where the values
size1,size2, … specify the size of the array, the number of indices, and the maximum allowed value for each specific index. In this case, array indexing by default starts at zero. So, the declaration:Dim Names(5) As String
defines a one-dimensional array of 5 elements assigned the
Stringdata type, and the declaration:Dim myArray(5, 7) As Variant
defines a two-dimensional array with 5 x 7 = 35 elements, which are
Varianttype variables.You can assign any data type to an array. The default data type for an array is
Variant. Each string is referenced by its index number. The index number starts at 0. The first string in the array has the index 0 and the last has the index 4:Names(0) Names(1) Names(2) Names(3) Names(4)
VBA supports a maximum of 60 dimensions. You may want to declare a multi-dimensional array.
In many situations, you are not sure of the size of an array. However, if your estimate is too low and the array actually needs more memory than allocated, an error message is generated. On the other hand, if your estimate is too high, VBA still allocates memory to unused array slots, which wastes memory. To avoid these problems, you may need to allocate the size of an array at runtime. For example, if you want to run a procedure that will store each student’s name in a list and you don’t know how many students are in the list, you can use a dynamic array.
You can declare a dynamic array by adding an empty pair of parentheses to the array name. For example, a dynamic array
Namesis declared as follows:Dim Names() As String
After declaring an array, you will want to store values in it. The next section deals with storing values in arrays.
Storing Values in an Array
To store values in an array, you must reference the array elements. Each element in an array is associated with an index number. The index number associated with a single data value in an array indicates its position in the array. The first element of an array has index 0, and the last element has an index one less than the array’s dimension. You can either address the entire set of values in an array or reference each value separately. For example, you can reference the third data element in the
Namesarray using the following statement:Names(2)
Similarly, you can use the index number and the assignment operator to assign a value to a specific data element in the array:
Names(2) = "Elie Chancelin"
The third element of the array
Namesreceives the value « Elie Chancelin ».By default, array indexing starts at 0. You can use the
Option Basestatement to change the default starting index. To do this, declare theOption Basestatement at the beginning of the code. For example:Option Base 2 Dim Names(5) As String
This changes the default array index from 0 to 2, giving:
Names(2)
Names(3)
Names(4)
Names(5)
Names(6)
Another way to modify the base index is by using the
Tokeyword when declaring an array. For example:Dim StockRate(2 To 6, 2 To 11) As Long Dim Names(2 To 6) As String
You can change the size of an array after declaration using the
ReDimstatement.Resizing an Array
Resizing an array refers to changing the size of the array. You may need to change an array’s size after declaring it. Once an array is declared, memory is allocated based on its size. If you want to increase or decrease the amount of memory allocated to the array, you can do so using the
ReDimstatement.The syntax to declare and size a dynamic array is as follows:
Dim ArrayName() As DataType
ReDim ArrayName(size1, size2, ...)
Here’s an example of declaring, sizing, and using a dynamic array, and resizing it later:
Dim myArray() As Variant
ReDim myArray(1, 2)
myArray(0, 0) = 2
myArray(0, 1) = 3
k = myArray(0, 0) + myArray(0, 1)
ReDim myArray(k)
myArray(0) = "String1"
Note: In this example,
myArrayis first defined as a two-dimensional array of two elements, then redefined as a one-dimensional array, with the upper index limit set by the value ofk.If the array
Namescontains values, theReDimstatement will erase previously stored values. If you want to resize an array without erasing the previously stored values, use theReDim Preservestatement:ReDim Preserve Names(10)
The above statement resizes the
Namesarray to 10 and retains the previously stored values.Once arrays are declared and initialized, you can use them in functions and procedures like variables. For example, you may need to perform analysis based on the values stored in an array.
Extracting Information from an Array
Arrays can be used in functions and procedures to store multiple values. Array values can be extracted to perform operations on them. You must specify the index number of the array element to specify the position of the data value you want to extract. You can then use the
MsgBoxfunction to display the value stored in the array.The following code declares an array
Names, with dimension 5:Dim Names(5) As String
The
Namesarray stores the following data:Names(0) = "Keukoua Elie Chancelin" Names(1) = "Tchoutang Landry" Names(2) = "Mbiada Vanina" Names(3) = "Nana Kemajou Armel" Names(4) = "Leudjeu Emilienne"
To extract the third value from the
Namesarray and display it, use:Names(2)
The above statement returns « Mbiada Vanina ».
Let’s now discuss the different functions and statements used to manipulate arrays.
Manipulating Arrays
VBA provides the
IsArray,LBound, andUBoundfunctions to manipulate arrays. You can also use theErasestatement to manage memory allocated to an array. The following sections describe each of these in detail.The
IsArrayFunctionAt some point in the code, you may need to check whether a variable is an array. VBA provides the
IsArrayfunction for this.IsArray(variableName)
The function returns
TrueorFalsedepending on whether the variable is an array. You can then act accordingly based on the return value.You might also need to find the upper and lower bounds of an array. Use
LBoundandUBoundfunctions.The
LBoundandUBoundFunctionsThese functions are used to find the lower and upper limits of an array.
LBoundretrieves the index of the first element, andUBoundretrieves the index of the last element.Syntax:
LBound(array, [dimension])
UBound(array, [dimension])
The optional
dimensionargument refers to the array dimension to return. The default is the first dimension.
Example:Dim ElieChancelin(300, 200, 33) As Long MsgBox UBound(ElieChancelin, 3) MsgBox LBound(ElieChancelin, 1)
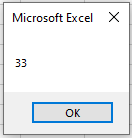
This code will display the upper bound of the 3rd dimension and the lower bound of the 1st.
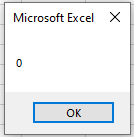
Another example:
Dim A(1 To 100, 0 To 5)
MsgBox UBound(A, 1) & vbCr & UBound(A, 2)
The
EraseStatementWhen you declare an array, memory is automatically allocated. Arrays can be deleted when no longer needed. You can free the allocated memory using
Erase.Example:
Erase ElieChancelin
This removes the array
ElieChancelinfrom memory.The
Array()FunctionA convenient way to define one-dimensional arrays is with the
Array()function, which converts a list of comma-separated items into a vector and assigns it to aVariant. You can initialize both 1D and 2D arrays using nestedArray()functions.Initialize a one-dimensional array:
Dim numberA As Variant
Dim s As Double
numberA = Array(10, 20)
s = numberA(0) + numberA(1)
MsgBox s
Initialize a multidimensional array:
Dim CityCountry As Variant CityCountry = Array(Array("Douala", "Cameroon"), _ Array("Dakar", "Senegal")) MsgBox CityCountry(0)(0) 'Displays "Douala" MsgBox CityCountry(0)(1) 'Displays "Cameroon"vUsing Constants in Excel VBA
Using Constants in Excel VBA
A constant is a named element that remains fixed throughout the execution of a program. Unlike variables, constants do not change their values. A constant can be a number, a string, or any other value. Each application has its own set of constants, and new constants can be defined by a user. Once you declare a constant, it can be used anywhere in the program instead of the actual value. VBA supports two types of constants: built-in constants and user-defined constants.Built-in Constants
Each application has its own predefined built-in constants. These constants are assigned values. You can use these values to refer to the constants instead of their names. However, using names is preferable because it is difficult to remember the value of each constant. The names of built-in (or intrinsic) constants begin with two letters indicating the application name. For example, constants for Word objects begin with wd, constants for PowerPoint begin with pp, and constants for Excel begin with xl (e.g.,
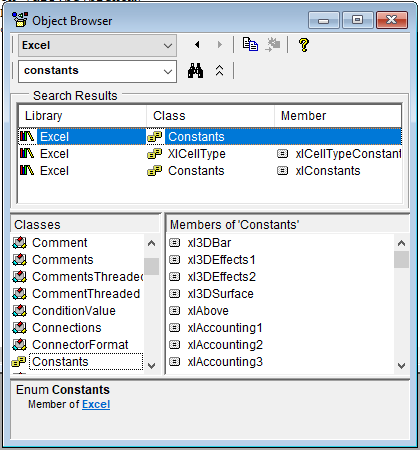
xlSaveChangesorxlDoNotSaveChanges), etc. Similarly, in VBA, objects are referenced by prefixing the constants with vb.Microsoft Excel and VBA have a long list of predefined constants that do not need to be declared. These built-in constants can be found using the Object Browser window. Here is how to access this window:
-
In the Visual Basic Editor window, choose View / Object Browser.
-
In the Project / Library dropdown list, click the arrow and select Excel.
-
Enter keywords like constants in the search box and press Enter or click the Search button. Visual Basic will display the search results in the Search Results area.
-
Scroll through the Classes list to locate and then select Constants, as shown in the following figure. The right-hand side of the Object Browser window displays a list of all built-in constants available in the Microsoft Excel object library.
-
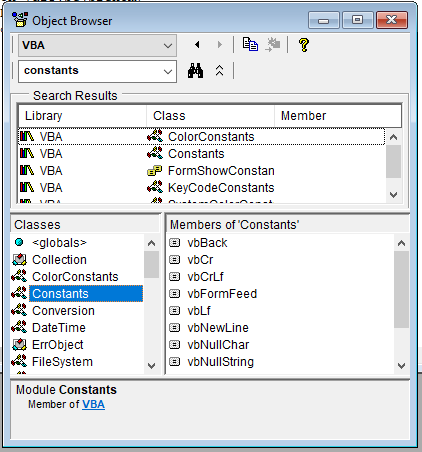
To search for VBA constants, choose VBA in the Project / Library dropdown list.
User-Defined Constants
In addition to built-in constants, VBA allows you to create your own constants. These are called user-defined constants. Constants are helpful in situations where you need to use a literal value multiple times. To declare constants, you must use the
Conststatement. The syntax of theConststatement is as follows:[Public | Private] Const ConstantName [As type] = expression
Remarks
-
Public | Privatespecifies the scope of the constant. A constant declared inside a procedure is local to that procedure. This part is optional. -
Constis the keyword used to declare user-defined constants. -
ConstantNamespecifies the name of the constant. The name must follow standard variable naming conventions. -
typespecifies the data type of the constant. A separateAs typeclause must be specified for each constant declaration. However, specifying the type is optional. -
expressionspecifies the value of the constant.
For example, the following statement declares a constant
MaConstand initializes it with the value95:Const Private MaConst As Integer = 95
You can specify multiple constants in a single statement. However, the data type for each constant must be included. For example:
Const Public rti_no As Integer = 520, stud_nom As String = "Elie"
Although declaring a constant resembles declaring a variable, there is a slight difference between the two. You initialize a constant at the time of its declaration, unlike variables which may or may not be initialized upon declaration. Once a constant is initialized, you cannot change its value during program execution.
Here are some typical constant declarations:
Const myWorkbook = "Workbook1.xls"
Const StartDate = #1/1/1999#
Const ErrorMessage1 = "Error during printing!"
Const VAT = 1.19
What can be improved here?
What applies to variables also has implications for constants. The examples above have not yet specified which data types should be used. The Variant data type is currently used in all four examples. To save memory space, we should declare the constant type explicitly:Const myWorkbook As String = "Workbook1.xls" Const StartDate As Date = #1/1/1999# Const ErrorMessage1 As String = "Error during printing!" Const VAT As Single = 1.19
-