Votre panier est actuellement vide !
Étiquette : vba
Control Elements in a UserForm, Excel VBA
VBA has a rich set of built-in controls that you can use in your form. Using them, it’s easy to create any user interface that meets the full requirements of a Windows environment. Control elements are created using the Toolbox toolbar, which is displayed on screen either by selecting View | Toolbox, or by clicking the Standard toolbar button.

The Toolbox contains buttons used to create controls. All buttons in the toolbox, except for the Select Objects button, are used to create controls. By clicking the Select Objects button, you can select an existing control in the form for further editing (resizing or moving).
Table: Toolbox Buttons and Commands
Name Tooltip Description Label 
Caption Displays information TextBox 
Text Box Allows text input ComboBox 
Drop-down list Allows selection and/or entry in a list ListBox List box Allows selection in a list CheckBox 
Check box Returns True or False OptionButton 
Option button Allows a choice from a list of options ToggleButton 
Toggle button Returns True or False Frame 
Frame Container used to group controls CommandButton 
Command button Triggers actions (Sub/Function) TabStrip 
Tab control Adds tabs to the UserForm MultiPage 
MultiPage Allows multiple pages ScrollBar 
Scroll bar Increments or decrements values SpinButton 
Spin button Increments or decrements values Image 
Image Inserts an image RefEdit 
RefEdit Retrieves a cell range address To place a control on the form, click the corresponding button in the Toolbox and drag the control’s frame to the desired location. After that, the control can be moved, resized, copied to clipboard, pasted, or removed from the form.
Label
The Label control is used to display information or captions. The user cannot modify the text displayed in the label at runtime. The main property is
Caption, which defines the displayed text.A Label does not display values from data sources or expressions; it is always unbound and does not change when navigating records.
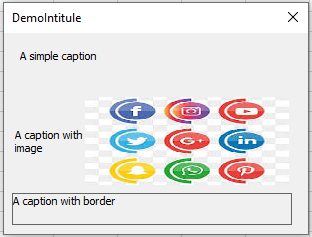
The following example shows different types of Labels: simple, with an image, and with a border. To implement this, create a form and place three Labels. The image file used is
D:logo.jpg. In the form module, enter:Private Sub UserForm_Initialize() Me.Caption = "DemoIntitule" Label1.Caption = "A simple caption" Label2.Caption = "A caption with image" Label2.Picture = LoadPicture("logo.jpg") Label2.PicturePosition = fmPicturePositionRightCenter Label3.Caption = "A caption with border" Label3.BorderStyle = fmBorderStyleSingle Label3.WordWrap = True End SubComments:
- In Label2’s properties window, the image is loaded using the
Pictureproperty.PicturePositiondefines the image’s position relative to the text. - Label3 uses
BorderStyleto determine whether a border is shown. - The
WordWrapproperty determines if the text wraps within the control.
Parfait. Voici la suite exacte en anglais à partir de la section 2 – TextBox (Text Box), y compris toutes les sous-sections, propriétés, explications et blocs de code, sans résumé ni reformulation :
TextBox
The TextBox control is primarily used for user input of text, which is then used in the program or to output calculation results. Text entered into the TextBox can be converted to numbers or formulas via code. The main event associated with the TextBox is the
Changeevent.Table: Basic TextBox Properties
Property Description Name Sets the name of the TextBox Text Returns the text contained in the TextBox Multiline Boolean value that enables multiline input ScrollBars Defines the display mode of scrollbars SelLength, SelStart, SelText Characterize the selected text fragment MaxLength Sets the maximum number of characters allowed PasswordChar Sets the character displayed when entering a password ControlTipText Tooltip text shown when mouse hovers over the control Enabled When set to False, locks the control for the user and it cannot receive focusLocked When set to True, prevents user from editing the TextBox contentAdding Two Numbers
As an example with TextBoxes, let’s create a project where two numbers entered in two TextBoxes are added together, and the result is displayed in a third TextBox, as shown in the following figure.

Design:
Place three Labels, three TextBoxes, and two CommandButtons on a form. Use the Properties window to set their values as follows:
Object Property Value UserForm Caption c = a + b Label Caption A TextBox Name txtA Label Caption B TextBox Name txtB Label Caption C TextBox Name txtC CommandButton Name cmdOK Caption OK CommandButton Name cmdANNULER Caption CANCEL Form Module Code:
Private Sub cmdOK_Click()
    Dim a As Double, b As Double, c As Double
    a = txtA.Text
    b = txtB.Text
    c = a + b
    txtC.Text = c
End Sub

Private Sub cmdANNULER_Click()
    Unload Me
End Sub
Comments:
- The two numbers are entered in
txtAandtxtB; the sum is calculated and displayed intxtCwhen OK is clicked. - The syntax
Unload Mecloses the form when CANCEL is clicked.
Keyboard Shortcut Button
The
Acceleratorproperty assigns a key (letter or number) that, when pressed along with<Alt>, triggers the control’s click event. That character must appear in the control’sCaptionand will appear underlined.For example, add the following initialization procedure to assign
<Alt> + Oto OK and<Alt> + Ato CANCEL:Private Sub UserForm_Initialize() cmdOK.Accelerator = "O" cmdANNULER.Accelerator = "A" End SubNOTE:
When launching an Excel form, a series of events occur. One of these isInitialize, triggered after controls are loaded but before the form is displayed.<Enter> and <Escape> Keys
- Setting
Default = Trueon a button allows it to be triggered by the<Enter>key. - Setting
Cancel = Trueallows the<Escape>key to trigger that button.
Private Sub UserForm_Initialize()
    cmdOK.Default = True
    cmdCancel.Cancel = True
End Sub
Pressing
<Enter>runs the OK action;<Escape>closes the form.Locked Result Field
To completely lock a TextBox from user interaction, set:
Private Sub UserForm_Initialize()
    txtC.Enabled = False
End Sub
This disables the TextBox from being focused or edited.
Prevent a Button from Receiving Focus on Click
If a button gets focused when clicked, users may need to refocus a text field afterward. To prevent that, set:
Private Sub UserForm_Initialize()
    cmdOK.TakeFocusOnClick = False
End Sub
Moving Focus Between Fields with
To move focus with
<Enter>, handle theKeyDownevent in each TextBox and use theSetFocusmethod.Private Sub txtA_KeyDown(ByVal KeyCode As MSForms.ReturnInteger, _ ByVal Shift As Integer) If KeyCode = vbKeyReturn Then txtB.SetFocus End If End Sub Private Sub txtB_KeyDown(ByVal KeyCode As MSForms.ReturnInteger, _ ByVal Shift As Integer) If KeyCode = vbKeyReturn Then cmdOK_Click txtA.SetFocus End If End Sub Private Sub UserForm_Initialize() txtC.Locked = True End SubSetFocusmoves focus to the specified control:Object.SetFocusTooltip (ControlTipText)
Tooltips are shown when hovering over a control. You can define them using the
ControlTipTextproperty.Private Sub cmdOK_Click() Dim a As Double, b As Double, c As Double a = txtA.Text b = txtB.Text c = a + b txtC.Text = c End Sub Private Sub cmdANNULER_Click() Unload Me End Sub Private Sub UserForm_Initialize() txtA.ControlTipText = "Value of a" txtB.ControlTipText = "Value of b" txtC.ControlTipText = "Value of c" cmdOK.ControlTipText = "Sum of a + b" cmdANNULER.ControlTipText = "Cancel the operation" End SubPassword Input Field
You can use the
PasswordCharproperty to mask input characters. Example of a password-protected button: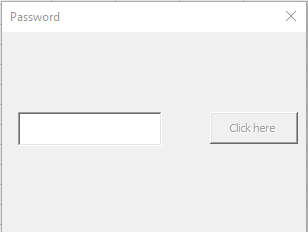
Design:
- One TextBox named
TxtMotpasse - One CommandButton named
CmdMessage
Code:
Private password As String

Private Sub UserForm_Initialize()
    cmdMessage.Enabled = False
    txtPassword.PasswordChar = "*"
    password = "chancelin"
End Sub

Private Sub txtPassword_KeyDown(ByVal KeyCode As MSForms.ReturnInteger, ByVal Shift As Integer)
    If KeyCode = vbKeyReturn Then
        If LCase(txtPassword.Text) = LCase(password) Then
            cmdMessage.Enabled = True
        Else
            cmdMessage.Enabled = False
        End If
    End If
End Sub

Private Sub cmdMessage_Click()
    MsgBox "Password entered correctly"
End Sub
Comments:
LCase()is used to ignore case sensitivity.Enableddetermines whether a control can receive focus and respond to events.
Très bien. Voici la suite exacte en anglais à partir de la section 2.9 – Multiline TextBox jusqu’à la fin de la section 6 sur les contrôles synchronisés
SpinButtonetTextBox, incluant toutes les propriétés, explications, et blocs de code :Multiline TextBox
A TextBox can be used as a multiline input field. To do so, set the
MultiLineproperty toTrue.Let’s build a simple project that converts euros to dollars. The project has two TextBoxes:
- A single-line TextBox for entering the amount.
- A multiline TextBox for displaying the result.
When the
<Enter>key is pressed in the first box, the conversion is calculated and displayed.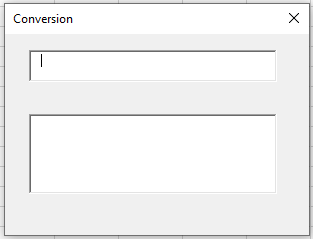
Design:
Place two TextBoxes on a form and set the following properties:
Object Property Value TextBox Name TxtMontant TextBox Name TxtConversion Form Module Code:
Private taux As Double

Private Sub UserForm_Initialize()
    taux = 1.19
    txtConversion.MultiLine = True
    txtConversion.Locked = True
End Sub

Private Sub txtMontant_KeyDown(ByVal KeyCode As MSForms.ReturnInteger, _
                             ByVal Shift As Integer)
    If KeyCode = vbKeyReturn Then
        Dim r As Double
        Dim d As Double
        r = txtMontant.Text
        d = FormatNumber(r / taux, 2)
        txtConversion.Text = "Amount entered in euros: " & r & vbCr & _
                             "Conversion rate: " & taux & vbCr & _
                             "Converted amount: " & d & " Dollars"
    End If
End Sub
Comments:
- To prevent users from modifying the result, the multiline field is locked using the
Lockedproperty. vbCr(orChr(13)) inserts a carriage return (line break).
Sharing Values Between Forms
If multiple forms exist in the project, they can exchange values via public variables declared in a standard module.
Example:
- UserForm1 has two TextBoxes and one CommandButton.
- UserForm2 has one TextBox to receive the result.
Standard Module Code:
Public valeurechange As Double
UserForm1 Code:
Private Sub CommandButton1_Click()
    valeurechange = CDbl(TextBox1.Text) + CDbl(TextBox2.Text)
    Unload Me
    UserForm2.Show
End Sub
UserForm2 Code:
Private Sub UserForm_Initialize()
    TextBox1.Text = valeurechange
End Sub
Comment:
CDbl()converts a numeric value into a double-precision number.
CheckBox and ToggleButton
The CheckBox and ToggleButton controls allow the user to make a selection. Their key property is
Value:True: selectedFalse: unselectedNull: neither selected nor unselected (grayed out)
To use
Null, theTripleStateproperty must be set toTrue.Controlling Control Visibility
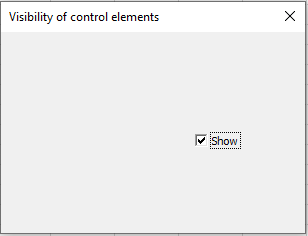
The
Visibleproperty determines if a control is shown (True) or hidden (False).Example: Use a CheckBox to toggle the visibility of a TextBox.
Private Sub UserForm_Initialize()
    CheckBox1.Caption = "Show"
    TextBox1.Visible = True
    CheckBox1.Value = True
End Sub

Private Sub CheckBox1_Change()
    If CheckBox1.Value Then
        TextBox1.Visible = True
    Else
        TextBox1.Visible = False
    End If
End Sub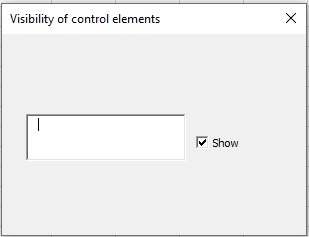
Controlling Accessibility of Controls
The
Enabledproperty defines whether the control is usable by the user.

Example: Use a CheckBox to toggle whether a CommandButton is enabled:
Private Sub UserForm_Initialize()
    CommandButton1.Caption = "ACCESSIBLE"
    CheckBox1.Caption = "Lock"
    CheckBox1.Value = True
End Sub

Private Sub CheckBox1_Change()
    If CheckBox1.Value Then
        CommandButton1.Enabled = False
    Else
        CommandButton1.Enabled = True
    End If
End Sub

Private Sub CommandButton1_Click()
    MsgBox "Hello! (-:"
End Sub
Comment:
If the box “Lock” is checked, the button is disabled. If unchecked, it becomes available.Frame
The Frame control is used to group other controls together. Its main property is
Caption.CheckBoxes and OptionButtons can also be grouped in code using the
GroupNameproperty.OptionButton
The OptionButton (radio button) allows mutually exclusive choices. They are often grouped inside a
Frame, or using theirGroupNameproperty.Key properties/events:
Value:True= selected,False= not selectedClickandChange: main events
Selecting the Operation to Perform
Revisiting example Addition of two numbers let’s now use OptionButtons to let the user choose between Addition and Subtraction.
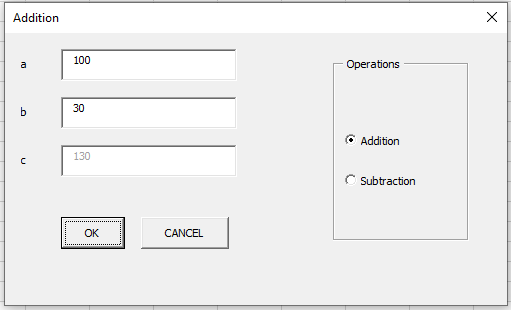
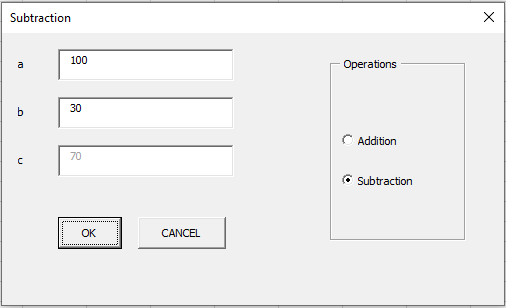
Design:
Form contains:
- 3 Labels
- 3 TextBoxes (txtA, txtB, txtC)
- 2 CommandButtons (cmdOK, cmdANNULER)
- 1 Frame (
Caption = Operations) - 2 OptionButtons (optAddition, optSoustraction)
Code:
Private Sub UserForm_Initialize()
    optAddition.Value = True
End Sub

Private Sub cmdOK_Click()
    Dim a As Double, b As Double, c As Double
    a = txtA.Text
    b = txtB.Text
    If optAddition.Value Then
        c = a + b
    End If
    If optSoustraction.Value Then
        c = a - b
    End If
    txtC.Text = c
End Sub

Private Sub optAddition_Click()
    Me.Caption = "Addition"
End Sub

Private Sub optSoustraction_Click()
    Me.Caption = "Subtraction"
End Sub
Comments:
- The selected OptionButton determines the operation performed.
- The form’s title (
Caption) is updated based on the selected operation.
ScrollBar and SpinButton
The ScrollBar and SpinButton controls are used to define numeric values.
ScrollBarincludes a slider.SpinButtonhas increment/decrement arrows only.
Both have:
Value(current value)Min,Max(range)
Synchronizing a SpinButton with a TextBox
Let’s create a form where a SpinButton adjusts a TextBox value, and vice versa.
Design:
Place a TextBox (
txtZonetexte) and a SpinButton (SpinBouton) on the form.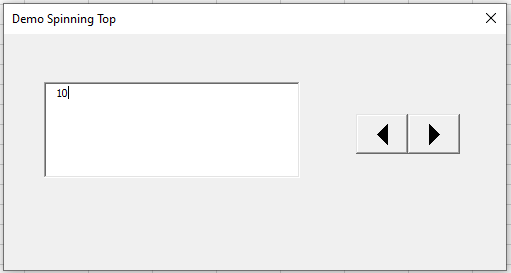
Code:
Private Sub UserForm_Initialize()
    SpinBouton.Min = 1
    SpinBouton.Max = 10
End Sub

Private Sub SpinBouton_Change()
    txtZonetexte.Text = SpinBouton.Value
End Sub

Private Sub txtZonetexte_Change()
    Dim v As Variant
    v = txtZonetexte.Text
    If IsNumeric(v) Then
        If SpinBouton.Min <= v And v <= SpinBouton.Max Then
            SpinBouton.Value = v
        End If
    End If
End Sub
Comments:
- Use
IsNumeric()to validate that the TextBox contains a number. - Also check that the value falls within the valid range (
MintoMax). - In this example, Min is 1 and Max is 10 (set during initialization).
- In Label2’s properties window, the image is loaded using the
Creating and Managing a UserForm in Excel VBA
Do you want your applications to be user-friendly and easy to use? In this chapter, we’ll explore the elements that allow you to create a custom interface for your projects. This will make applications flexible, reflect business logic as much as possible, and offer optimal user experience.
A custom form or UserForm is a dialog box in which you place various controls your application needs. You may design the interface with one or several forms. Moreover, the entire set of controls will serve only to accomplish that specific task. In all cases, using forms will give your project an individual look, streamline processing of application data, and reduce time spent performing necessary operations.
About UserForms
Creating a UserForm
The first step in creating a UserForm is to insert one in the Visual Basic Editor. To do this, press
Alt + F11to access the VBE and select your workbook’s name in the Project Explorer, as shown in the figure below.
With the workbook name selected, click
Insert > UserFormin the menu bar.
A new UserForm opens in its design window, as illustrated.

Customizing a UserForm
UserForms have a variety of properties. You can display the Properties window for the UserForm by clicking
View > Properties Windowor its icon.
Under the Project Explorer, you will see the Properties window, partially visible in the figure.

For the first UserForm of the workbook, VBA assigns a default value of
UserForm1to its Name and Caption properties. If you were to create a second UserForm, its default properties would beUserForm2, and so on. To distinguish between Name and Caption, the figure shows where the Name was replaced withfrmEmployeesand the Caption (displayed in the title bar) was changed toEmployees.
NOTE:
When naming a UserForm—or any object—it is best to assign a name that reflects its purpose. It is recommended to use the prefixfrm(for UserForm) followed by an intuitive name such asEmployees.Adding Controls to a Custom Form
As we saw in the previous chapter, a control is an object like a Label, TextBox, OptionButton, or CheckBox in a UserForm or embedded in a worksheet that allows users to view or manipulate information. VBA supports these and other controls, accessible from the VBE Toolbox.
To display the Toolbox, click its icon or choose
View > Toolbox.
The controls you place on your UserForm depend on its purpose. For a simple form to gather employee info, you might need a text box for employee name and a list of job titles. The figure shows the toolbox with the Label control hovered.

To place a control on your UserForm, draw it in the UserForm’s design area. Click the control’s icon in the Toolbox and draw it like you would a shape on a worksheet.
When a Label control is drawn, it will show the default caption
Label1. You can change this caption to something meaningful in the Properties window.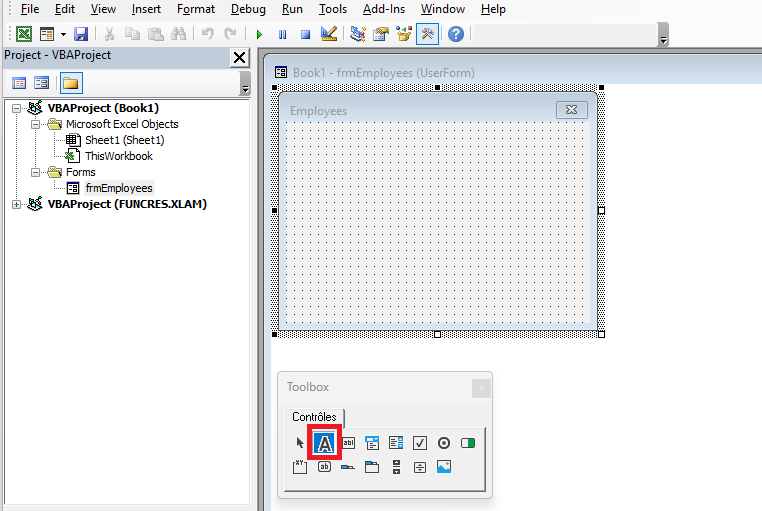

Since the label is placed above the text box and its purpose is to indicate employee name, the caption is changed to
Employee Name. Then the TextBox icon is selected to place a text box under the label.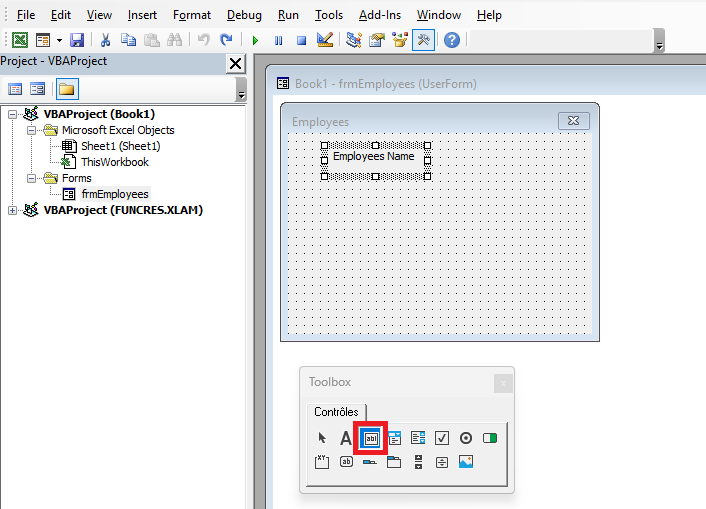
After clicking the TextBox icon, draw it below the label. The text box should be wide enough to accept and display a name. Then, select the Frame icon to place a Frame control.
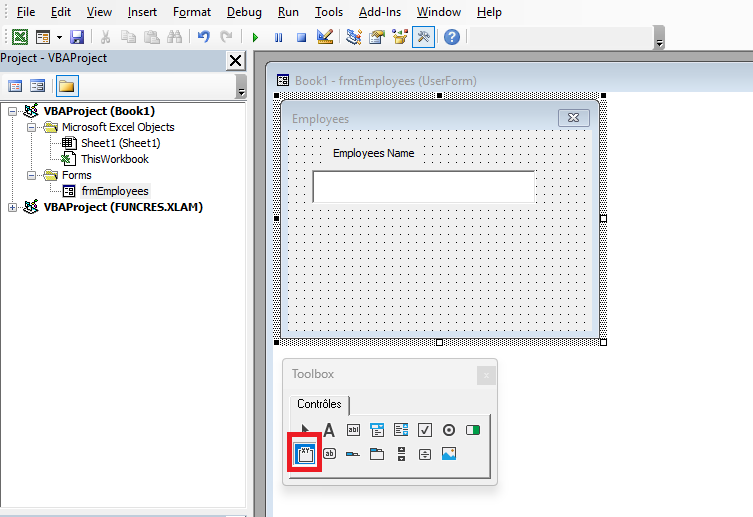
The Frame control, once drawn, shows the default caption
Frame1. Frames group controls visually, often under a theme. In this case, it will contain job titles so the user can select only one.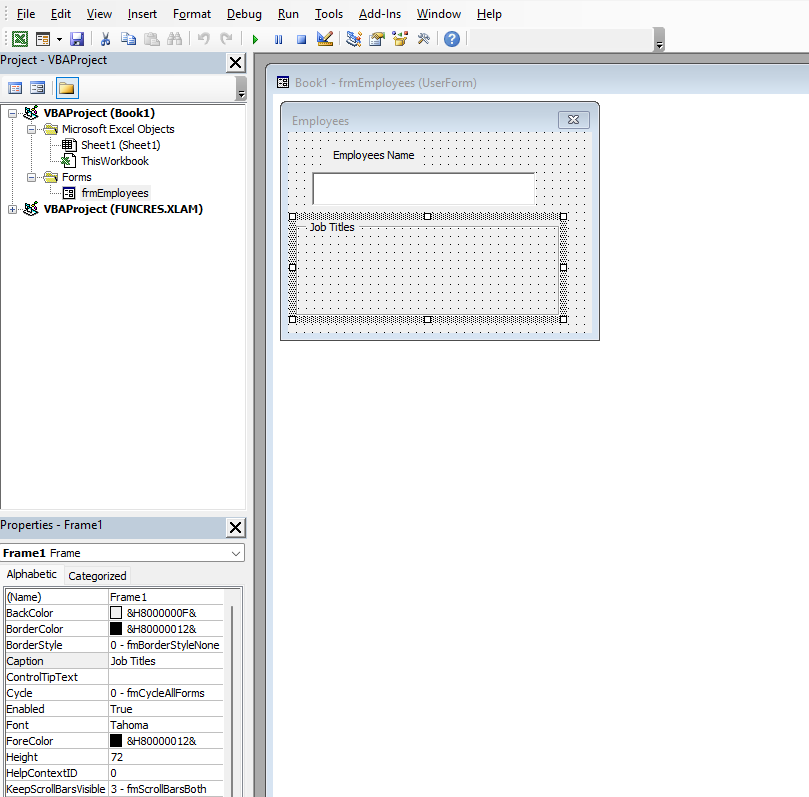
Change the caption
Frame1toJob Titles. Then select the OptionButton icon in the Toolbox. Since employees have only one job title, use OptionButtons within the Frame for selection.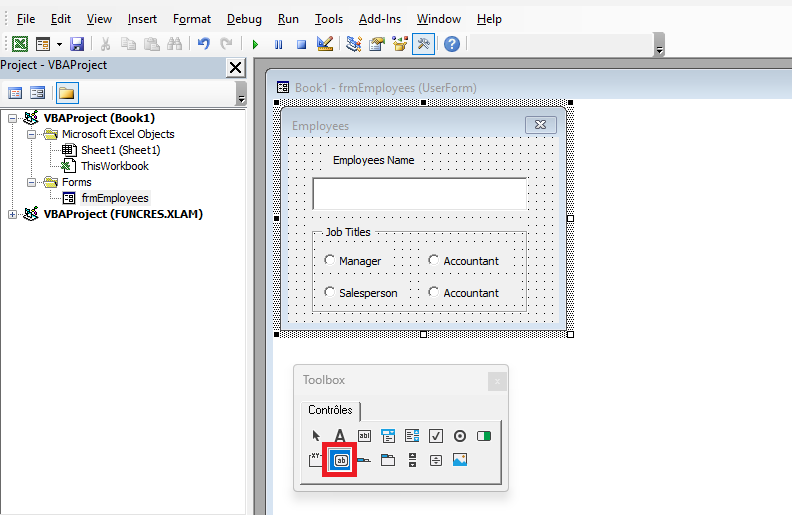
Add two CommandButtons: one labeled
OKto confirm inputs and anotherCancelto exit the form.
Properties, Methods, and Events of UserForms
UserForm Properties
The form has a wide range of properties that let you control appearance and behavior. The most used are
NameandCaption.Property Description Name Name of the UserForm ActiveControl Returns a reference to the control with focus BackColor Background color BorderColor Border color BorderStyle Border style ( fmBorderStyleNone,fmBorderStyleSingle)CanPaste Defines if paste is allowed from clipboard CanRedo Defines if redo is possible CanUndo Defines if undo is possible Caption Form title Cycle Focus behavior in container objects (Frame/Page) DrawBuffer Size of memory used when redrawing an image Enabled Whether the form is enabled ForeColor Foreground color Height, Width Form dimensions HelpContextID Link to Help file chapter InsideHeight/Width Dimensions excluding title bar and border thickness KeepScrollBarsVisible Visibility of scrollbars Left, Top Coordinates of the form’s upper-left corner MouseIcon Custom mouse pointer MousePointer Type of mouse pointer Picture Bitmap used as background PictureAlignment Bitmap alignment PictureSizeMode Image scaling behavior ScrollHeight/Width Scrollable area size ScrollLeft/Top Coordinates of scrollable area SpecialEffect Form appearance StartUpPosition Initial form position Tag Identifier string VerticalScrollbarSide Side where scrollbars appear Visible Form visibility WhatsThisButton Show “?” help button Zoom Zoom level UserForm Methods
Method Description Copy Copies the object to clipboard Cut Cuts and copies to clipboard Hide Hides the form without unloading it Load Loads the form into memory Move Moves the form Paste Pastes from clipboard PrintForm Prints an image of the form RedoAction Repeats the last redo command Repaint Refreshes the form’s image Scroll Scrolls the image SetDefaultTabOrder Sets default tab order for controls Show Displays the form UndoAction Repeats the last undo command Unload Unloads the form from memory WhatsThisMode Shows “?” pointer UserForm Events
Event Description Activate, Deactivate Triggered when form gains/loses focus AddControl When a control is added BeforeDragOver When dragging data BeforeDropOrPaste Before inserting dragged data Click When the form is clicked DblClick When the form is double-clicked Error When an error occurs Initialize When form is initialized Layout When layout changes KeyDown, KeyUp On key press/release KeyPress On key press (non-function/service keys) MouseDown, MouseUp Mouse button pressed/released MouseMove Mouse moves over form QueryClose Before the form is closed RemoveControl When a control is removed Resize When form is resized Scroll When scrolling Terminate When form is terminated Zoom When zoom level changes Animating a UserForm
Displaying a UserForm
To display a UserForm, you run the
Showmethod with the syntax:
FormName.ShowFor example, if you followed the steps described earlier and created the
frmEmployeesUserForm, you could use the following macro to call the form:Sub EmployeeFormulaire() frmEmployees.Show End SubIf you’d like to see how the UserForm looks when invoked in the actual worksheet environment without writing a macro, you can type:
frmEmployees.Show
into the Immediate window and press
Enter. The following figure shows how you and your users will view the example UserForm.
Where Does the UserForm Code Go?
A UserForm is a VBA object class that has its own code module. Just as each worksheet has its own module, every UserForm you add to your workbook automatically comes with its own module.
To access a UserForm’s module in the VBE:
- Double-click the UserForm in the design pane,
- Or right-click the UserForm name in the Project Explorer and choose View Code.

Closing a UserForm
You can close a UserForm in two ways: using the
Unloadmethod or theHidemethod.Though both seem to make the UserForm disappear, each performs different instructions. This can confuse beginners, so it’s important to understand the distinction between Unload and Hide.
Unloading a UserForm
When you unload a UserForm, the form closes and its contents are removed from memory. In most cases, this is the desired behavior: entered data is saved or passed to public variables, and then the form closes.

To unload a UserForm, use:
Unload Me
Typically, this is triggered by a
CommandButton, such as a Cancel button. Suppose you want to unload the UserForm when clicking Cancel. A quick way to do this is to double-click the command button in the form designer, which creates:Private Sub CommandButton2_Click() End Sub
Complete the
Clickprocedure by adding:Private Sub CommandButton2_Click() Unload Me End SubNow, clicking the Cancel button will unload (i.e., close and free memory) the UserForm.
Hiding a UserForm
The
Hidemethod makes the UserForm invisible, but its contents remain in memory. You might want this behavior if you’re working with multiple UserForms and wish to focus on only one at a time.To hide a form, use:
Me.Hide
NOTE:
To summarize the difference:- Use
Unloadwhen you want to clear the form from memory. - Use
Hidewhen you want to preserve the form’s data in memory for reuse later.
If the workbook is closed while the form is hidden, it is automatically unloaded.
How to Run a UserForm?
To test the form’s code, you don’t need to create controls on a sheet. After building the form and writing code in its module, simply:
- Choose
Run > Run Sub/UserFormfrom the menu, - Or press
<F5>, - Or click the Run Macro button on the Standard toolbar.
The form will then appear over the active worksheet.
Closing the Form with the Key
<Escape>It is possible to close a UserForm using a keyboard key such as
<Escape>. To do this, handle theKeyDownevent, check if the correct key is pressed, and unload the form usingUnloadorEnd.The
KeyDownevent has two parameters:KeyCode: The key that was pressedShift: Modifier keys (Shift, Ctrl, Alt)
VBA has a special constant for
<Escape>:vbKeyEscapeHere’s an example that closes the form when
<Escape>is pressed:Private Sub UserForm_KeyDown(ByVal KeyCode As MSForms.ReturnInteger, _ ByVal Shift As Integer) If KeyCode = vbKeyEscape Then Unload Me End If End SubComments:
KeyDownandKeyUpare triggered when a key is pressed and released.- Syntax for KeyDown and KeyUp:
Private Sub Object_KeyDown(ByVal KeyCode As MSForms.ReturnInteger, ByVal Shift As fmShiftState)
Private Sub Object_KeyUp(ByVal KeyCode As MSForms.ReturnInteger, ByVal Shift As fmShiftState)
Table: Shift Parameter Constants
Constant Value Description fmShiftMask 1 Shift key was pressed fmCtrlMask 2 Ctrl key was pressed fmAltMask 4 Alt key was pressed You can use the following
KeyCodeconstants anywhere in your code:Constant Value Description vbKeyLButton 0x1 Left mouse button vbKeyRButton 0x2 Right mouse button vbKeyCancel 0x3 Cancel key vbKeyMButton 0x4 Middle mouse button vbKeyBack 0x8 Backspace vbKeyTab 0x9 Tab vbKeyClear 0xC Clear vbKeyReturn 0xD Enter vbKeyShift 0x10 Shift vbKeyControl 0x11 Ctrl vbKeyMenu 0x12 Alt/Menu vbKeyPause 0x13 Pause vbKeyCapital 0x14 Caps Lock vbKeyEscape 0x1B Escape vbKeySpace 0x20 Spacebar vbKeyPageUp 0x21 Page Up vbKeyPageDown 0x22 Page Down vbKeyEnd 0x23 End vbKeyHome 0x24 Home vbKeyLeft 0x25 Left Arrow vbKeyUp 0x26 Up Arrow vbKeyRight 0x27 Right Arrow vbKeyDown 0x28 Down Arrow vbKeySelect 0x29 Select vbKeyPrint 0x2A Print Screen vbKeyExecute 0x2B Execute vbKeySnapshot 0x2C Snapshot vbKeyInsert 0x2D Insert vbKeyDelete 0x2E Delete vbKeyHelp 0x2F Help vbKeyNumlock 0x90 Num Lock Parfait, voici la suite exacte en anglais à partir de la section 4.8 – Confirmation Before Closing the Window, y compris les codes VBA, sans résumé ni reformulation :
Confirming the Closure of the Window
In projects, it is often necessary to request user confirmation before closing a form. This can be achieved using the
QueryCloseevent procedure, which is triggered just before the form is closed.This procedure has two parameters:
- If the first parameter (
Cancel) is set to-1, the closure is canceled. - If it is set to
0, the window closes. - The second parameter (
CloseMode) identifies the reason that caused the window to close.
For example, in the following code, when the user tries to close the UserForm, a dialog box appears with two buttons: Yes and No. If the user clicks Yes, the form closes. If No, the closure is canceled.
Private Sub UserForm_QueryClose(Cancel As Integer, CloseMode As Integer)
    Select Case MsgBox("Close the window?", vbYesNo + vbQuestion)
        Case vbYes: Cancel = 0
        Case vbNo: Cancel = -1
    End Select
End Sub
Setting the Location of the Form
The initial location of the form is defined by the
StartUpPositionproperty. The valid values are listed in the following table:Value Description 0 The coordinates of the top-left corner of the form are set using TopandLeft1 Center of the window 2 Center of the screen 3 Top-left corner of the screen For example, the following code sets the form so that its top-left corner is positioned at coordinates (100, 100):
Private Sub UserForm_Initialize()
    Me.StartUpPosition = 0
    Me.Top = 100
    Me.Left = 100
End Sub
Modal Window
A modal window is one that must be closed before accessing another window. By default, a UserForm in VBA is modal.
You can define the form type (modal or modeless) using the optional
styleparameter of theShowmethod.Show styleThe
styleparameter has two valid values:vbModalor1→ Modal windowvbModelessor0→ Modeless window
Examples:
UserForm1.Show vbModeless  ' User can still access the worksheet
UserForm1.Show vbModal     ' User must close the form before accessing the worksheet
Using Multiple Custom Forms
You can have multiple UserForms in a project. When switching from one form to another, consider whether it is opened as modal or modeless.
For example, suppose your project contains
UserForm1andUserForm2. Create a button on the worksheet namedcmdForm1. When clicked, it displays the first form.Modal Mode – Worksheet Module Code
Private Sub cmdForm1_Click()
    UserForm1.Show vbModal
End Sub
Modal Mode – UserForm1 Code Module
Private Sub UserForm_Click()
    Unload UserForm1
    UserForm2.Show
End Sub
In modal mode, you must close the first form before showing the second. Only one form is visible at a time.
Modeless Mode – Worksheet Module Code
Private Sub cmdForm1_Click()
    UserForm1.Show vbModeless
End Sub
Modeless Mode – UserForm1 Code Module
Private Sub UserForm_Click()
    UserForm2.StartUpPosition = 0
    UserForm2.Top = UserForm1.Top + 20
    UserForm2.Left = UserForm1.Left + 20
    UserForm2.Show
End Sub
In modeless mode, both forms can appear on the screen at the same time, with the second slightly offset.
Some Examples with Images
Form with a Changeable Background
A background image can be embedded in a form using the
Pictureproperty. This property displays the image at its original dimensions.If you want the image to fill the entire client area of the form, or its full width or height, use the
PictureSizeModeproperty. ThePictureAlignmentproperty defines how the image is aligned within the form (e.g., centered or aligned to a specific side).Let’s build a project with a form that displays a background image, which changes between two images each time the form is clicked.
To implement the project, you need two image files:
C:\image1.jpgC:\image2.jpg
Then, create a form and define its property values using the Properties window as shown in the following table:
Object Property Value UserForm Picture Path to bitmap: C:\image1.jpgPictureSizeMode fmPictureSizeModeStretchCaption Changeable BackgroundsNext, double-click on the UserForm to open its code window, and enter the following code:
Private Sub UserForm_Click()
    Static flag As Boolean
    Dim filename As String
    If Not flag Then
        filename = "C:\image1.jpg"
        Me.Picture = LoadPicture(filename)
        Me.PictureSizeMode = fmPictureSizeModeStretch
        Me.Caption = "Changeable Backgrounds " & filename
    Else
        filename = "C:\image2.jpg"
        Me.Picture = LoadPicture(filename)
        Me.PictureSizeMode = fmPictureSizeModeZoom
        Me.PictureAlignment = fmPictureAlignmentTopLeft
        Me.Caption = "Changeable Backgrounds " & filename
    End If
    Me.Repaint
    flag = Not flag
End Sub
Comments:
- When you click on the form, the images
C:\image1.jpgandC:\image2.jpgalternate as the background. - The image is loaded using the
LoadPicturefunction, whose argument is the file path. - Since
PictureSizeModeis set tofmPictureSizeModeStretchfor image1, it stretches or shrinks disproportionately to fill the entire form. - For image2,
PictureSizeModeis set tofmPictureSizeModeZoom, so the image resizes proportionally to fill either width or height. - The
PictureAlignmentproperty set tofmPictureAlignmentTopLeftaligns the top-left corners of the image and form. - It’s not necessary to define
PictureandPictureSizeModein the properties window. Instead, you can invoke the form’sClickevent from theInitializeevent, like this:
Private Sub UserForm_Initialize() UserForm_Click End Sub- In the Properties window, you can remove the image by placing the cursor in the
Picturefield and pressing the<Delete>key. - In code, do the same by setting:
Me.Picture = LoadPicture("")Form with a Tiled Background
An image on a form can also be displayed as a tiled background (repeated across the form). For this, set the
PictureTilingproperty toTrue.Also make sure to configure the
PictureAlignmentproperty, which determines the starting point of the tile pattern.These property values can be set either in the Properties window or through code — typically within the
Initializeevent, which occurs before the form is displayed.Let’s create a form with a tiled background image and set its properties via code:
In the UserForm’s module, write the following code. Ensure that the default working directory of Excel contains the required image file (e.g.,
image1.jpg):Private Sub UserForm_Initialize() Me.Caption = "Tiled Background" Me.BorderStyle = fmBorderStyleNone Dim imageA As String imageA = "image1.jpg" If Len(Dir(imageA)) > 0 Then Me.Picture = LoadPicture(imageA) Me.PictureAlignment = fmPictureAlignmentTopLeft Me.PictureTiling = True Else MsgBox "File not found: " & CurDir & "\" & imageA End If End SubComments:
- To check your default directory, go to the File tab in the ribbon, click Options, and in the Save section, look at the Default local file location field. It can be changed if needed.
- The application verifies the existence of the image file using the
Dir()function. - If the image file is not found in the working directory, the form appears without a background.
Dir()returns a filename string if found, or an empty string if not.- Therefore, checking for a file’s existence is simply:
If Len(Dir(filename)) > 0 Then ...
Using Worksheet Controls in Excel VBA
Worksheet controls help you create a custom project interface embedded directly into the worksheet — that is, an interface as close to the user as possible. They automate user tasks, thereby simplifying and increasing work efficiency. Such controls also provide the necessary protection for your data.
Overview of Toolbar Commands
Controls are an integral part of the Windows graphical user interface. Examples of controls include command buttons, text boxes, lists, scroll bars, and other interface elements that you can use to enter a number, select a value, or perform another action. Various controls can be placed on an Excel worksheet. Controls are accessed by clicking the Insert button under the Developer tab in the Controls group on the ribbon. Note that when you click the Insert button, two groups of controls are available: Form Controls and ActiveX Controls, as shown in the figure below.
The Form Controls group is mainly intended to ensure compatibility with earlier versions of Excel (up to Excel 97) that used these corresponding controls. They are far less powerful than the controls found in the ActiveX Control panel. Some of these elements cannot be used at all in newer Excel documents — such as text boxes and combo boxes. However, they have some functionalities that ActiveX controls do not, for example, they can be placed on chart sheets.
ActiveX Controls are independent components from various applications and can also be used in Excel. The following table lists the main commands and corresponding buttons in the toolbar:
Button Prefix Icon Description Label Lbl 
Allows adding text that the user cannot modify, like a caption under a chart. TextBox Txt 
Contains text that the user can enter or modify. ComboBox Cbo 
Displays a combo list with a text field. ListBox Lst 
Displays a list of items for the user to choose from. CheckBox Chk 
Creates a box the user can check to indicate True or False. OptionButton Opt 
Displays multiple options where only one can be selected. ToggleButton Tgl 
Creates a button that can be toggled on or off. Frame 
Creates a graphical or functional group of controls. CommandButton Cmd 
Creates a button that the user can click to execute a command. TabStrip 
Defines several pages for the same window area or dialog box. MultiPage 
Displays multiple screens as a set. ScrollBar Scr 
Graphical tool to quickly access many list items or large amounts of data; shows current position on a scale. SpinButton Spn 
Counter control to increment/decrement numbers or scroll values. Image Img 
Displays a bitmap, icon, or metafile image for decoration (uses fewer resources than PictureBox). More Controls Displays a list of additional ActiveX controls available on your computer that you can add to a custom form. Placing a Control on a Worksheet
Creating a control on a worksheet involves two steps: placing the control and customizing it.
Customization involves defining the control’s properties — for example, linking the control to specific worksheet cells, customizing its appearance, and other settings.
To place a control on a worksheet:
- Click the Insert button from the Developer tab in the Controls group and select the desired control from either Form Controls or ActiveX Controls. The mouse pointer changes to a cross.
- Position the cross pointer where you want the control, and click the left mouse button. The control appears on the worksheet.
- Drag the white squares (handles) to resize the control.
To insert additional controls using the dialog:
- Click the More Controls button in the ActiveX Controls toolbar (as shown below).
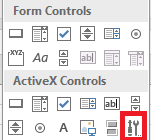
- Select the desired control from the list. The pointer becomes a cross.
- Move the pointer to the desired position on the worksheet and click. The control will appear.
- Resize the control if necessary.
The control is not tied to any worksheet cell and can be moved freely. Both the mouse and keyboard can be used to reposition the control, although the mouse is more practical for long-distance moves.
To move the control using the mouse:
- Highlight the desired control. For an ActiveX control, click Design Mode in the Controls group under the Developer tab, then select the control. The selected control shows a border with handles.
- Drag the control using its border or its image — not the caption area — otherwise it may enter edit mode instead of dragging.
To select multiple controls, hold down + and click each control.
To move the control vertically/horizontally, hold down while dragging. To snap to gridlines, hold . You can combine both keys.
To move a control using the keyboard:
- Select the control.
- Use the arrow keys <←>, <↑>, <→>, and <↓> to move it.
To copy a control:
- Highlight the desired control.
- Hold down , drag the object to the new location, and release the mouse. A copy appears.
You can group, align, layer, or snap controls just like any other object.
Controls are objects. Like all objects, they have properties, methods, and events. Properties can be set both during design time and via code.
To set properties during design:
- Select the control and click the Properties button under the Developer tab. The Properties window appears.
- The left side lists property names; the right side shows fields or drop-downs for setting values.
You can also link a macro or VBA procedure to a control triggered by an event. Event-handling code is written in the sheet module where the control is located.
To access this module:
- Select the control and click View Code under the Developer tab in the Controls group.
After finishing, exit Design Mode by clicking the Design Mode button again.
Your First Project with a Control
Let’s now create our first project with a control. We’ll place a button on the worksheet, and when clicked, a message box saying “Bonjour à tous!” will appear.
Steps:
- Click the CommandButton in ActiveX Controls, found under Insert in the Controls group on the Developer tab.
- Draw the button on the worksheet.
- Select the button, then click Properties under the Developer tab. In the Properties window:
- Set
NametocmdBonjour - Set
Captionto"Bonjour à tous"
- Set
- Select the button again and click View Code under the Developer tab. This opens the Visual Basic Editor, which automatically creates the event handler:
Private Sub cmdBonjour_Click()
End Sub
- Inside the
cmdBonjour_Clickprocedure, add the message box instruction:
Private Sub cmdBonjour_Click()
    MsgBox "Hello everyone!", vbExclamation
End Sub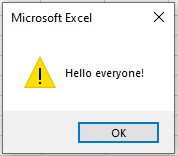
Exit Design Mode by clicking its button again. Your project is ready — test it by clicking the button: a greeting dialog box will appear.
Control Properties, Methods, and Events
General Properties of Controls
Controls have many properties that define settings ranging from position and size to displayed text and graphics. The table below summarizes common control properties:
Property Description AutoSize Whether the control resizes automatically to fit content BackColor Background color BackStyle Background transparency BottomRightCell, TopLeftCell Refer to cells under control corners Caption Text displayed on the control ControlTipText Tooltip text Enabled Whether the control is available to the user Font Returns a Font object to set font properties ForeColor Font color Height, Width Control size Left, Top Coordinates of top-left corner MouseIcon Custom mouse pointer MousePointer Type of mouse pointer Name Object name OldHeight, OldWidth Previous size of the control OldLeft, OldTop Previous position of the control Parent Reference to containing object Picture Link to bitmap file for background image PicturePosition Image position relative to text PrintObject Whether control appears in print Tag Used to identify a control TakeFocusOnClick Whether the control gains focus on click Visible Control visibility WordWrap Whether text wraps to next line Common Control Methods
Controls have several methods for moving, positioning, and managing them:
Method Description Move Moves the control SetFocus Sets input focus to the control BringToFront, SendToBack Sends control to front or back ZOrder Controls layering: values include fmTopandfmBottomCommon Control Events
Controls support many events triggered by user/system actions — like mouse clicks or errors:
Event Description BeforeDragOver Occurs when dragging data over BeforeDropOrPaste Occurs before dropping or pasting dragged data Click Occurs when the user clicks the control DblClick Double-click event Enter, Exit When control gains/loses focus Error Triggered when control encounters an error KeyDown, KeyUp Keyboard key pressed/released (when control has focus) KeyPress Character key pressed (non-function keys) MouseDown, MouseUp Mouse button pressed/released MouseMove Mouse pointer moves over control The CommandButton Control
The CommandButton control is mainly used to execute certain actions triggered by clicking the button, such as starting or stopping a program, printing results, and so on. Thus, the main event associated with a command button is the Click event. The key property of a CommandButton is the Caption property, which gets or sets the text displayed on the surface of the button.
Command Button Menu
Let’s create a workbook containing three worksheets: Sheet1, Sheet2, and Sheet3. The first sheet contains two buttons named after the other two sheets, as shown in the following figure.
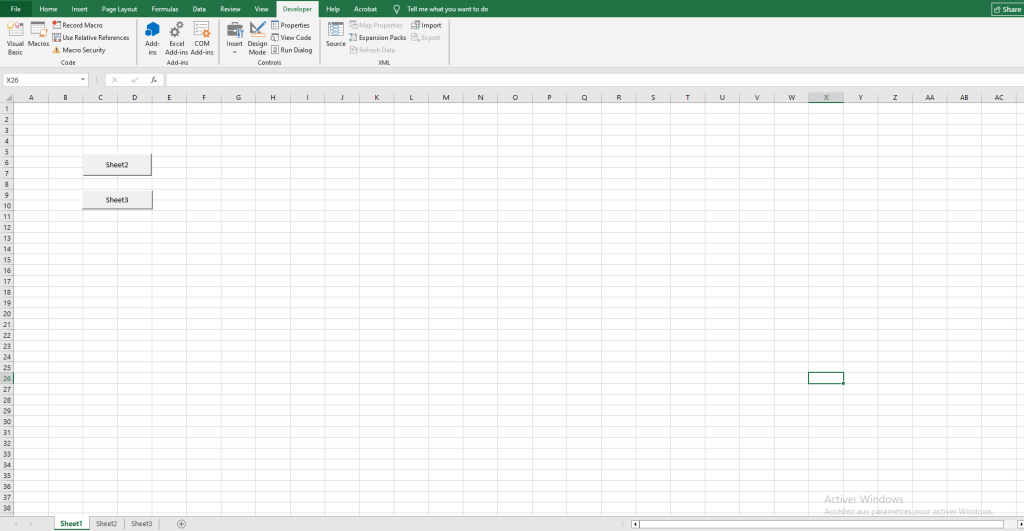
Clicking the button leads to the activation of the sheet with the corresponding name, and when the second button is pressed, not only is the sheet activated, but it also scrolls so that the specified cell appears in the top-left corner of the worksheet window.
Using the Properties window, set their property values as shown in the following table:
Object Property Value Command Button Name cmdFeuil2 Caption Feuil 2 Command Button Name cmdFeuil3 Caption Feuil 3 In the module for Sheet1, enter the following code:
Private Sub cmdFeuil2_Click() Worksheets("Sheet2").Activate End Sub Private Sub cmdFeuil3_Click() Worksheets("Sheet3").Activate ActiveWindow.ScrollColumn = 20 ActiveWindow.ScrollRow = 30 End SubComments:
- Clicking the « Feuil 2 » button activates Sheet2 using the
Activatemethod of the Worksheet object. - The worksheet scrolls so that the specified cell appears in the top-left corner using the ScrollColumn and ScrollRow properties of the Window object.
- The ScrollColumn property gets or sets the number of the leftmost visible column. Syntax:
expression.ScrollColumn, whereexpressionis a Window object. - The ScrollRow property gets or sets the number of the topmost visible row. Syntax:
expression.ScrollRow, whereexpressionis a Window object.
Displaying a Value with CommandButton
The CommandButton can be used not only for navigation but also for inputting values into cells. For example, you can use it to display total amounts, costs, or profits.
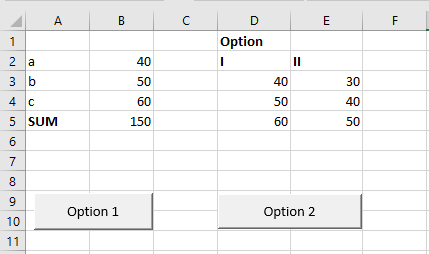
Let’s consider the problem of finding the total sum a + b + c for three variables with two possible sets of values, as shown in the following table:
I II a 40 30 b 50 40 c 60 50 Steps to implement the described example:
- On the worksheet, place variables a, b, and c in cells B2, B3, and B4.
- In cell B5, enter the formula
=SUM(B2:B4)to compute the total. - In range D3:D5, enter the first set of values.
- In range E3:E5, enter the second set of values.
- Create two buttons and set their properties as follows:
Object Property Value Command Button Name cmdVar1 Caption Option 1 Command Button Name cmdVar2 Caption Option 2 In the Sheet1 module, enter the following code:
Private Sub cmdVar1_Click() Range("B2").Value = Range("D3").Value Range("B3").Value = Range("D4").Value Range("B4").Value = Range("D5").Value End Sub Private Sub cmdVar2_Click() Range("B2").Value = Range("E3").Value Range("B3").Value = Range("E4").Value Range("B4").Value = Range("E5").Value End SubComments:
- Clicking Option 1 reads values from range D3:D5 using the Value property and inputs them into B2:B4.
- Clicking Option 2 does the same using values from E3:E5.
Decorating a CommandButton with Images and Custom Mouse Pointer
Adding images can make buttons look more presentable. Changing the mouse pointer can also enhance visual appeal.
The image is loaded onto the button using the Picture property. The PicturePosition property sets the relative position of the text and image. The MousePointer property sets the mouse pointer type. Valid values are listed below. In VBA, the Picture and MouseIcon properties are set using the
LoadPicturefunction, with the filename as the argument.Constant Value Description FmMousePointerDefault 00 Default FmMousePointerArrow 01 
FmMousePointerCross 02 
FmMousePointerIBeam 03 
FmMousePointerSizeNESW 06 
FmMousePointerSizeNS 07 
FmMousePointerSizeNWSE 08 
FmMousePointerSizeWE 09 
FmMousePointerUpArrow 10 
FmMousePointerHourglass 11 
FmMousePointerNoDrop 12 
FmMousePointerAppStarting 13 
FmMousePointerHelp 14 
FmMousePointerSizeAll 15 
FmMousePointerCustom 99 User-defined Example: Calculate values of
x + yandx – yusing formulas entered via buttons.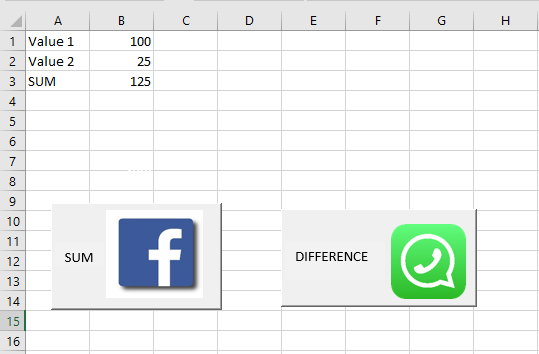
Steps:
- On the worksheet, place variables Value1 and Value2 in cells B1 and B2. Cell B3 will contain the formula inserted via code.
- Create two buttons and assign the following properties:
Object Property Value Command Button Name CmdSomme Caption Sum Picture Link to an image file (e.g., Facebook logo) PicturePosition FmPicturePositionRightCenter MousePointer FmMousePointerAppStarting Command Button Name CmdDifference Caption Difference Picture Link to an image file (e.g., WhatsApp logo) PicturePosition FmPicturePositionRightCenter MousePointer FmMousePointerCustom MouseIcon Path to custom cursor (e.g., C:\Windows\Cursors\Inodrop.cur) Code to place in the worksheet module:
Private Sub cmdSomme_Click() Range("B3").Formula = "=B1+B2" Range("A3").Value = "Sum" End Sub Private Sub cmdDifference_Click() Range("B3").Formula = "=B1-B2" Range("A3").Value = "Difference" End SubComments:
- Clicking Sum places the formula
=B1+B2in B3 and sets cell A3 to “Sum”. - Clicking Difference places
=B1-B2in B3 and sets A3 to “Difference”. - The Formula property sets a formula to a range. Syntax:
expression.Formula.
Interactive Button with CommandButton
Using MouseDown and MouseUp events, you can make a button interactive. Let’s illustrate this with a sales table for a company, « Bristols House », which exports products.
We aim to highlight:
- The row with the highest sales in red
- Rows with sales above average in yellow
Since sales data change constantly, we’ll automate the highlighting.
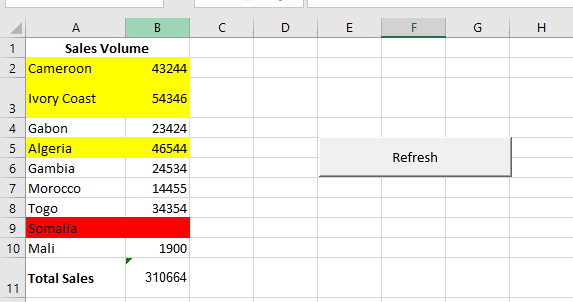
Steps:
- Enter sales data in range B2:B10.
- In cell B11, enter
=SUM(B2:B10)to compute the total. - Create a CommandButton and set the following properties:
Object Property Value Button Name CmdActualiser Caption Refresh In the worksheet module (e.g., Sheet1), enter the following code:
Private Sub cmdActualiser_MouseDown(ByVal Button As Integer, _ ByVal Shift As Integer, ByVal X As Single, ByVal Y As Single) With cmdActualiser .Font.Bold = True .Font.Size = 16 .ForeColor = vbRed .Shadow = True .BackColor = vbBlue End With End Sub Private Sub cmdActualiser_MouseUp(ByVal Button As Integer, _ ByVal Shift As Integer, ByVal X As Single, ByVal Y As Single) With cmdActualiser .Font.Bold = False .Font.Size = 12 .ForeColor = vbBlack .Shadow = False .BackColor = vbGreen End With RefreshData End Sub Sub RefreshData() Dim maxVal, avgVal As Double Dim i As Integer With WorksheetFunction maxVal = .Max(Range("B2:B10")) avgVal = .Average(Range("B2:B10")) End With For i = 2 To 10 With Range(Cells(i, 1), Cells(i, 2)).Interior If Cells(i, 2).Value = maxVal Then .Color = RGB(255, 0, 0) ' Red for max ElseIf Cells(i, 2).Value >= avgVal Then .Color = RGB(255, 255, 0) ' Yellow for ≥ average Else .ColorIndex = xlColorIndexNone ' No fill End If End With Next End SubComments:
- Clicking Refresh recalculates and updates the table.
- MouseDown and MouseUp event procedures modify the button’s appearance: font style, size, text color (ForeColor), background color (BackColor), and shadow effect (Shadow).
- ForeColor defines text color:
expression.ForeColor. - BackColor defines background color.
- Shadow adds a shadow effect.
- Recalculation is handled by the
RefreshDataprocedure. WorksheetFunctionis a property of theApplicationobject and contains built-in Excel functions.Coloris a property ofInteriorused to set cell color.- Setting
ColorIndextoxlColorIndexNoneremoves fill color. ColorIndexis an index value from the current color palette or a constant likexlColorIndexAutomaticorxlColorIndexNone.
Managing Charts in Excel VBA
To visualize numeric data in Microsoft Excel, there is a wide range of chart types available:
■ Charts
■ Shapes
■ WordArt
■ Conditional Formatting
■ Sparklines
■ SmartArtCharts can be quickly generated in Excel by simply pressing a button. In this chapter, you’ll learn how to create and modify charts using VBA code. This enables you to use your programming skills to create customized charts.
Naturally, to build a chart, you must first prepare a data range, determine the chart type, consider the elements to display, etc. This chapter demonstrates how to use the
ChartandChartObjectobjects, which allow you to automate chart creation and configuration.What Should You Know About Charts?
In Excel, you can create two types of charts: embedded charts and chart sheets.
- Embedded charts appear on a worksheet alongside data and text—ideal for reports.
- Charts on chart sheets are better suited for slide presentations or printing.
Creating a chart takes just a click: select the prepared data, go to the Insert tab, and choose the chart type from the Charts group. By default, the chart appears next to the data.
About the ChartObjects and Charts Collections, ChartObject and Chart
In VBA, the
Sheetscollection includes two subcollections:Worksheets: regular worksheetsCharts: chart sheets only
Charts embedded in worksheets belong to the
ChartObjectscollection. Charts on dedicated chart sheets belong to theChartscollection. So:ChartObject→ embedded in a WorksheetChart→ embedded in a Workbook
Both
WorkbookandApplicationobjects have anActiveChartproperty that returns the currently active chart.Table: Sub-objects of the Chart Object
Object Description ChartArea The area where the entire chart is drawn PlotArea The area where the data series are plotted Floor Horizontal plane of a 3D chart Walls (BackWall…) Vertical planes of a 3D chart Corners Corners of a 3D chart PageSetup Page layout settings ChartTitle Title of the chart SeriesCollection Data series along the Y-axis Trendlines Trendlines Axis Axes AxisTitle Axis titles DisplayUnitLabel Axis unit scaling Gridlines Coordinate gridlines TickLabels Axis tick labels DataTable Data table for the chart Legend Chart legend Shapes Plotting area shapes DataLabels Data value labels Points Data points in a series Adding Items to ChartObjects and Charts Collections
Both collections support:
Add: add a new chartDelete: remove a chartCount: number of charts
ChartObjects.Add(left, top, width, height)
- All parameters are optional.
- Defines the location and size of an embedded chart on the worksheet.
Charts.Add(before, after, count)
- All parameters are optional.
- Specifies where to insert a chart sheet in the workbook.
Key Properties of the Chart Object
Property Description Area3DGroup Info on the 3D area of the chart AutoScaling Enables auto-scaling in 3D charts Bar3DGroup Info on 3D bar chart ChartArea Chart area object ChartTitle Chart title object ChartType Chart type (e.g., xlLine,xlPie)Column3DGroup Info on 3D column chart Corners Chart corners DataTable Data table object DepthPercent 3D chart depth DisplayBlanksAs How to treat empty cells ( xlZero,xlInterpolated,xlNotPlotted)Elevation 3D chart elevation angle Floor Floor object for 3D charts GapDepth Space between bars in 3D chart HasAxis Whether axes are shown HasDataTable Whether chart includes a data table HasLegend Whether chart has a legend HasTitle Whether chart has a title HeightPercent Height as a percent of width Hyperlinks Hyperlinks collection Index Chart index in Charts collection Legend Legend object PageSetup Page layout object Perspective Perspective angle for 3D chart PlotArea Plot area object PlotBy Plot by xlRowsorxlColumnsPlotVisibleOnly Whether hidden cells are ignored Protection properties (e.g., ProtectContents,ProtectFormatting) defines protection levelRotation 3D rotation angle Visible Visibility of the chart Walls Walls object ChartType Values
Chart Type Constants Column xlColumnClustered,xl3DColumnClustered, etc.Bar xlBarClustered,xlBarStacked, etc.Line xlLine,xlLineMarkers,xl3DLine, etc.Pie xlPie,xl3DPie,xlPieOfPie, etc.XY (Scatter) xlXYScatter,xlXYScatterSmooth, etc.Area xlArea,xl3DArea,xlAreaStacked, etc.Doughnut xlDoughnut,xlDoughnutExplodedRadar xlRadar,xlRadarMarkers,xlRadarFilledSurface xlSurface,xlSurfaceTopView, etc.Bubble xlBubble,xlBubble3DEffectStock xlStockHLC,xlStockOHLC, etc.Cylinder xlCylinderColClustered,xlCylinderBarStacked, etc.Cone xlConeColClustered,xlConeBarStacked, etc.Pyramid xlPyramidColClustered,xlPyramidBarStacked, etc.Chart Object Methods
Method Description ActivateActivates the chart ApplyDataLabelsApplies data labels AutoFormatApplies automatic formatting AxesReturns the Axes collection ChartObjectsReturns the ChartObjects collection ChartWizardBuilds a chart with a wizard CheckSpellingPerforms spell check CopyCopies the chart CopyPictureCopies the chart as a picture DeleteDeletes the chart DeselectDeselects the chart ExportExports the chart as a graphic file GetChartElementGets element info at specified coordinates LocationSets or returns the chart’s location MoveMoves the chart PastePastes clipboard content to the chart PrintOutPrints the chart SendToBackSends the chart to back ProtectSets protection options RefreshRefreshes the chart SaveAsSaves chart as new file SelectSelects the chart SeriesCollectionReturns the data series collection SetBackgroundPictureSets chart background image SetSourceDataDefines the data range for the chart UnprotectRemoves chart protection Chart Object Events
Event Description ActivateWhen the chart is activated BeforeDoubleClickBefore double-clicking the chart BeforeRightClickBefore right-clicking the chart CalculateWhen chart data changes DeactivateWhen the chart is deactivated DragOverWhile dragging a range over the chart DragPlotWhile dragging a range into the chart MouseDown,MouseUpWhen mouse button is pressed/released MouseMoveWhen the mouse moves over the chart ResizeWhen the chart is resized SelectWhen a chart element is selected SeriesChangeWhen hovering over a data series Creating a Chart
Creating a Simple Chart
You can create a chart on a dedicated chart sheet or embed it in a worksheet. Both are covered below.

Creating a Chart Sheet
Sub CreateChartSheet()
    ThisWorkbook.Charts.Add After:=Worksheets("Sheet1")
    With ActiveChart
        .ChartType = xlLine
        .SetSourceData Worksheets("Sheet1").Range("A1:C11")
        .Name = "Chart1"
    End With
End Sub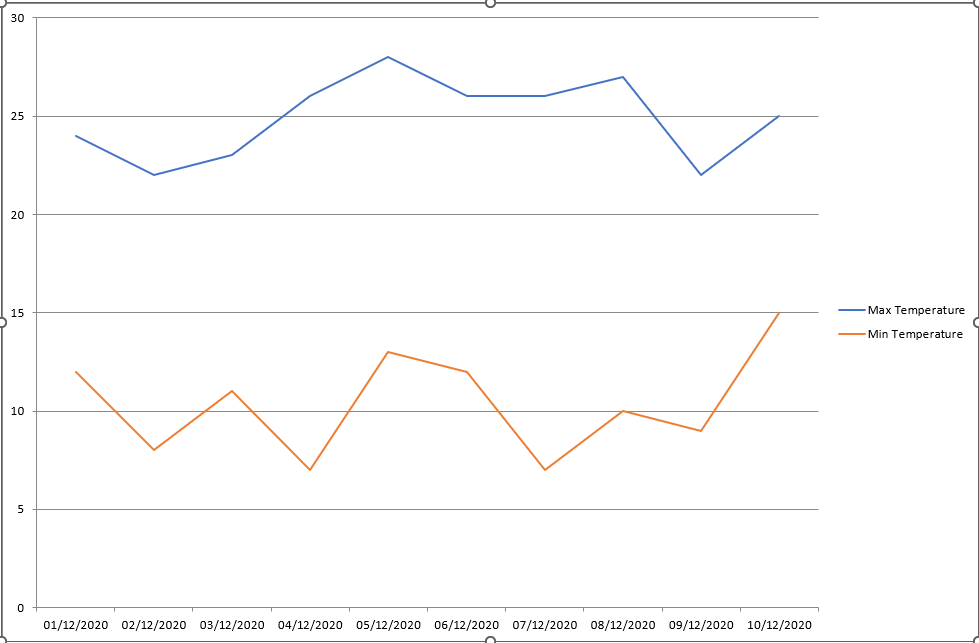
Comments:
Charts.Addcreates a new chart sheet.ChartTypesets the chart type (here: line chart).SetSourceDatasets the data range for the chart.Nameassigns a name to the chart.
Note:
SetSourceDataalso accepts a second argument to specify whether data is plotted by rows or columns:xlColumns(default) orxlRows.Creating an Embedded Chart
Sub CreateEmbeddedChart()
    Dim ChartFrame As ChartObject
    Dim RealChart As Chart

    Set ChartFrame = ThisWorkbook.Worksheets("Sheet1") _
        .ChartObjects.Add(250, 15, 300, 150)
    Set RealChart = ChartFrame.Chart
    RealChart.ChartType = xlLine
    RealChart.SetSourceData Worksheets("Sheet1").Range("A1:C11")
End Sub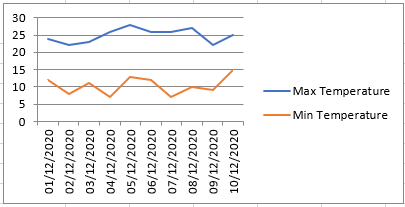
Comments:
ChartObjects.Add(left, top, width, height)creates an embedded chart.ChartObjectholds the frame;.Chartgives access to the actual chart.ChartTypeandSetSourceDatawork just like with chart sheets.
Customizing a Chart
You can modify many properties depending on the chart type.
Customize the Chart Sheet
Sub CustomizeChartSheet()
    Dim RealChart As Chart
    Set RealChart = ThisWorkbook.Charts(1)
    CustomizeChart RealChart
End Sub
Comments
The program is divided into two parts. First, the part that applies only to chart sheets:- A variable of type
Chartis declared. - The first chart sheet in the workbook is assigned to it.
- The
CustomizeChartprocedure is called, and the chart is passed as a parameter.
Sub CustomizeChart (RealChart As Chart)
Sub CustomizeChart(RealChart As Chart)
    ' Chart Area
    RealChart.ChartArea.Interior.Color = vbCyan
    ' Plot Area
    RealChart.PlotArea.Interior.Color = vbYellow
    ' Title
    RealChart.HasTitle = True
    RealChart.ChartTitle.Text = "Temperature"
    ' Legend
    RealChart.HasLegend = True
    With RealChart.Legend
        .Interior.Color = vbYellow
        .Border.Color = vbBlue
        .Border.Weight = xlThick
    End With
    ' Category Axis
    With RealChart.Axes(xlCategory)
        .HasTitle = True
        .AxisTitle.Text = " Date "
        .TickLabels.NumberFormatLocal = "DD.MM."
    End With
    ' Value Axis
    With RealChart.Axes(xlValue)
        .HasTitle = True
        .AxisTitle.Text = " Degree"
        .MinimumScale = 5
        .MaximumScale = 35
    End With
    ' Data Series
    With RealChart.SeriesCollection(1)
        .Border.Color = vbRed
        .MarkerStyle = xlMarkerStyleCircle
        .MarkerForegroundColor = vbRed
        .MarkerBackgroundColor = vbRed
    End With
    ' Data Point
    With RealChart.SeriesCollection(1).Points(3)
        .Border.Color = vbBlue
        .ApplyDataLabels xlShowValue
        .MarkerStyle = xlMarkerStyleSquare
        .MarkerForegroundColor = vbBlue
        .MarkerBackgroundColor = vbBlue
    End With
End Sub
Comments
- The
ChartAreaproperty represents the entire chart area (plot, title, legend). - The
Interior.Colorproperty sets the fill color. PlotArearepresents the data plotting area. It also supports color fill.- The chart title is activated with
HasTitle = True. ChartTitle.Textsets the title string.Legendis controlled viaHasLegend. You can style its interior and border.- All axes are listed in
Axes.xlCategory: horizontal axisxlValue: vertical axis
AxisTitle.Textdefines the title for each axis.TickLabels.NumberFormatLocalsets the format (e.g. for dates).MinimumScaleandMaximumScaleadjust the axis scale range.SeriesCollection(1)accesses the first data series:- You can style its border and marker (color, shape).
Points(3)accesses the third data point in the series:- Its appearance and label are customized.
ApplyDataLabels xlShowValuedisplays value labels.- Valid constants for marker styles include:
xlMarkerStyleCircle,xlMarkerStyleSquare,xlMarkerStyleNone.
Customize an Embedded Chart
Sub CustomizeEmbeddedChart()
    Dim CO As ChartObject
    Dim CH As Chart

    Set CO = ThisWorkbook.Worksheets("Sheet1").ChartObjects(1)
    CO.Left = 180
    CO.Top = 25
    CO.Width = 390
    CO.Height = 250

    Set CH = CO.Chart
    CustomizeChart CH
End Sub
Comments
- Variables
COandCHare declared asChartObjectandChart. - For embedded charts, you can adjust position and size using:
Left,Top,Width,Height
- The known
CustomizeChartprocedure is called to apply styling.
The Excel Application Object
The Application object is the main object. It is located at the top of Excel’s object hierarchy within the Excel application itself. Some properties and methods are explained below. By controlling the Application object, you can perform many tasks, such as saving the appearance of your screen at the end of a workday or quitting the application. As you know, Excel allows you to save screen settings using the Save Workspace button on the View tab. The task of saving the workspace can be easily done with VBA.
Application.SaveWorkspace "Projet"
This instruction saves the screen settings in the workspace file named Projet.
The next time you want to work with the same files and the same window layout, simply open the file Projet.xlwx so that Excel displays the correct files and restores your screen with those settings.
Now, let’s write a few instructions that use the Application object.Path of the Installed Application
The path where Excel is installed is generated with the following procedure:
Sub CheminApplication()
    MsgBox Application.Path
End Sub
Comments
The value of thePathproperty of the Application object is retrieved and displayed.
It corresponds to the directory on the PC where Excel has been installed.
The output with a standard installation: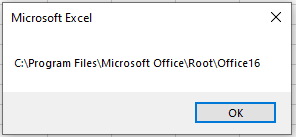
Calling a Procedure with a Delay
The following procedure triggers the call of another procedure in the future:
Sub AppelProcedureFutur()
    Application.OnTime Now + TimeValue("00:00:05"), _
    "CheminApplication"
End Sub
Comments
TheOnTime()method of the Application object is called.
It is used to execute procedures at a future time. It is called with a time value and a procedure name (in quotes).
The time can be either absolute (e.g., call at 17:35:30) or relative (e.g., call in 5 seconds, as above).
If the time is relative, the current time must first be determined using the built-inNow()function. A time value is then added to it, provided by the built-inTimeValue()function.Closing the Microsoft Excel Application
The following procedure closes the entire Excel application:
Sub FermerExcel()
    Application.Quit
End Sub
Comments
TheQuit()method of the Application object is called.
It closes Excel, including all open workbooks, the VBE, and Excel Help.
If a workbook has been modified, the user will be prompted to save it.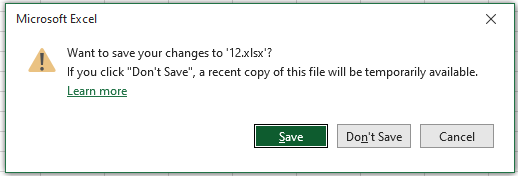
Managing Workbooks in Excel VBA
Although the Workbook object has many properties and methods, you will use only a handful of them regularly. In this chapter, you will examine these common properties and methods as well as some events associated with the Workbook object. It is important to remember that the Workbooks object represents all Workbook objects currently open in Excel.
There are several ways to modify a specific workbook:
- The ActiveWorkbook property of the Application object: This property returns the active workbook (that is, the workbook in the active window). Its syntax is
ApplicationObject.ActiveWorkbook. Specifying the ApplicationObject is optional. - The ThisWorkbook property of the Application object: This property returns the workbook in which the code is running. Its syntax is
ApplicationObject.ThisWorkbook. Specifying the ApplicationObject is optional.
Note that although most of the time, ActiveWorkbook is the same as ThisWorkbook, this is not always the case. The active workbook may be different from the one in which the code is executing.
Saving Workbooks
When saving a workbook, you need to know where to save it. To do this, use the
ChDrivestatement to set the drive and theChDirstatement to set the correct directory. Now, only the file name is missing. In the following example, take the name suggested by Excel with theNameproperty. Only then do you save the file.Sub saveFile() Dim str As String Const theDrive = "C:\" Const theFolder = "C:\mon fichier" str = ActiveWorkbook.Name ChDrive theDrive ChDir theFolder ActiveWorkbook.SaveAs FileName:=str, FileFormat:= _ xlNormal, Password:="", WriteResPassword:="", _ ReadOnlyRecommended:=False, CreateBackup:=True End SubThe SaveAs method has several arguments. Its syntax is:
ActiveWorkbook.SaveAs(Filename, FileFormat, Password, _
    WriteResPassword, ReadOnlyRecommended, CreateBackup, _
    AddToMru, TextCodePage, TextVisualLayout)
Comments:
FileName: String indicating the name of the file to save. You can include a full path; if not, Microsoft Excel saves the file in the active folder.FileFormat: File format to use when saving the file. For a list of valid choices, see theXlFileFormatenumeration. For an existing file, the default format is the last one specified; for a new file, the default is the current version of Excel.Password: Case-sensitive string (maximum 15 characters) indicating the password to protect the file.WriteResPassword: String indicating the write-protection password. If a file is saved with a password and the password is not provided when opening, the file opens as read-only.ReadOnlyRecommended:Trueto display a message when the file is opened, suggesting read-only mode.CreateBackup:Trueto create a backup file.AccessMode: Access mode for the workbook.ConflictResolution:XlSaveConflictResolutionvalue that determines how conflicts are handled when saving. WithxlUserResolution, the conflict resolution dialog box appears. WithxlLocalSessionChanges, local user changes are automatically accepted. WithxlOtherSessionChanges, changes from other sessions are accepted instead. If not defined, the dialog box appears.AddToMru:Trueto add the workbook to the list of most recently used files. Default isFalse.TextCodePage: Ignored for all languages in Microsoft Excel.Local:Truesaves files using the language of Microsoft Excel (including Control Panel settings).False(default) saves using the VBA language (usually U.S. English unless the project was created in older Excel VBA projects).
Saving a Workbook
The following procedure shows two ways of saving a workbook:
Sub SaveWorkbook()
    ThisWorkbook.Save
    ThisWorkbook.SaveAs "C:\Users\Temp\Documents\monfichier.xlsx"
    MsgBox "Saved: " & ThisWorkbook.Saved
End Sub
Comments:
- The
Save()method of the Workbook object saves the workbook. - The
SaveAs()method saves the workbook in the specified directory.
Save Workbook Twice
An additional save function consists of saving the file to two different drives.
Sub DoubleSaveFile()
    Dim s As String
    Const theDrive1 = "C:\"
    Const theDrive2 = "D:\"
    Const theFolder1 = "C:\mes fichiers"
    Const theFolder2 = "D:\mes donnees"

    s = ActiveWorkbook.Name

    ChDrive theDrive1
    ChDir theFolder1
    ActiveWorkbook.SaveAs FileName:=s, FileFormat:= _
        xlNormal, Password:="", WriteResPassword:="", _
        ReadOnlyRecommended:=False, CreateBackup:=True

    ChDrive theDrive2
    ChDir theFolder2
    ActiveWorkbook.SaveAs FileName:=s, FileFormat:= _
        xlNormal, Password:="", WriteResPassword:="", _
        ReadOnlyRecommended:=False, CreateBackup:=True
End Sub
Comments:
ChDrivechanges the current drive.ChDirchanges the current directory.
Call the Save As Dialog Box
If you wish, you can also call the built-in Save As dialog box using the following macro:
Sub saveWithDialog()
    Application.Dialogs(xlDialogSaveAs).Show
End Sub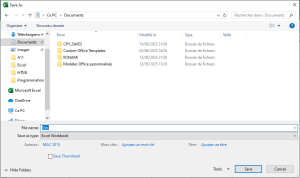
Determine Workbook Path
It is often necessary to access workbooks in the same directory or a subdirectory. To do this, determine the path of the current workbook:
Sub determinePath()
    Workbooks.Open "C:\monclasseur\Classeur3.xlsm"
    MsgBox "Classeur3 is located in " & ActiveWorkbook.Path
    MsgBox "This workbook is located in " & ThisWorkbook.Path
    Workbooks.Open ThisWorkbook.Path & "\Classeur1.xlsm"
    Workbooks.Open ThisWorkbook.Path & "\mesdoc\Inventaire.xlsx"
    MsgBox "Inventaire is located in " & ActiveWorkbook.Path
End Sub
Comments:
- Workbook
Classeur3.xlsmis first opened. It’s now the active workbook. - The
Pathproperty returns the path of the workbook containing the procedure. Classeur1.xlsmis opened from the same directory.Inventaire.xlsxis opened from a subdirectory.
NOTE: In Excel versions prior to 2007, file names must be:
Classeur3.xls,Classeur1.xls, andInventaire.xls.Determine the Status of the Workbook
If you want to know whether changes have been made to the workbook since it was last saved—whether through links or user input—use the following macro:
Sub workbookModified()
    If ActiveWorkbook.Saved = False Then
        MsgBox "The workbook has been modified!"
    End If
End Sub
Comments:
- The
Savedproperty returnsTrueif the active workbook has not been changed since its last save. - If the property returns
False, changes have been made to the workbook.
Save Workbook After Specified Cell Is Modified
Sometimes you work with such important data that it’s worth saving it as soon as a change is made in a specific cell or range. The macro below defines a cell range in which any modification will trigger a save.
Private Sub Worksheet_Change(ByVal Target As Range)
    ' Step 1: Check if the modified cell is in the specified range.
    If Intersect(Target, Range("D5:D20")) Is Nothing Then
        ' Step 2: If not, exit
        Exit Sub
    Else
        ' Step 3: If it is, save the workbook
        ActiveWorkbook.Save
        ' Step 4: End the If statement
    End If
End Sub
Comments:
- Step 1 uses the
Intersectmethod to verify if the modified cell is within the range. - If it is not, the macro ends immediately.
- If it is within the range, the
Savemethod is executed. - The
If ... Then ... Elsestructure must always be closed withEnd If.
Save Workbook Before Closing
The following macro is a great way to prevent users from accidentally closing a workbook without saving it. It triggers the
BeforeCloseevent and asks the user to confirm.Private Sub Workbook_BeforeClose(Cancel As Boolean) ' Step 1: Display the message box and begin checking Select Case MsgBox("Save and close?", vbOKCancel) ' Step 2: Cancel button pressed – cancel closing Case vbCancel Cancel = True ' Step 3: OK button pressed – save and close the workbook Case vbOK ActiveWorkbook.Save ' Step 4: Close the Select Case statement End Select End SubComments:
- Step 1 activates a message box as the condition for
Select Case. - If the user clicks Cancel, the event
Workbook_Closeis canceled. - If the user clicks OK, Excel is instructed to save and continue closing.
- Step 4 ends the
Select Caseblock. EverySelect Casemust be closed withEnd Select.
Opening a Workbook
The following procedure opens an existing workbook:
Sub OpenWorkbook()
    Workbooks.Open "C:\Temp\chancelin.xlsm"
End Sub
Comments:
- The
Open()method of theWorkbooksobject opens the specified workbook. - A new item is added to the workbook collection.
- The example uses an absolute path. You can also use relative paths.
- If the workbook doesn’t exist, the program ends with an error.
Syntax of the
Openmethod:Workbooks.Open(Filename, [UpdateLinks], [ReadOnly], [Format], [Password], [WriteResPassword], _ [IgnoreReadOnlyRecommended], [Origin], [Delimiter], [Editable], [Notify], [Converter], _ [AddToMru], [Local], [CorruptLoad])Only the first argument (Filename) is required.
Password: Password to open a protected workbook.ReadOnly:Trueopens the file in read-only mode.Filename: Required. Full path and name of the workbook to open.
Call the Built-In Open Dialog Box
Sub openFileDialogBox()
    Application.Dialogs(xlDialogOpen).Show _
        "C:\Users\MAC 2015\Documents"
End Sub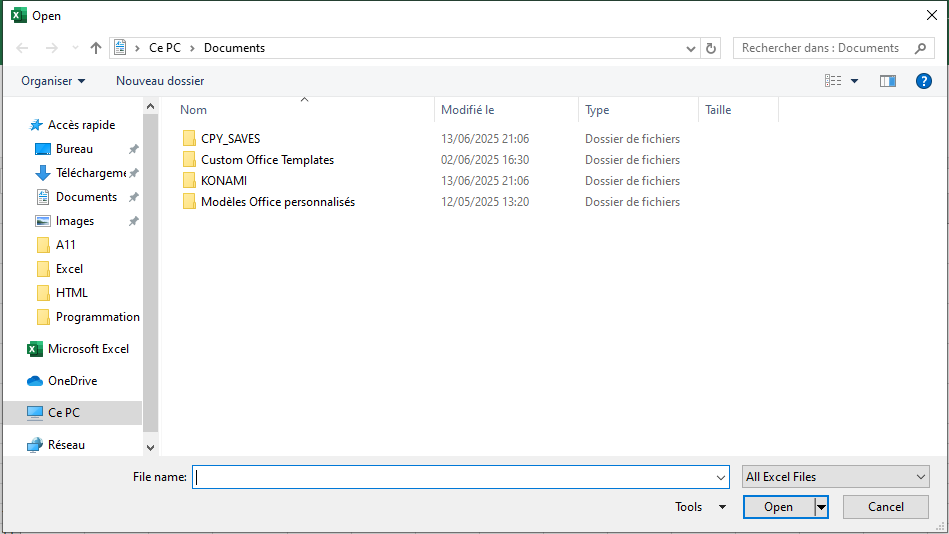
Open a Workbook Selected by the User
This macro opens a dialog where the user can choose a file:
Sub OpenWorkbook()
    ' Step 1: Declare the variable
    Dim FileName As Variant

    ' Step 2: Open dialog using GetOpenFilename
    FileName = Application.GetOpenFilename( _
        FileFilter:="Excel Workbooks,*.xl*", _
        Title:="Select workbook to open", _
        MultiSelect:=False)

    ' Step 3: If a file is selected, open it!
    If FileName <> False Then
        Workbooks.Open Filename:=FileName
    End If
End Sub
Comments:
NomFstores the selected file name.GetOpenFilenamedisplays a file picker dialog.FileFilterrestricts file types;Titlechanges the dialog title;MultiSelectrestricts multiple selections.- If a file is selected,
Workbooks.Openopens it.
Open All Workbooks from a Folder
This macro opens all
.xlsxfiles from a folder:Sub OpenAllWorkbooks() ' Step 1: Declare variables Dim MyFiles As String ' Step 2: Set the target directory MyFiles = Dir("C:\Temp\*.xlsx") Do While MyFiles <> "" ' Step 3: Open workbook Workbooks.Open "C:\Temp\" & MyFiles MsgBox ActiveWorkbook.Name ActiveWorkbook.Close SaveChanges:=True ' Step 4: Next file MyFiles = Dir Loop End SubComments:
Dirlists file names from a directory.- You can filter file types (e.g.,
.xls,.csv). - Use
Dir[(pathname[, attributes])]for options likevbNormal,vbHidden,vbSystem, etc. - Each file is opened, processed (e.g.,
MsgBox), saved, and closed.
Note: Wildcards are supported in
Dir—*for multiple characters,?for one.Count Open Workbooks
Sub WorkbookCount()
    MsgBox "Number of workbooks: " & Workbooks.Count
End Sub
Comments:
- The
Countproperty returns the number of open workbooks. - Macro-enabled files are included in the count.
Get the Name of the Active Directory
Use the
CurDirfunction:CurDir([drive])
Comments:
driveis optional. If omitted, VBA uses the current drive.CurDir$returns the result as a string.
Example in Immediate Window (Ctrl + G):
? CurDir
' Returns the current default directory for the active drive

? CurDir("D:\")
' Returns the current default directory on drive D:

monDrive = Left(CurDir$, 1)
? monDrive
' Returns the first character of the current directory path (typically the drive letter only)

monDrive = Left(CurDir$, 2)
? monDrive
' Returns the first two characters of the current directory path (e.g., "C:")
Closing a Workbook
If changes have been made, Excel asks whether to save. You can suppress this prompt with
DisplayAlerts.Close All Workbooks
Sub CloseWorkbooks()
    Workbooks.Close
End Sub
Comments:
- Closes all open workbooks.
- Excel application remains open.
- Prompts user to save if changes exist.
Close Multiple Workbooks at Once
Sub SimultaneousWorkbookClosure()
    ' Step 1: Declare variable
    Dim myWorkbook As Workbook

    ' Step 2: Loop through workbooks to save and close
    For Each myWorkbook In Workbooks
        myWorkbook.Close SaveChanges:=True
    Next myWorkbook
End Sub
Comments:
- Loops through all open workbooks.
- Saves and closes each one.
Close a Workbook and Save Changes
Sub closeWorkbook()
    With ActiveWorkbook
        .Sheets(1).Range("A1").Value = _
            "last change " & Now & " by user " & _
            Application.UserName
        .Close SaveChanges:=True
    End With
    Application.DisplayAlerts = False
End Sub
Comments:
- Saves changes before closing.
- Stores timestamp and user in cell A1.
- Suppresses confirmation messages.
Close All Except Active Workbook
Sub closeAllWorkbooksExceptThisOne()
    Dim myWorkbook As Workbook

    For Each myWorkbook In Application.Workbooks
        If myWorkbook.Name <> ThisWorkbook.Name Then
            myWorkbook.Close
        End If
    Next
End Sub
Comments:
- Loops through all workbooks and compares names.
- Closes all except the active one.
Sub countOpenWorkbooks()
    MsgBox "Currently " & _
        Application.Workbooks.Count & _
        " file(s) open.", vbInformation
End Sub
Create a New Workbook
Example 1
Sub NewWorkbook()
    Workbooks.Add
End Sub
Comments:
Add()creates a new workbook and makes it active.- Optional
Templateargument can specify a model workbook or sheet type.
Example 2: Copy and Save
Sub CreateNewWorkbook()
    ' Step 1: Copy data
    Sheets("Feuil1").Range("B4:C15").Copy

    ' Step 2: Create new workbook
    Workbooks.Add

    ' Step 3: Paste data
    ActiveSheet.Paste Destination:=Range("A1")

    ' Step 4: Disable alerts
    Application.DisplayAlerts = False

    ' Step 5: Save workbook
    ActiveWorkbook.SaveAs _
        Filename:="C:\Temp\monfichier.xlsx"

    ' Step 6: Enable alerts
    Application.DisplayAlerts = True
End Sub
Comments:
- Pastes copied data into the new workbook.
DisplayAlerts = Falsesuppresses overwrite warnings.SaveAssaves with specified path and name.
Example 3: Get Workbook Name
Sub workbookName()
    MsgBox "Name: " & ThisWorkbook.Name
    MsgBox "Name with path: " & ThisWorkbook.FullName
End Sub
Comments:
Namereturns the workbook file name.FullNamereturns the full path and name.
- The ActiveWorkbook property of the Application object: This property returns the active workbook (that is, the workbook in the active window). Its syntax is
Managing Worksheets in Excel VBA
The
Worksheetsobject is a collection that contains all the worksheets in the workbook.
There are several options to modify a single worksheet:ActiveSheet: the currently active worksheetWorksheets(Index): Index is the sequence number of the worksheet in the worksheets collectionWorksheets("Name"): the worksheet’s name as a string (in quotation marks)
Adding a New Worksheet
The following procedure inserts a new worksheet:
Sub insertSheet()
    Worksheets.Add
End Sub
Comments
- By default, Excel offers three worksheets when creating a new workbook. If you want to add more, use the
Addmethod. - The
Addmethod creates a new worksheet. The new worksheet becomes the active sheet. Its syntax is:
expression.Add (Before, After, Count, Type):- Before: specifies the sheet before which the new sheet is added.
- After: specifies the sheet after which the new sheet is added.
- Count: number of sheets to add. Default is the number of selected sheets.
- Type: specifies the sheet type. It can be one of the
XlSheetTypeconstants:xlWorksheet,xlChart,xlExcel4MacroSheet, orxlExcel4IntlMacroSheet. To insert a sheet based on an existing template, specify the template’s path. Default isxlWorksheet.
If you want to insert a sheet at a specific position:
Sub insertSheet2()
    Worksheets.Add Before:=ActiveWorkbook.Worksheets(1)
End Sub
Comments
- The new worksheet is inserted at the beginning of the workbook, i.e., as the first worksheet.
- The previous worksheet at index 1 is moved one position to the right.
To insert a sheet at the end:
Sub insertSheet3()
    Worksheets.Add After:=Worksheets(Worksheets.Count)
End Sub
Comments
- To determine the position where the new sheet should be inserted, you must first know how many worksheets are already in the workbook. The
Countproperty helps you do this. - Then, just provide the
Afterargument and the new sheet will be added as the last worksheet.
Renaming a Worksheet
This procedure renames a new worksheet in the workbook:
Sub CreateRenameSheet()
    ThisWorkbook.Activate
    MsgBox Worksheets.Count
    Worksheets.Add
    ActiveSheet.Name = "Elie"
    MsgBox Worksheets.Count
End Sub
Comments
- First, the number of worksheets is retrieved using the
Countproperty. - The
Add()method is called to insert a new worksheet before the active one. The new sheet becomes the active one. ActiveSheetrefers to the currently active worksheet. The sheet name can be retrieved or modified.- The sheet count is displayed again for verification; it has increased by 1.
Another macro:
Sub RenameSheet()
'Step 1: Specify what Excel should do in case of an error
    On Error GoTo MyError
'Step 2: Add a new sheet and rename it
    Sheets.Add
    ActiveSheet.Name = WorksheetFunction.Text(Now(), "d-m-yyyy     hh_mm_ss ")
    Exit Sub
'Step 3: If error occurs, inform the user
MyError:
    MsgBox "A sheet with this name already exists."
End Sub
Comments
- Here, we anticipate a possible error if the new sheet gets an already existing name. The
On Errorstatement handles this. - The default name of the new sheet is
SheetN. The code changes this using theNameproperty, based on the current date and time. On Errorprevents step 3 from executing unless an error actually occurs.
To rename Sheet3 to the current date:
Sub sheetNameDate()
    On Error Resume Next
    Worksheets("Sheet3").Name = Date
End Sub
Comments
- The current date is assigned as the new sheet name using the
Nameproperty. - Excel gets the date from the Windows system clock.
On Errorhandles the case where Sheet3 doesn’t exist.
To rename a sheet based on cell B1 content:
Sub sheetNameFromCell()
    Worksheets(1).Name = Range("B1").Value
End Sub
Comments
Worksheets(1).Namerefers to the leftmost sheet. Similar toWorksheets("Sheet1").Name.
To name the first sheet based on the user and current date:
Sub sheetNameUser()
    Worksheets(1).Name = Application.UserName & "," & Date
End Sub
Comments
- The new name combines the username and the current date using the
UserNameproperty andDate. - You can check the username via File > Options > General tab.
Deleting Worksheets
To delete a worksheet:
Sub deleteSheet()
    On Error GoTo errorHandler
    Sheets("Sheet1").Delete
    Exit Sub
errorHandler:
    MsgBox "There is no sheet to delete."
End Sub
Comments
On Errorredirects the flow if the specified sheet doesn’t exist.Exit Substops the macro after a successful deletion.- An error message is shown otherwise.
Delete Without Confirmation
Sub deleteSheetSilently()
    Application.DisplayAlerts = False
    Sheets(1).Delete
End Sub
Comments
DisplayAlerts = Falsesuppresses confirmation prompts.- It is
Trueby default, which normally shows the « Are you sure? » message.
Delete All Sheets Except the Active One
Sub deleteAllSheetsExceptActive()
    Dim mysheet As Worksheet
    For Each mysheet In ThisWorkbook.Worksheets
        If mysheet.Name <> ThisWorkbook.ActiveSheet.Name Then
            Application.DisplayAlerts = False
            mysheet.Delete
            Application.DisplayAlerts = True
        End If
    Next mysheet
End Sub
Comments
- Declares a variable
mysheet. - Loops through all sheets in
ThisWorkbook(the workbook containing the code). - Compares each name to the active sheet. If different, it is deleted.
Delete All Empty Worksheets
Sub deleteEmptySheets()
    Dim i As Integer
    Application.DisplayAlerts = False
    On Error Resume Next
    For i = ActiveWorkbook.Sheets.Count To 1 Step -1
        Sheets(i).Activate
        If ActiveCell.SpecialCells(xlLastCell).Address = "$A$1" Then Sheets(i).Delete
    Next i
    Application.DisplayAlerts = True
End Sub
Comments
- Uses
Countto determine how many sheets exist. - Loops backward and checks if the last used cell is A1.
- If so, the sheet is considered empty and is deleted.
Activate a Worksheet
Sub ActivateSheet()
    ThisWorkbook.Activate
    Worksheets("Sheet3").Activate
    MsgBox ActiveSheet.Name
    Worksheets("Sheet1").Activate
    MsgBox ActiveSheet.Name
End Sub
Comments
- Activates specific sheets and displays their names.
To activate the previous sheet:
Sub activatePreviousSheet()
    On Error Resume Next
    ActiveSheet.Previous.Activate
End Sub
To activate the next sheet:
Sub activateNextSheet()
    On Error Resume Next
    ActiveSheet.Next.Activate
End Sub
Copying and Moving Worksheets
Copy a Worksheet
Sub CopySheet()
    ThisWorkbook.Activate
    Worksheets("Sheet1").Copy After:=Worksheets("Sheet3")
    ActiveSheet.Name = "Inventory"
End Sub
Comments
Copyduplicates Sheet1 and places it after Sheet3.- If no destination is given, a new workbook is created.
To copy used range from Sheet1 to Sheet2:
Sub CopyRangeSheet()
    Worksheets("Sheet1").UsedRange.Copy
    Worksheets("Sheet2").Paste Worksheets("Sheet2").Range("A1")
    Application.CutCopyMode = False
End Sub
To transfer data without using
Copy:Sub transferSheet() Dim sheet1 As Worksheet Dim sheet2 As Worksheet Dim i As Integer Dim y As Integer Set sheet1 = ThisWorkbook.Worksheets("Sheet1") Set sheet2 = ThisWorkbook.Worksheets("Sheet2") For i = 1 To sheet1.UsedRange.Rows.Count y = y + 1 sheet2.Cells(i, 1) = sheet1.Cells(y, 1) Next i End SubMove a Worksheet
Sub MoveSheet()
    ThisWorkbook.Activate
    Worksheets("Inventory").Move Before:=Worksheets("Sheet1")
End Sub
Move the Active Worksheet
Sub MoveActiveSheet()
    'Move active sheet to the end
    ActiveSheet.Move After:=Worksheets(Worksheets.Count)
    'Move active sheet to the beginning
    ActiveSheet.Move Before:=Worksheets(1)
End Sub
Transfer Sheet Without Formulas or Links
Sub transferSheetValuesOnly()
    Cells.Copy
    Application.Workbooks.Add
    Range("A1").Select
    Selection.PasteSpecial Paste:=xlValues, Operation:=xlNone, SkipBlanks:=False, Transpose:=False
    Application.CutCopyMode = False
End Sub
Comments
- Copies all cells in the current sheet.
- Pastes only values (no formulas or links) into a new workbook.
Cells and Ranges in Excel VBA
The Range object has a large collection of methods that allow the developer to program a series of actions, from copying a range to the clipboard to finding the root of a nonlinear equation, including formatting the range. The most commonly used methods for the Range object are:
- Activate
- AddComment
- AutoFill
- AutoFit
- BorderAround
- Clear
- ClearComments
- ClearContents
- ClearFormats
- ClearNotes
- Copy
- CopyPicture
- Cut
- DataSeries
- Delete
- FillDown
- FillLeft
- FillRight
- FillUp
- Find
- FindNext
- FindPrevious
- FunctionWizard
- GoalSeek
- Insert
- PasteSpecial
- Replace
- Select
- Show
In addition to methods, the Range object also has properties. These properties allow you to control its appearance and automate behavior. The main properties of the Range object are:
- Address
- AllowEdit
- Areas
- Borders
- Cells
- Characters
- Column
- Columns
- ColumnWidth
- Comment
- Count
- CurrentRegion
- End
- EntireColumn
- EntireRow
- Font
- Formula
- FormulaArray
- FormulaHidden
- FormulaLocal
- FormulaR1C1
- FormulaR1C1Local
- HasFormula
- Height
- Hidden
- HorizontalAlignment
- Hyperlinks
- Interior
- Left
- Locked
- Name
- NumberFormat
- Offset
- Orientation
- Resize
- Row
- RowHeight
- Rows
- ShrinkToFit
- Top
- UseStandardHeight
- UseStandardWidth
- Value
- VerticalAlignment
- Width
- Worksheet
- WrapText
You can find detailed information on how to use the methods and properties of the Range object in the VBA Help system.
Using the Range and Cells objects, you have many options for accessing individual cells or entire cell ranges in a worksheet. The currently active cell is referred to as ActiveCell. With the Range object, both contiguous and non-contiguous cell ranges can be selected. A letter designates the column and a number the row. Some possibilities are shown in the following table:
Range Description Range(« A3 »).Select Selects a single cell Range(« A3:F7 »).Select Selects a contiguous range Range(« A3, C5, E2 »).Select Selects multiple non-contiguous cells Range(« A8, B2:C4, E2 »).Select Selects multiple non-contiguous cells/ranges Ranges can also be entire columns or rows, as shown below:
Range Description Range(« A:A »).Select Selects entire column A Range(« C:E »).Select Selects multiple contiguous columns Range(« B:D, F:F, H:I »).Select Selects multiple non-contiguous columns Range(« 3:3 »).Select Selects entire row 3 Range(« 3:5 »).Select Selects multiple contiguous rows Range(« 3:5, 8:9, 12:12 »).Select Selects multiple non-contiguous rows Range(« A2:B4, 7:8, D:E, G2:H4 »).Select Combination of options Activating, Selecting, and Filling a Range of Cells
Selecting a Range Using the Range Object
The Activate method of the Range object activates the range, and the Select method selects it.
Sub ActivationSelection()
    ' Step 1: Activate the worksheet named "Feuil1" in the current workbook
    ThisWorkbook.Worksheets("Feuil1").Activate
    ' Step 2: Activate cell A3
    Range("A3").Activate
    ' Step 3: Enter the value 5 into the active cell (A3)
    ActiveCell.Value = 5
    ' Step 4: Select the range A4:A10
    Range("A4:A10").Select
    ' Step 5: Enter the value 11 into the selected range
    Selection.Value = 11
End Sub
Comments:
- The Range object uses « A3 » and « A4:A10 » as arguments.
- A3 is activated using
Activate, then value 5 is inserted usingValue. - The range A4:A10 is selected using
Select, and value 11 is inserted. - The
Valueproperty sets content for both A3 and A4:A10.
Inserting a Value Using the Cells Property
The Cells property allows access to all worksheet cells, individually or as ranges. It specifies a row and column number. Using
Cellshas the advantage of working with variables to define row and column numbers.Sub SelectionCells() ' Step 1: Activate worksheet "Feuil1" ThisWorkbook.Worksheets("Feuil1").Activate ' Step 2: Insert "bac" into cell F2 Cells(2, 6).Value = "bac" ' Step 3: Insert "eck" into range F4:I6 Range(Cells(4, 6), Cells(6, 9)).Value = "eck" End SubComments:
"bac"is inserted intoCells(2, 6)→ Row 2, Column 6 = F2"eck"is inserted intoRange(Cells(4, 6), Cells(6, 9))→ Range F4:I6
Entering Values and Formulas
Sub InsertionValeursFormules()
    ThisWorkbook.Worksheets("Feuil1").Activate
    ' Numbers
    Range("B1").Value = 14
    Range("B2").Value = 245.17
    Range("B3").FormulaLocal = "=SOMME(B1:B2)"
    ' Dates
    Range("B4").Value = "2019/11/23"
    Range("B5").Value = "2009/08/18"
    Range("B6").FormulaLocal = "=B4-B5"
    ' Percentage
    Range("B7").Value = 0.215
End Sub
Comments:
- Numeric values are inserted into B1 and B2
- Decimal point must be used (not a comma)
- FormulaLocal assigns the SUM formula
- Dates are enclosed in quotes
- B6 computes the difference between B4 and B5
- B7 holds a percentage value
Fill a Range with a Value
FillDown: fills from top to bottomFillUp: fills from bottom to topFillLeft: fills from right to leftFillRight: fills from left to right
Sub RemplirFillUp()
    Range("A1:A10").FillUp
End Sub
AutoFill
AutoFill allows cells to be filled automatically with data, such as lists or sequences. You can trigger it using the black fill handle in the bottom-right corner of the cell selection or the Fill button on the Home tab → Editing group.
Useful for:
- Copying values across cells
- Generating number or date sequences
Fill a Range with a Progression
DataSeries method creates a progression with syntax:
DataSeries(RowCol, Type, Date, Step, Stop, Trend)
RowCol: xlRows or xlColumnsType: xlDataSeriesLinear, xlGrowth, xlChronological, xlAutoFillDate: xlDay, xlWeekday, xlMonth, xlYearStep: step sizeStop: end valueTrend: True/False (trend vs. static list)
Examples:
Sub ProgressionPas()
    Range("C1").Value = 0
    Range("C1").DataSeries Rowcol:=xlColumns, Type:=xlDataSeriesLinear, _
    Step:=5, Stop:=30
End Sub

Sub RrogressionGeometrique()
    Range("A1").Value = 2
    Range("A1:A6").DataSeries Rowcol:=xlColumns, Type:=xlGrowth, Step:=3
End Sub

Sub ProgressionDate()
    Range("E1").Value = "1/01/2020"
    Range("E1:E5").DataSeries Rowcol:=xlColumns, Type:=xlChronological, _
    Date:=xlMonth
End Sub
Automatically Fill a Range with Sequence Elements
AutoFill method syntax:
expression.AutoFill(Destination, Type)
expression: source rangeDestination: target range (must include the source)Type: optional fill type (xlFillSeries, xlLinearTrend, xlGrowthTrend, etc.)
Examples:
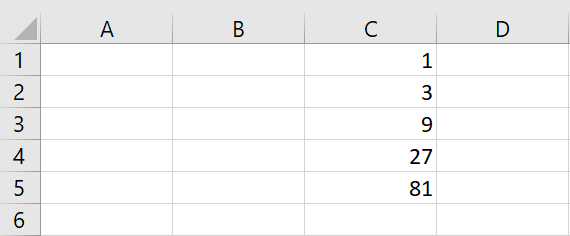
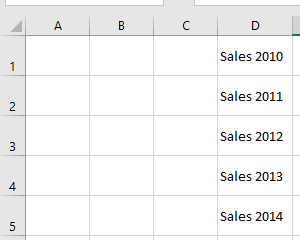
Sub ProgressionArith() Range("B1").Value = 2 Range("B2").Value = 8 Range("B1:B2").AutoFill Destination:=Range("B1:B5"), Type:=xlLinearTrend End Sub Sub ProgressionGeo() Range("C1").Value = 1 Range("C2").Value = 3 Range("C1:C2").AutoFill Destination:=Range("C1:C5"), Type:=xlGrowthTrend End Sub Sub ProgressionAuto() Range("D1").Value = "Ventes 2010" Range("D1").AutoFill Destination:=Range("D1:D5"), Type:=xlFillSeries End SubError Handling and Debugging in Excel VBA
When developing and testing a program, errors are generally common. All developers make mistakes. The difference between a beginner developer and an expert developer is that the expert recognizes, diagnoses, and corrects errors much more quickly than a beginner.
In this chapter, we will help you get started by teaching you the tools and debugging features included in the Visual Basic Editor (VBE), as well as the tactics you can use to troubleshoot your code when problems arise.
These errors can be divided into three groups: syntax errors, runtime errors, and logical errors. Syntax errors can be avoided using the editor. Runtime errors—errors that occur during program execution and cause the program to crash—can be handled with the
On Errorstatement. Logical errors are the most difficult to detect.Syntax Error
Syntax errors occur when your code does not follow the syntax rules of VBA (e.g., incomplete or badly written code). These errors are relatively harmless because they typically occur during code development, and as long as the automatic syntax checking feature is enabled, some of them can be automatically detected by the VBE as you type your code.
However, the automatic syntax checking feature does not detect all syntax errors. Specifically, it can only detect syntax errors that occur within a single statement or line of code.For example, the line
Debug.Prinfis a syntax error that the automatic syntax checking feature can detect because it does not require other statements to make sense. The correct statement isDebug.Print.
The following code contains a syntax error that cannot be detected by the automatic syntax checking feature:Sub SyntaxError() Dim n As Long For n = 10 To 20 Step 2 MsgBox n End Sub
Comments:
- The problem with this code is that it is missing a
Nextstatement. - This code is classified as a syntax error because it does not follow VBA’s syntax rules. Every
Forstatement must eventually be followed by a correspondingNextstatement within the same procedure. - The automatic syntax checking feature will never warn you about this error because it only checks individual statements as they are entered. Therefore, it cannot detect syntax errors that require other statements to ensure the procedure is correctly formed.
Visual Basic includes a syntax checking feature that:
- Checks each statement as you type for syntax errors, such as a misspelled keyword or a missing separator, and alerts you in case of an error;
- Translates the code into an internal form if the syntax is correct, which speeds up execution time.
This feature is enabled by default, but you can disable it if you prefer to write code without being warned about errors as they are detected.
To enable syntax checking:
- From the Tools menu, choose Options.
- Select the Editor tab.
- Check the Auto Syntax Check checkbox, as shown in the figure below.
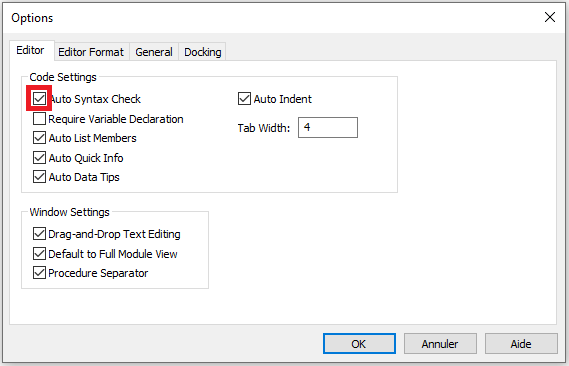
- Click OK.
Runtime Error
Runtime errors occur when the program attempts to perform an invalid operation. Examples of runtime errors include:
■ Division by zero
■ Attempting to open a non-existent workbook
■ Referring to a non-existent worksheetRuntime errors are more difficult to detect than syntax errors for two reasons. First, the code is syntactically correct from the compiler’s point of view, so the errors cannot be detected automatically. Second, it is difficult to anticipate all the possible conditions your program might encounter.
Program with Runtime Errors
The following procedure triggers a runtime error. The content of cell A1 is divided by the content of cell A2. The result of the division is to be output in cell A3.
Sub RuntimeError()
    Dim aa As Integer, bb As Integer, cc As Integer
    ThisWorkbook.Worksheets("Sheet1").Activate
    aa = Range("A1").Value
    bb = Range("A2").Value
    cc = aa / bb
    Range("A3").Value = cc
End Sub
Comments
■ If the numbers 100 and 25 are in the two cells, the result is as expected, as shown in the figure below.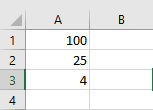
■ However, if the numbers 100 and 0 are in the cells, the program ends with a runtime error. A dialog box appears with an error message.
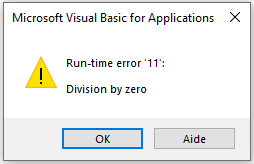
■ You can now click the End button or the Debug button. If you click Debug, the faulty line of code is highlighted in yellow and code execution is paused. In this case, it’s the linecc = aa / bb, as this is where the division is performed. This gives you a clue for troubleshooting.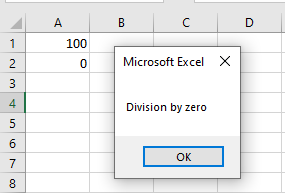
■ If you click End, code execution is aborted. However, no reference to the faulty line of code is provided.
■ The error messages displayed are often not very informative. Clicking the Help button provides more information, but it doesn’t always relate directly to the issue that caused the error. Don’t worry—over time, you’ll develop an instinct for what might be wrong. Forums can also help, as they often provide quick solutions to problems.Error Handling
An error can be managed even during code execution, provided its presence is anticipated and a configuration has been set in the code to handle it.
The
On Errorstatement is used precisely for such cases, as it positions the procedure and starts an error-handling routine.There are three syntax forms for the
On Errorstatement:On Error Resume NextOn Error GoToOn Error GoTo 0
These are described in the following table:
Syntax Description On Error Resume Next When a runtime error occurs, Visual Basic skips the line that caused the error and continues the procedure with the next line. On Error GoTo Specifies a label to jump to when an error occurs. This label marks the beginning of the error-handling routine. The label must appear in the same procedure as the On Errorstatement.On Error GoTo 0 Disables error handling in the procedure. When VBA encounters this statement, errors are detected but not handled. On Error Resume Next
When you use
On Error Resume Nextin your code, any error encountered will be ignored, and the code will continue to execute. This error-handling method is commonly used, but you must use it cautiously. Since it completely ignores any error that may occur, you may not be able to identify errors that should be fixed.The previous procedure is now improved to handle the runtime error as follows:
Sub ErrorHandlingExample1()
    Dim aa As Integer, bb As Integer, cc As Integer
    ThisWorkbook.Worksheets("Sheet1").Activate
    On Error GoTo myError
    aa = Range("A1").Value
    bb = Range("A2").Value
    cc = aa / bb
    Range("A3").Value = cc
    myError:
    MsgBox Err.Description
    Resume Next
End Sub
Comments
- The statement
On Error GoTo myErrormeans that if a runtime error occurs in this procedure, it will jump to the line marked with the labelmyError. - The label is defined using
myError:—a label name followed by a colon. - If a runtime error occurs, the Err object stores the error details. For example, you can use the
Descriptionproperty to display the error message.
The table below lists the most important properties and methods of the
Errobject:Property or Method Description Clear This method resets all information of the Errobject.Description Contains a brief description of the error. Number Returns the error number. Raise Generates a built-in error message. Source Specifies the source of the error. ■ Unlike the previous example, the program can continue—it does not stop.
■Exit Sub(similar toExit FororExit Dofor loops) can be used to exit a procedure early. If this statement were omitted, the code following the error label would always execute—even when there is no error, which should be avoided.
■ The statementResume Nextmeans that the program will continue execution from the statement following the one where the error occurred.On Error GoTo
With this syntax, the line argument is required and specifies the line where the handler should begin. We can define this argument as any label or line number. It works when a runtime error occurs and the control jumps to the line, starting the error handler.
To avoid a compilation error, note that the label must be defined within the same procedure where the
On Errorstatement is used.In the following example, a variable
ageis created to receive a numeric value. You will be prompted to enter a value in an input box, which will be assigned to the variable. It is known that aBytetype variable cannot store text (String) values and only accepts numeric values between 0 and 255.Sub ErrorHandlingExample2() Dim age As Byte age = InputBox("Enter your age") MsgBox "Age is " & age End SubComments
■ If a numeric value is entered in the text box, it will be displayed in a message box.
■ If text is entered, a runtime error will occur in the macro because the variable is numeric. For example, type the text “Chancelin”.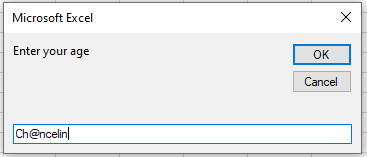
When you click OK, the following error appears:
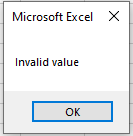
We can now use error handling. In this situation, if an error occurs, the commands in the handler label will execute.
Using the
On Error GoTostatement, if an error occurs, the process jumps to the error-handling label, which contains a command to display a message.Sub ErrorHandlingExample3() On Error GoTo myError Dim age As Byte age = InputBox("Enter your age") MsgBox "Age is " & age Exit Sub myError: MsgBox "Invalid value" End SubComments
■ If there is no runtime error, all commands will be executed, including the contents of the error handler, since programming lines are executed sequentially.
■ To prevent the message Invalid value from displaying even when a numeric value is entered, you must insert theExit Substatement before the error-handling routine.On Error GoTo 0
On Error GoTo 0disables error handling in the current procedure. It does not specify line 0 as the start of the error-handling code, even if the procedure contains a line numbered 0. Without anOn Error GoTo 0statement, an error handler is automatically disabled when a procedure exits.Sub ExampleErrorHandling4() On Error GoTo 0 Dim age As Byte age = InputBox("Enter your age") MsgBox "Age is " & age Exit Sub myError: MsgBox "Invalid value" End SubLogical Errors
Logical errors occur when an application compiles without syntax errors and runs without runtime errors but does not produce the expected result.
Logical errors can potentially go unnoticed for a long time because your application will appear to work correctly on the surface. Logical errors are not detected by the compiler during development or compilation and do not bother you by displaying runtime error messages to your end users. While most logical errors are detected and do not cause serious problems, some logical errors can be extremely difficult to find and may cause serious damage depending on how your application is used.
Finding the cause of logical errors is often difficult and can only be done through extensive testing and analysis of processes and results. Therefore, a testing environment is available in the development environment, which you can use to quickly find and eliminate errors.Debugging
When learning a programming language, you make the most mistakes. Therefore, it is necessary to know how to find and fix errors and which tools are available for this purpose. Searching for and eliminating errors during programming is inevitable because programming errors will occur. However, it is always important to know how far—and especially if—the program ran correctly before the error. For this reason, a testing environment is available in the development environment that you can use to quickly find and fix errors.
The Code Window
When an error occurs, you can enter and modify your VBA macros in the Code Window. This is the window where your code resides. If this window is not yet visible, select Code from the View menu or press the shortcut key F7.
The Code Window contains the following objects:
- Object dropdown: Displays the names of selected objects. Click the arrow to the right to see a list of all objects associated with the form.
- Procedure dropdown: Lists all events Visual Basic detects for the form or control shown in the Object dropdown. When an event is selected, the associated event procedure appears in the Code Window. All procedures are also listed alphabetically in this dropdown, which greatly facilitates locating specific modules.
At the upper right edge of the vertical scrollbar in the Code Window, you can see the window splitter. The splitter is located just above the up-arrow symbol, as shown in the figure below.
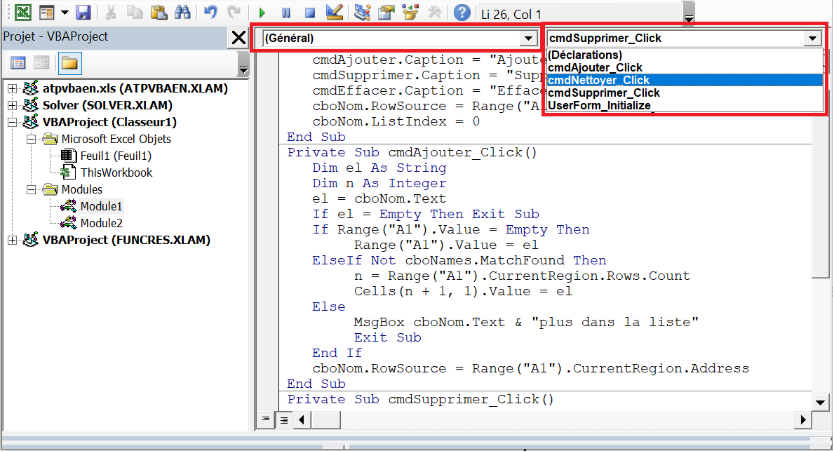
This allows you to split the Code Window into two horizontally scrollable panes. This way, you can view different parts, such as the beginning and the end of a macro, at the same time.
The information displayed in the Object and Procedure dropdowns relates to the code of the currently active window. You can close a window by double-clicking the window splitter.
The Immediate Window
The Immediate Window is used to try various statements, functions, and operators available in the Visual Basic language before using them in your own VBA procedures. It is an excellent tool that allows you to type VBA statements and test their results immediately without writing a procedure.
For example, in the Immediate Window, type the following statement:
Worksheets.Add
Press Enter, and VBA adds a new sheet to the current workbook. The tab Sheet2 at the bottom of the workbook should now be highlighted.
The Immediate Window also allows you to ask questions. Suppose you want to know which cells are currently selected, the value of the active cell, the name of the active sheet, or the number of the current window. When working in the Immediate Window, you can easily get answers to these and other questions. The question mark (
?) tells Excel to display the result of the statement in the Immediate Window. Instead of the question mark, you can use the keywordPrint, as shown next.The Immediate Window is an excellent way to test a macro. You can document the content of variables and positions in the code. For example, you can display certain variable contents in the Immediate Window to correct values that might cause errors. Consider the following example:
Sub ImmediateWindow()
    Dim myVar As Integer
    For myVar = 1 To 12
        Debug.Print "Loop pass: " & myVar
    Next myVar
End Sub
Comments:
- In this macro, the loop executes exactly twelve times.
- Each time the loop runs, the
Debug.Printcommand writes an entry in the Immediate Window that logs the current loop iteration.
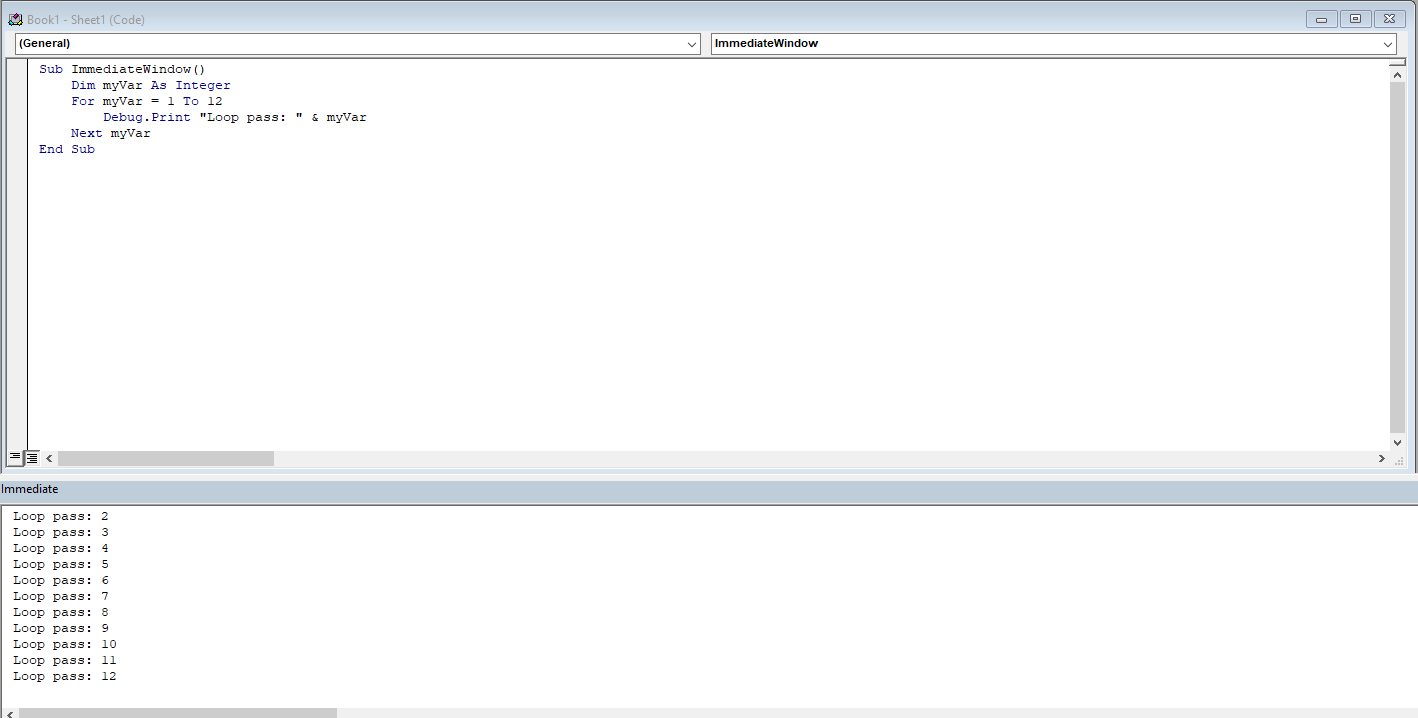
Place the cursor on the first line of the macro and press F5 to start the macro. Now check the result in the Immediate Window.
In a new line in the Immediate Window, enter the following statement and press Enter:
? 24/6
Excel displays the result of the division on the next line.
Step Through Code (Step-by-Step Execution)
Another way to troubleshoot Excel is to step through the macro line by line. To do this, place the cursor on the first line of the macro and press F8. You can also select Debug > Step Into from the menu. The macro stops after each statement. You can then check if the intended action was performed by briefly leaving the development environment and checking the results in your Excel workbook.
Using the previous example, ensure the numbers 100 and 25 are in the cells for the first step-through execution.
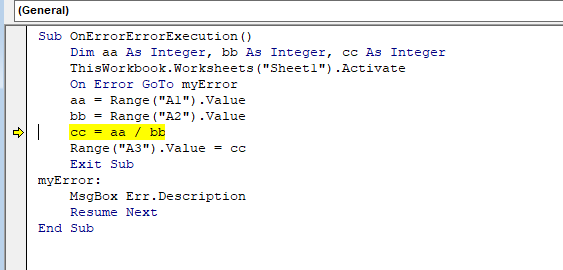
If you now place the cursor over a variable (e.g., variable
aa), you will see its current value (here, 100 foraa). You will also see that variableccstill has the value 0, because the currently selected statement has not yet been executed. After the next step, variableccwill have the value 4.This simple example shows you can use the step-through method to follow a program’s flow piece by piece, making it easier to locate the source of a logical error.
Another option is to set the cursor at the line to which you want the macro to run, then press Ctrl + F8. The code runs up to the currently marked line and stops exactly there. You can now verify if the macro worked correctly. If everything is correct, press F5 to let the macro run to completion. If something is wrong, cancel the macro using Run > Reset from the menu.
Breakpoints
If stepping through code takes too long for a given program, you can also work with breakpoints. The program runs all statements until such a breakpoint. Set a breakpoint near where you suspect the source of an error.
To set a breakpoint, click in the gray left margin where you want the breakpoint. A red dot appears. A breakpoint is set on the line where the cursor is. In the example, the line where
cc = aa / bbis calculated is suitable.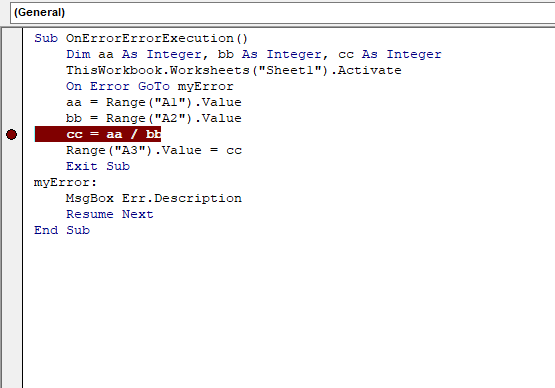
Run the program using the F5 key. It breaks before executing the line with the breakpoint. From that point, you can run the program step-by-step and check variable values as described above.
You can set multiple breakpoints. A breakpoint can be removed by placing the cursor on the appropriate line and pressing F9 again.
Adding a Watch
Many errors in procedures are caused by variables taking unexpected values. If a procedure uses a variable whose value changes in various places, you might want to pause the procedure and check the current value of that variable. Visual Basic offers a special Watch window that lets you keep an eye on variables or expressions during procedure execution.
To add a Watch window, select Watch Window from the View menu (or press Shift + F9). Now you can monitor when a particular variable changes.
In the following example, a loop runs exactly twelve times. The variable
myVariablechanges on each loop iteration. According to logic, the following macro should stop after the first loop iteration.Sub ImmediateWindow() Dim myVar As Integer For myVar = 1 To 12 Debug.Print "Loop pass: " & myVar Next myVar End SubTo add a watch for the variable
myVariable, follow these steps:- In the development environment’s Debug menu, select Add Watch.
- Enter the variable name (
myVariable) in the Expression field. - Check Break When Value Changes.
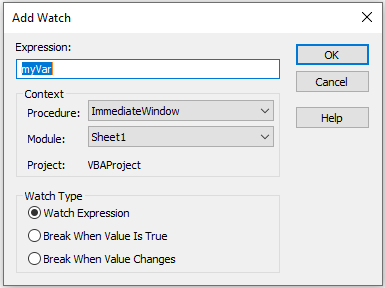
The macro will pause the first time the variable
myVariablechanges.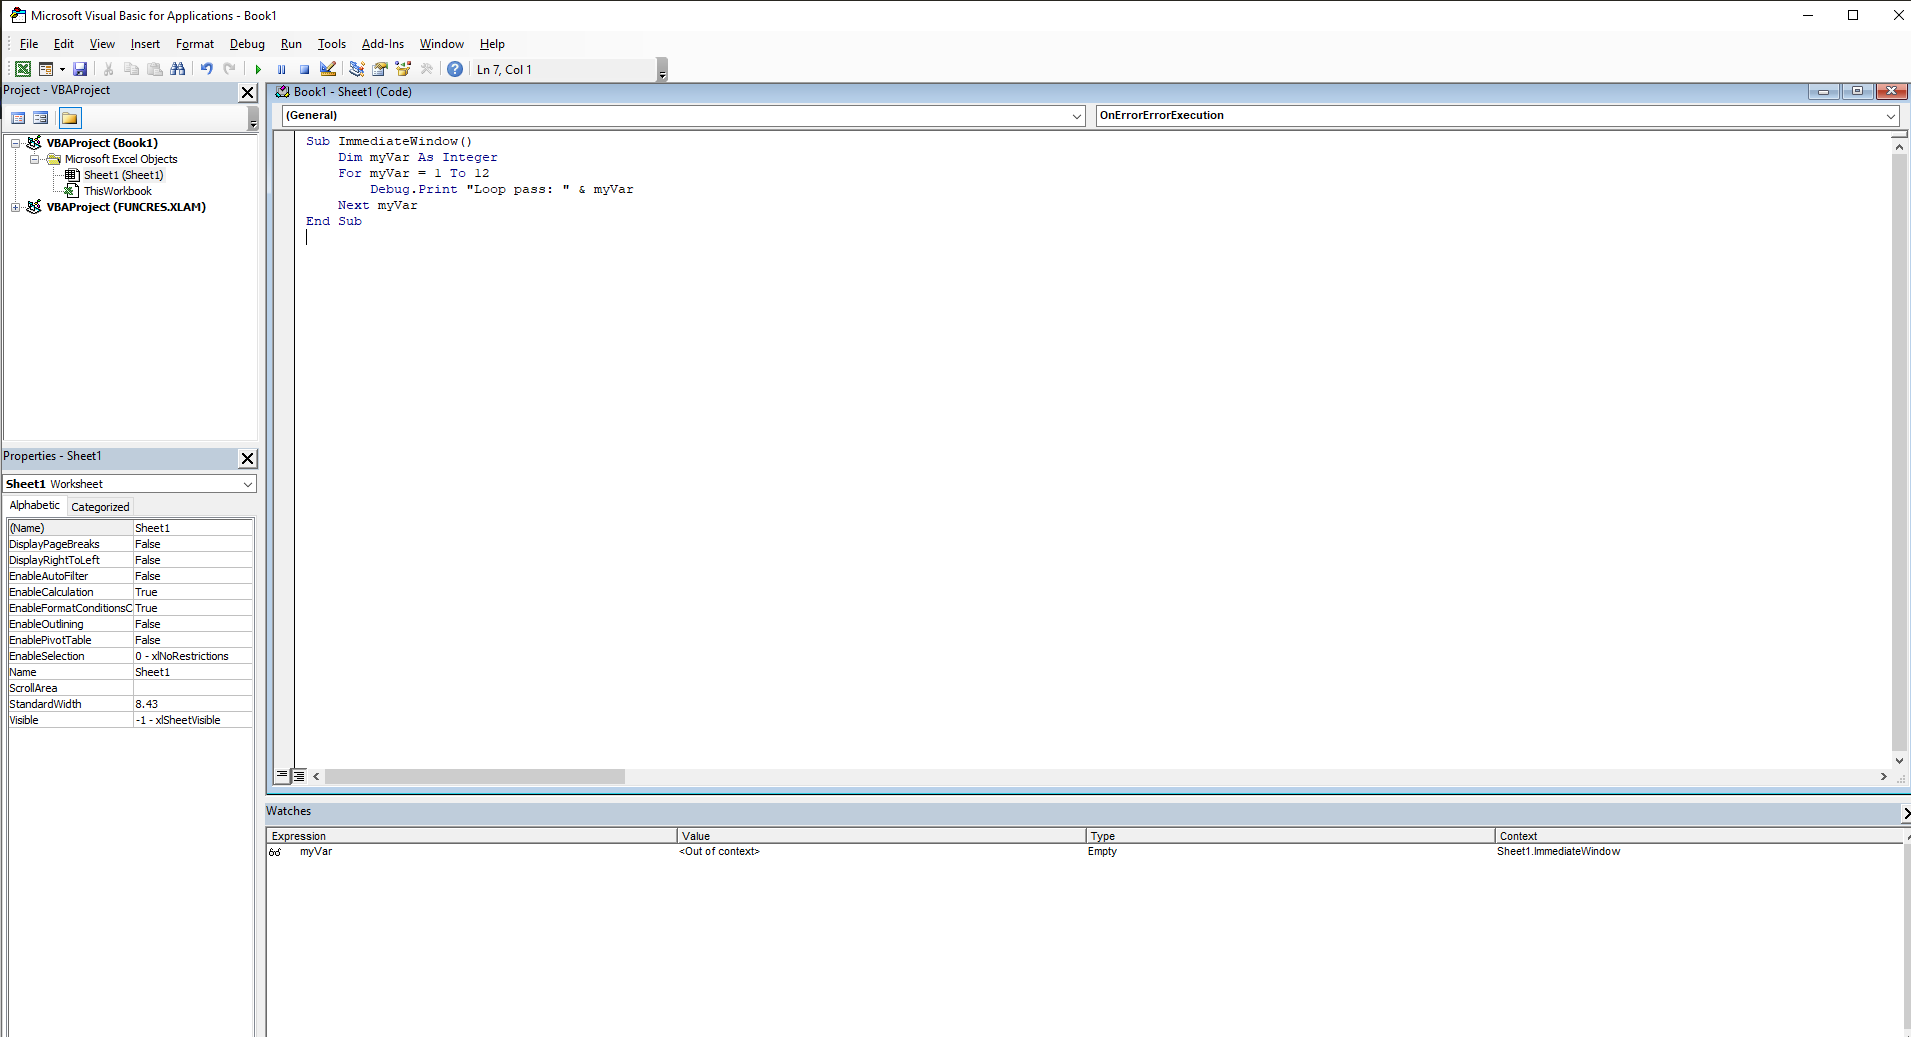
Field Description Expression Displays the name of a variable you highlighted in your procedure. If you opened the Add Watch dialog without selecting a variable name, type the name of the variable you want to watch in the Expression box. Context Here you specify the name of the procedure containing the variable and the name of the module where that procedure is located. Type Specifies how to watch the variable. Selecting Watch Expression lets you see the variable’s value in the Watch window while paused. Selecting Break When Value Is True automatically stops the procedure when the variable becomes true (nonzero). Selecting Break When Value Changes stops the procedure every time the variable or expression’s value changes. You can add a Watch before running a procedure or after pausing execution.
The Watch window lists the following procedure WhatDate:
Sub WhatDate()
    Dim currentDate As Date
    Dim futureDate As Date
    Dim x As Integer
    currentDate = Date
    For x = 1 To 365
        futureDate = Date + x
    Next
End Sub
The procedure WhatDate uses a
For ... Nextloop to calculate the date corresponding toxdays in the future. If you run this procedure, you won’t get any result unless you insert the following statement in the procedure code:MsgBox "In " & x & " days, it will be " & nouvelleDate
In this example, however, you do not care to display each date day by day. What if all you want is to stop the program when the variable
xreaches 150? In other words, what date will it be 150 days from now? To get the answer, you can insert the following statement in your procedure:If x = 150 Then MsgBox "In " & x & " days, it will be " & nouvelleDate
Adding new instructions to your procedure just to get an answer about the value of a certain variable when a specific condition occurs is not always practical. Instead of adding
MsgBoxor other debug instructions to your code that you must later remove, you can use the Watch window to avoid extra code maintenance. If you add watch expressions to the procedure, Visual Basic will stop theFor ... Nextloop when the specified condition is met, allowing you to check the desired variable values.To add a watch for the variable
xwith the conditionx = 150, follow these steps:- In the development environment Debug menu, select Add Watch.
- In the Expression textbox, enter:
x = 150. - In the Context section, choose
QuelleDatein the Procedure dropdown. - In the Watch Type section, select the option Break When Value Is True.
- Click OK to close the Add Watch dialog. Visual Basic opens the Watch window and adds your expression
x = 150.
Now add another expression to the Watch window to track the current date:
- In the Code window, place the cursor anywhere on the variable name
LaDate. Choose Debug > Add Watch and click OK to accept the default Watch Expression type. Note thatLaDatenow appears in the Expression column of the Watch window. - In the Code window, place the cursor anywhere on the variable name
nouvelleDate. Choose Debug > Add Watch and click OK to accept the default Watch Expression type.
x

Note that
nouvelleDatenow also appears in the Expression column of the Watch window. After these steps, theQuelleDateprocedure contains three watches.On Error GoTo 0
On Error GoTo 0disables error handling in the current procedure. It does not specify line 0 as the beginning of the error-handling code, even if the procedure contains a line numbered 0. Without anOn Error GoTo 0statement, an error handler is automatically deactivated when a procedure exits.Sub ExampleErrorHandling4() On Error GoTo 0 Dim age As Byte age = InputBox("Enter your age") MsgBox "Age is " & age Exit Sub myError: MsgBox "Invalid value" End SubLogical Errors
Logical errors occur when an application compiles without syntax errors and runs without runtime errors but does not produce the expected result. Logical errors may go unnoticed for a long time because the application appears to function correctly. Logical errors are not caught by the compiler during development or compilation and do not interrupt users with explicit runtime error messages. Although most logical errors are detected and do not cause major issues, some can be extremely difficult to identify and may result in serious consequences depending on how the application is used.
Identifying the cause of logical errors is often difficult and can only be achieved through intensive testing and analysis of processes and outcomes. A testing environment is available in the development environment to help locate and eliminate errors quickly.
Debugging
When learning a programming language, you’re likely to make many mistakes. Therefore, it’s important to know how to find and correct errors and what tools are available to help. During programming, errors are inevitable. However, it’s important to know how far the program ran correctly before the error occurred. For this reason, a testing environment is provided in the development environment that can be used to quickly locate and correct errors.
The Code Window
In case of errors, you can enter and edit your VBA macros in the Code window. This is where your code resides. If the window is not already open, select the Code command from the View menu or press the F7 shortcut key.
The Code window contains the following objects:
- Object drop-down list: Displays the names of the selected objects. Click the arrow to the right of the list box to view all objects associated with the form.
- Procedure drop-down list: Lists all events detected by Visual Basic for the form or control shown in the Object box. When you select an event, the corresponding event procedure appears in the code window. All procedures are displayed alphabetically in this list, making it easier to locate specific modules.
If you look at the top-right edge of the vertical scroll bar of the code window, you’ll see the split box. The split box is located just above the up arrow symbol, as shown in the following figure.
Steps:
- In the Debug menu, select Add Watch.
- Enter
x = 150in the Expression field. In the Procedure drop-down, selectWhatDate. - Under Watch Type, select Break When Value Is True.
- Click OK to add the watch. Visual Basic opens the Watch Window and displays
x = 150.
Now, to track the current date:
- In the Code window, place the cursor on
currentDate. - Choose Debug > Add Watch, then click OK with default settings.
Repeat the same for
futureDate.After completing these steps, the
WhatDateprocedure has three watches active.Place the insertion point anywhere inside the QuelleDate procedure code and press F5.
Note that the value of the variablexin the Watch Window is the same as the value you specified in the Add Watch dialog box. In addition, the Watch Window displays the values of both variables:LaDateandnouvelleDate. The procedure is in break mode. You can press F5 to continue or ask another question, such as “What will the date be in 250 days?” The next step shows you how.Choose Debug | Edit Watch and enter the following expression:
x = 277.
Click OK to close the Edit Watch dialog box.
Note that the Watch Window now displays a new value for the expression.xis now False.Press F5 to continue the procedure’s execution.
The procedure stops again when the value ofxequals 277. The value ofcurDateis the same; however, thenewDatevariable now contains a new value, a date 277 days from now. You can again modify the expression value or complete the procedure.Press F5 to finish running the procedure.
When your procedure is running and a watch expression has a value, the Watch Window displays that value. If you open the Watch Window after the procedure has ended, you will see instead of the variable values. In other words, when the watch expression is out of context, it has no value.The Locals Window
The Locals Window is not displayed in the development environment by default. However, you can display this window via the View menu. The Locals Window shows all variables declared in the current procedure and their values, allowing you to clearly verify the values of your variables.
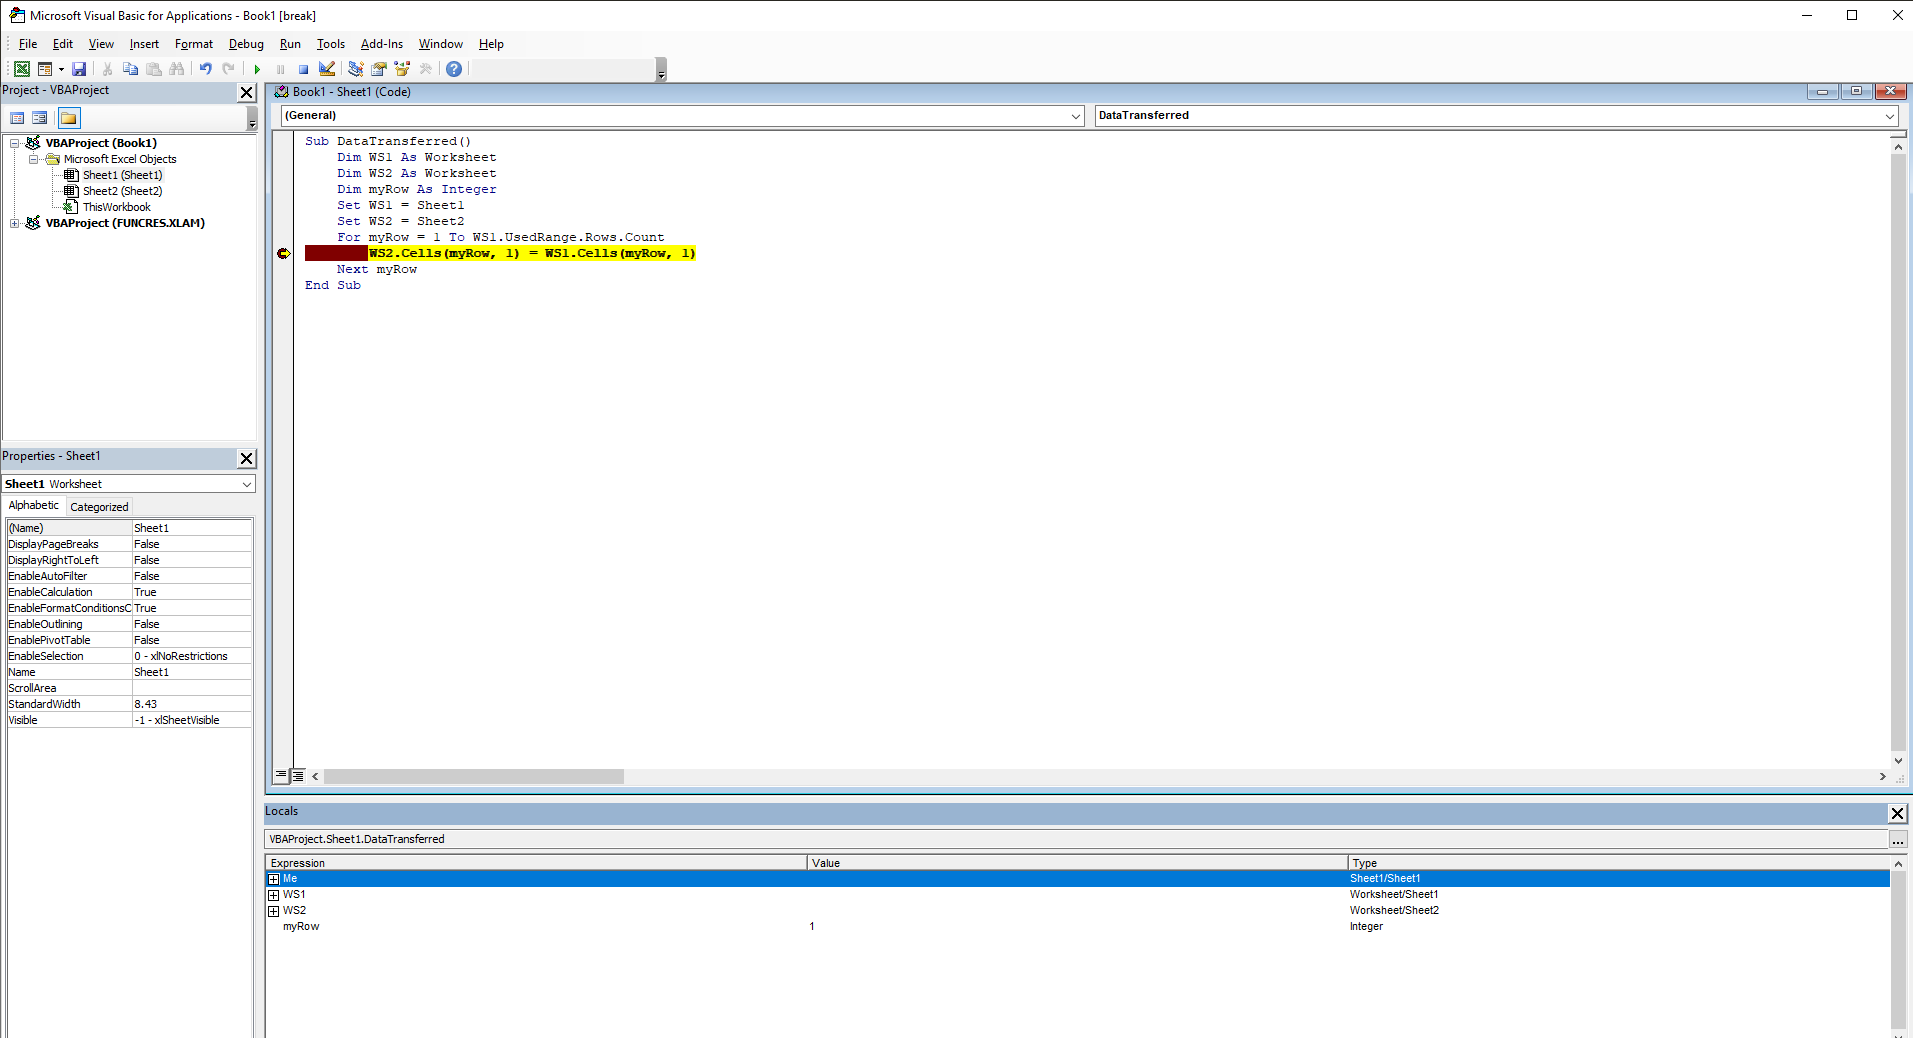
To test this feature, enter the following macro, which transfers all used cells from Sheet5 to Sheet6:
Sub DataTransferred()
    Dim WS1 As Worksheet
    Dim WS2 As Worksheet
    Dim myRow As Integer
    Set WS1 = Sheet5
    Set WS2 = Sheet6
    For myRow = 1 To WS1.UsedRange.Rows.Count
        WS2.Cells(myRow, 1) = WS1.Cells(myRow, 1)
    Next myRow
End Sub
Comments
- In the first step, declare two object variables of worksheet type. Then use the
Setstatement to assign them. - In a For loop, you then transfer all cells from column A of Sheet5 to the target worksheet Sheet6.
- You use the
Cellsproperty, which requires two arguments. The first argument represents the currently active row, and the second argument represents the column. Since the column remains constant (column A), you can set this argument to 1. The row argument is incremented on each loop pass.
To use the Locals Window, proceed as follows:
- Place the mouse pointer on a line within the loop.
- Press the F9 key to set a breakpoint on that line.
- Start the macro by pressing the F5 key.
- The macro runs to the breakpoint. The contents of the variables are now displayed in the Locals Window.
- Continue stepping through the loop by pressing F5 again.
The following columns are displayed in the Locals Window:
- Expression: Lists the names of variables. The first variable in the list is a special module-level variable that can be expanded to show all module-level variables for the current module. Global variables and variables from other projects are not available in the Locals Window.
- Value: If you click directly on a value entry, the cursor changes to an input field. You can modify this value and press Enter. If the value is not allowed, the edit field remains active, and the value is highlighted. A message box also appears describing the error. You can press Esc to cancel the change. For example, you can change the value of the variable
ito 7. Excel would then continue after the seventh loop pass. - Type: This column shows the variable’s data type. However, you cannot change the type.
- Call Stack: At the top right of the Locals Window, you’ll find a button with ellipsis (…). Clicking it displays a list of currently active procedure calls in break mode. When code is running in a procedure, it’s added to the call stack. Each time another procedure is called, it’s added to the stack. Procedures are removed from the list as execution returns to the calling procedure.
Incidentally, you can also remove a breakpoint during execution. After stopping the macro again, press F9.
The Debug Toolbar
The Debug Toolbar provides icons that simplify quick code testing.
To display this toolbar, click Toolbars on the View tab and then select Debug.The following icons are available, from left to right:
- Design Mode: Toggles design mode on and off.
- Run/Continue: Runs the current procedure if the cursor is within one; runs the UserForm if a form is active.
- Break: Stops program execution and enters break mode. You can also press Esc to stop the macro.
- Reset: Clears the call stack and module-level variables and ends the project.
- Toggle Breakpoint: Sets or removes a breakpoint on the current line. You can also press F9 to toggle a breakpoint.
- Step Into: Executes exactly one statement in the code. You can also use F8 to step through code line by line.
- Step Over: Executes a procedure or statement in the code window.
- Step Out: Executes the remaining lines of the current procedure.
- Locals Window: Displays the Locals Window.
- Immediate Window: Displays the Immediate Window. You can also press Ctrl + G.
- Watch Window: Displays the Watch Window.
- Quick Watch: Opens the Quick Watch dialog with the current value of the selected expression.
- Call Stack: Displays the Call Stack dialog showing active procedure calls (procedures that have started but not yet ended).
Error Messages
The following is a table of catchable error codes. As you can see, this list skips some numbers. Among the unused numbers, those from 1 to 1000 may be used by Visual Basic in the future.
Error Code Message 3 Return without GoSub 5 Invalid procedure call 6 Overflow 7 Out of memory 9 Subscript out of range 10 This array is fixed or temporarily locked 11 Division by zero 13 Type mismatch 14 Out of string space 16 Expression too complex 17 Cannot perform requested operation 18 User interrupt 20 Resume without error handler 28 Stack space overflow 35 Sub or Function not defined 47 Too many application clients for DLL 48 Error loading DLL 49 Bad DLL calling convention 51 Internal error 52 Bad file name or number 53 File not found 54 Bad file mode 55 File already open 57 Device I/O error 58 File already exists 59 Bad record length 61 Disk full 62 Input past end of file 63 Bad record number 67 Too many files 68 Device unavailable 70 Permission denied 71 Disk not ready 74 Can’t rename with different drive 75 Path/file access error 76 Path not found 91 Object variable or With block variable not set 92 For loop not initialized 93 Invalid string pattern 94 Invalid use of Null 95 Application-defined or object-defined error 322 Cannot create necessary temporary file 325 Invalid format in resource file 380 Invalid property value 423 Property or method not found 424 Object required 429 ActiveX component can’t create object 430 Class does not support Automation 432 File name or class name not found during Automation operation 438 Object doesn’t support this property or method 440 Automation error 442 Connection to type library or object library for remote processing lost 443 Automation object has no default value 445 Object doesn’t support this action 446 Object doesn’t support named arguments 447 Object doesn’t support current locale setting 448 Named argument not found 449 Argument not optional 450 Wrong number of arguments or invalid property assignment 451 Object not a collection 452 Invalid ordinal 453 Specified DLL function not found 454 Code resource not found 455 Code resource lock error 457 This key is already associated with an element of this collection 458 Variable uses an Automation type not supported in Visual Basic 481 Invalid picture 500 Variable not defined 501 Cannot assign to variable 502 Object not safe for scripting 503 Object not safe for initialization 32811 Element not found Protecting VBA Projects
If you’ve invested a lot of time in programming your VBA projects and now want to protect them from unauthorized access, you have several options:
- Assign a password
- Create an add-in
To assign a password to protect your code:
- Switch to the development environment.
- Right-click on the workbook in the Project Explorer that you want to protect and select VBAProject Properties from the context menu.
- Go to the Protection tab.
- Check Lock project for viewing.
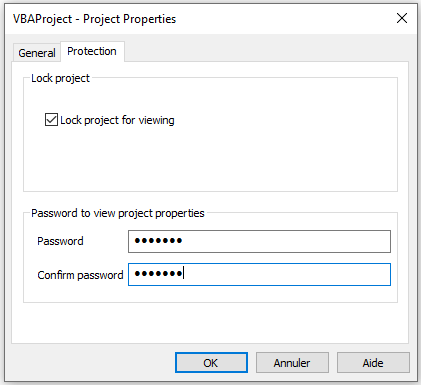
- Assign and confirm a password.
- Click OK to finish.
- Save, close, and reopen the Excel file. Try to view the code.
You will now see the following dialog box:
If you want to protect the macro from running without a password, add the following lines of code:
Sub ProtectProject()
    Dim passcode As Variant
    passcode = Application.InputBox("Enter a password", "Password")
    Select Case passcode
        Case Is = False
            ' do nothing
        Case Is = "easy"
            Range("A1").Value = "This is a secret code"
        Case Else
            MsgBox "Incorrect password"
    End Select
End Sub
Comments
- The macro uses the
InputBoxmethod of theApplicationobject. If the user clicks Cancel, the method returns False, and nothing happens. - Only if the user knows the password (still “easy”) will the secret code be executed. If the entered password is incorrect, a MsgBox appears.
- Note that the user cannot inspect the password in the Visual Basic Editor because the project is locked for viewing.
The second method to protect your code is to create an add-in. The code is compiled and can no longer be modified afterward.
- The problem with this code is that it is missing a
About Procedures and Functions in Excel VBA
What is a Procedure?
A procedure (or Sub procedure) is a piece of code that performs a set of actions or calculations, or a combination of both. It resides in a VBA module, which you access through the Visual Basic Editor (VBE). It can be a building block of a program and may sometimes need to be reused. It can be called multiple times in a VBA program.
The programmer only needs to write a procedure once, and it can then be called from anywhere in the program as many times as needed. However, it does not directly return a value; if it performs a calculation, there is no direct way to retrieve the result. It can modify variable values if parameters are passed using the
ByRefstatement, which will be explained later in this chapter. Most VBA code is contained in procedures.Its syntax is as follows:
[Private | Public | Friend] [Static] Sub ProcedureName [(Arguments)]
instructions
Exit Sub
instructions
End Sub
Notes:
Just like variables, procedures also have scope:
Privateis a keyword indicating the procedure is private and its scope is at the module level. Thus, private procedures can be called by other procedures within the same module but not by procedures in other modules.Publicis a keyword indicating the procedure is open and available to all other procedures in all modules. By default, procedures are Public; in other words, using thePublickeyword is not required, but programmers often include it for clarity.Friendis a keyword, used only in a class module, to indicate that the procedure is friend-level and belongs to the project.Staticis a keyword indicating that the procedure’s variables are retained at the end of the procedure.ProcedureNameis the name of the procedure that follows standard variable naming rules. The name should describe what the procedure does. A good practice is to use a name that includes a verb and a noun. Avoid meaningless names.Argumentsis a list of parameters whose values are passed to or returned from the procedure when it is called.instructionsis a set of statements executed in the procedure.Exit Subis a statement that leads to an immediate exit from the procedure.
Example: Here’s a procedure that swaps two values:
Sub SwapValues()
    Dim CellContent As String
    CellContent = Range("A1").Value
    Range("A1").Value = Range("B1").Value
    Range("B1").Value = CellContent
End Sub
Comments:
■ First, we declare a variable called
CellContentof type String.
■ We initializeCellContentwith the value from cell A1 (CellContent = Range("A1").Value).
■ We can now safely write the value from cell B1 into cell A1 (Range("A1").Value = Range("B1").Value) since we stored the original value from A1 inCellContent.
■ Finally, we write the original value from A1 (stored inCellContent) into cell B1 (Range("B1").Value = CellContent).A procedure can be of any length, but many prefer avoiding excessively long procedures that perform too many operations. You may find it easier to write several smaller procedures, each with a single objective, and then design a main procedure that calls those. This approach can make code maintenance easier.
NOTE:
With a few exceptions, all VBA statements in a module must be contained within procedures. Exceptions include variable declarations at the module level, user-defined data type definitions, and a few other statements that specify module-level options (e.g.,Option Explicit).Creating Custom Functions
In addition to Sub procedures, VBA has Function procedures (or simply functions). A Function is exactly like a procedure, except it returns a value. Functions start with
Function(instead ofSub) and end withEnd Function(instead ofEnd Sub). You can use these functions in your VBA code or in worksheet formulas. Functions generally return a single value (or an array), just like Excel’s built-in worksheet functions and VBA functions. Like built-in functions, your functions can use arguments.Functions are versatile and can be used in two scenarios:
- As part of an expression in a VBA procedure
- In formulas created in a worksheet
You are undoubtedly familiar with Excel worksheet functions; even beginners know how to use common worksheet functions like
SUM,AVERAGE, andIF. Excel includes over 450 built-in worksheet functions you can use in formulas. Additionally, you can create custom functions using VBA. With all the functions available in Excel and VBA, you might wonder why you’d need to create new ones. The answer is: to simplify your work. With a little planning, custom functions can be useful both in worksheet formulas and in VBA procedures.The syntax to declare a function is:
[Public | Private | Friend] [Static] Function FunctionName _
    [(Arguments)] [As Type]
instructions
FunctionName = expression
[Exit Function]
instructions
FunctionName = expression
End Function
Comments:
The syntax of a function contains the same elements as a procedure. Therefore, the same rules apply:
- If you do not declare the scope of a function, its default is
Public. - The
Exit Functionstatement causes the function to exit immediately. - Functions declared as
Privatedo not appear in Excel’s Insert Function dialog box. Therefore, when creating a function that should only be used within a VBA procedure, you should declare itPrivateto prevent users from trying to use it in a formula. - If your VBA code needs to call a function defined in another workbook, you must set a reference to the other workbook using the Tools > References command in the VBE.
- You do not need to establish a reference if the function is defined in an add-in. Such a function is available in all workbooks.
Function names must follow the same rules as variable names. If you plan to use your custom function in a worksheet formula, avoid names that also represent cell addresses. For example, if you name a function
ABC123, Excel will return a#REF!error when trying to use it in a worksheet formula becauseABC123is a valid cell address.To call a function in an expression, use its name followed by a list of parameters in parentheses. To return a value from a function, assign a value to the function name.
Example:
Public Function SumFunction(x As Double, y As Double) As Double
    SumFunction = x + y
End Function
Comments:
- This function adds two values. Instead of passing literal values, we make the function more flexible by using variables as arguments.
- Each variable (x, y) represents a value you provide when calling the function.
- To specify the return value, assign the result to the function name (
SumFunction = x + y).
You can quickly test your custom function in the Immediate Window. To do so:
- Open the Immediate Window by choosing View > Immediate Window in the VBE or pressing Ctrl + G
- Then type:
? SumFunction(12, 13)and press Enter - The result,
25, will appear below
You can also add a function using the Add Procedure dialog box: in VBE, go to Insert > Procedure…

Note: The functions you create, also called User Defined Functions (UDFs), become available in the Insert Function list when entering formulas in Excel. To use a custom function:
- Go to the Formulas tab on the ribbon
- In the Function Library group, click Insert Function
- In the Insert Function dialog box, choose User Defined as the category, and select the function you created
Running a Procedure or a Function
There are two main ways to run a procedure:
- You can call the Sub procedure using the Run / Run Sub/UserForm command in the VBE menu. You can also press F5, or click the Run button on the Standard toolbar. This assumes the cursor is inside a procedure. If not, VBE will show the Macro dialog box so you can select a procedure to run.
- You can also call a procedure from Excel’s Macro dialog box by selecting Developer > Macros

Excel’s Macro Dialog Box
You can also press Alt + F8 to access this dialog. Use the Macros in dropdown to filter the list of macros displayed.
The Macro dialog does not display the following:
- Functions
- Procedures declared with the
Privatekeyword - Procedures requiring one or more arguments
- Procedures in add-ins
- Event procedures
Once the macro is selected, click the Run button.
NOTE:
You can also run a procedure from:- Another procedure
- An event
- The Immediate Window
- A custom context menu
- The ribbon
- A button on a worksheet
- A Quick Access Toolbar icon
- A UserForm control
While you can run a procedure in several ways, functions can only be executed in four ways:
- Called from another procedure
- Used in a worksheet formula
- Used in a formula for conditional formatting
- Called from the Immediate Window in VBE
Calling a Procedure or Function from Another
One of the most common ways to run a procedure or function is by calling it from another. If you’re new to programming, you might wonder why anyone would call a procedure or function from another one. Why not just put the code into the other procedure and keep it simple?
Reason 1: It simplifies your code. Simpler code is easier to read, debug, and modify.
Reason 2: It eliminates redundancy. Suppose you need to perform an operation in 5 different places. Instead of writing the same code 5 times, write one procedure and call it 5 times. If you need to update it, you only make one change.
You can call a procedure or function in two ways:
- Enter the procedure or function name followed by its arguments:
Name argumentsName: the name of the procedure or functionarguments: a list of actual parameters matching in number and type with the parameter list in the procedure definition
Use the
Callstatement:Call Name(arguments)Note: When using
Call, arguments must be placed inside parentheses and separated by commas. WithoutCall, parentheses are omitted.A statement in a procedure can pass values to the called procedure using named arguments. Named arguments are specified as:
ArgumentName := valueExample:
Sub DemoSumFunction()
    MsgBox SumFunction(12, 13)
End Sub

Public Function SumFunction(x As Double, y As Double) As Double
    SumFunction = x + y
End Function
Comments:
- When
SumFunction = x + yis executed inside the function, VBA returns to theDemoSumFunctionprocedure and usesMsgBoxto display the result. - More information about
MsgBoxis available in Chapter 5.
Parameters and Arguments of Procedures or Functions
The arguments of a procedure or function provide it with data it uses in its instructions. The data passed through an argument can be a variable, a constant, an expression, an array, or an object.
You are probably familiar with many Excel worksheet functions. The arguments of procedures or functions are similar. Thus, a procedure or function may require no arguments, a fixed number of arguments, accept an indefinite number of arguments, may require some arguments while leaving others optional, or have all arguments optional.
For example, some Excel worksheet functions, such as RAND and NOW, use no arguments. Others, like COUNTIF, require two arguments. Still others, like SUM, can use up to 255 arguments. Some worksheet functions have optional arguments. The PV function, for instance, can have five arguments (three are required; two are optional).
Most procedures you have seen so far in this book have been declared without arguments. They have been declared with just the Sub keyword, the procedure name, and a set of empty parentheses. The empty parentheses indicate that the procedure accepts no arguments.
Each argument name refers to the value you provide when the function is called. When a procedure calls a function, it passes the required arguments as variables. Once the function is executed, the result is assigned to the function name. Note that the function name is used as if it were a variable. Like variables, functions can have types. The type of your function can be String, Integer, Long, etc. To specify the data type of your function’s result, add the keyword As and the desired data type name at the end of the function declaration line.
The parameter and argument list follows the syntax:
[Optional] [ByVal | ByRef] [ParamArray] myVariable()[As Type] [= DefaultValue]
■
Optionalis a keyword indicating that the parameter is optional. When using this element, all subsequent parameters in the argument list must also be optional and described using the Optional keyword. All parameters described as optional must be of type Variant. The Optional keyword is not allowed for any parameters if the ParamArray keyword is specified.■
ByValis a keyword indicating that this parameter is passed by value.■
ByRefis a keyword indicating that this parameter is passed by reference.ByRefis the default in VBA.■
ParamArrayis a keyword used only as the last item in the argument list to indicate that the final parameter is an array of Variant values described as optional. It cannot be used with the keywordsByVal,ByRef, orOptional.■
Typeis the type of parameter values passed to the procedure. Valid values: Byte, Boolean, Integer, Long, Currency, Single, Double, Date, String (variable-length only), Object, Variant. If the Optional keyword is missing, a user-defined type or object type can also be specified.■
DefaultValuesets the default value the parameter takes. If Object is specified, the only default value isNothing.Passing Arguments by Reference and by Value
In some procedures or functions, when you pass arguments as variables, Visual Basic may modify the values of those variables. To ensure that the called function does not modify the values of passed arguments, you must precede the argument name in the function declaration line with the keyword
ByVal. Let’s take a look at the following macro:Sub ByValRefProcedure() Dim number1 As Double, number2 As Double number1 = 15 number2 = 35 MsgBox AverageValue(number1, number2) MsgBox number1 MsgBox number2 End Sub Function AverageValue(ByVal number1, ByVal number2) number1 = number1 + 1 AverageValue = (number1 + number2) / 2 End FunctionComments
■ To prevent the function from modifying argument values, use the
ByValkeyword before the argument names.■ The
ByValRefProcedureprocedure assigns values to two variables, then calls theAveragefunction to calculate and return the average of the numbers stored in these variables.■ The function arguments are the variables
number1andnumber2. Note that all function arguments are preceded by theByValkeyword. Also note that before calculating the average, theAveragefunction modifies the value of the variablenumber1.■ In the function,
number1becomes 16 (15 + 1). Therefore, when the function returns the calculated average to theByValRefProcedure, theMsgBoxfunction displays the result 25.5, not 25 as expected. The next twoMsgBoxfunctions display the contents of each variable. The values stored in these variables are the same as the original values assigned to them: 15 and 35.What happens if you omit the
ByValkeyword before the argumentnumber1in the function declaration line ofAverage? The function’s result will still be the same, but the content of the variablenumber1displayed byMsgBoxwill now be 16. TheAveragefunction not only returned an unexpected result (25.5 instead of 25) but also modified the original data stored in the variablenumber1. To prevent Visual Basic from permanently changing the values passed to the function, use theByValkeyword.Since one of the variables passed to a procedure or function can be modified by the receiving procedure, it is important to know how to protect the original value of a variable. Visual Basic has two keywords:
ByRefandByVal, which respectively grant or deny permission to modify a variable’s content.By default, Visual Basic passes information to a procedure or function by reference (
ByRefkeyword), referencing the original data specified in the function’s argument when the function is called. So, if the function changes the argument’s value, the original value is changed. This is what happens if you omit theByValkeyword before the argumentnumber1in theAveragefunction.If you want the function to modify the original value, you don’t need to explicitly insert the
ByRefkeyword, since variables are passedByRefby default. When you use theByValkeyword before an argument name, Visual Basic passes the argument by value.This means Visual Basic makes a copy of the original data and passes this copy to the function. If the function changes the value of a passed-by-value argument, the original data does not change—only the copy does. That’s why, when the
Averagefunction modified the value of thenumber1argument, the original value of thenumber1variable remained the same.Function Examples
Function construction can be as simple or as complex as needed. Nevertheless, reviewing some examples can help you understand what’s going on.
The Maximum of Two Numbers
The following example calls the
MaxValue()function. It determines the maximum of the two passed parameters and returns it to the call point.Sub ExampleFunction() Dim x As Integer, y As Integer, z As Integer x = 15 y = 40 z = MaxValue(x, y) MsgBox z End Sub Function MaxValue(a As Integer, b As Integer) As Integer If a > b Then MaxValue = a Else MaxValue = b End If End FunctionComments
■ With the instruction
z = MaxValue(x, y), the following operations occur:– The
MaxValue()function is called, and two numeric values are transferred to the function.– Inside the function, the maximum of these two numbers is determined using an
If…Elsecondition and stored as the function’s return value.– The function ends and program control returns to the calling line.
– The determined value is assigned to the variable
z.■ If the instruction had been just
MaxValue(x, y), all these steps would have occurred except for the assignment toz. In this case, calling the function would have been pointless—a common beginner error.The
MaxValue()function can also be used in a worksheet. For example, enter in a cell:=MaxValue(A1, B1), and the expected result will appear.Calculating the Last Day of the Month
The following
EndOfMonth()function calculates the last day of the month for a specific year. As is known, the result is 30 or 31 depending on the month. For February, the result is 29 for leap years, otherwise 28. First, a test procedure that calls theEndOfMonth()function:Sub EndOfMonthTest() ThisWorkbook.Worksheets("Sheet3").Activate Range("C3").Value = _ EndOfMonth(Range("C1").Value, Range("C2").Value) End Sub Function EndOfMonth(Year As Integer, Month As Integer) If Month = 2 Then If Year Mod 4 = 0 And Year Mod 100 <> 0 _ Or Year Mod 400 = 0 Then EndOfMonth = 29 Else EndOfMonth = 28 End If ElseIf Month = 4 Or Month = 6 Or Month = 9 Or Month = 11 Then EndOfMonth = 30 Else EndOfMonth = 31 End If End FunctionComments
■ The two values for year and month are passed to the parameters
YearandMonthwhen the function is called.■ If it’s February, the
Modoperator checks whether the year is a leap year, meaning the year:– is divisible by 4, but not by 100 without a remainder
– or is divisible by 400 without a remainder
Otherwise, the value is 30 or 31 depending on the month.
■ In the expression
Year Mod 4 = 0 And Year Mod 100 <> 0 Or Year Mod 400 = 0, the following precedence applies to operators, from highest:–
Modarithmetic operator– Comparison operators
=or<>– Logical operator
And– Logical operator
OrParentheses must not be used under any circumstances.
Voici la suite et fin de la traduction exacte en anglais :
Optional Parameters
The number and order of parameters in the call and declaration of a procedure (or function) must match. However, you can also use optional parameters. These do not need to be specified when calling the function.
Parameters are identified in the parameter list using the
Optionalkeyword, must always be placed at the end of the parameter list, and can be initialized with a value.In the following example, the
Add()function is called three times in total: once with two parameters, once with three, and once with four. It calculates the sum of the transferred parameters and returns it.Sub OptionalParameter() Dim a As Double, b As Double, c As Double, d As Double a = 3 b = 10 c = 15 d = 7 MsgBox Add(a, b, c, d) MsgBox Add(a, b, c) MsgBox Add(a, b) ' MsgBox Add(a) End Sub Function Add(x As Double, y As Double, _ Optional z As Double = 0, Optional q _ As Double = 0) As Double Add = x + y + z + q End FunctionComments
■ The
Add()function expects a total of four parameters of typeDouble. The last two parameters are optional. You can initialize optional parameters with a default value.■ If the last two parameters are not specified when calling the function, they take the default value of 0.
■ For procedures or functions with optional parameters that must perform other tasks, different default values may be useful for initialization.
■ In the
OptionalParameter()procedure, theAdd()function is called with four, three, or two parameters. In all cases, this successfully leads to addition and the output of the values.■ A call with only one parameter would have caused an error message since the parameter
yis not optional.Any Number of Parameters
Using the
ParamArraykeyword, you can define a procedure (or function) to which any number of parameters can be passed.ParamArrayis incompatible withOptional, so you must choose one of the two options.In the following example, the
Average()function is called three times in total: once with no parameters, once with two, and once with four parameters. It calculates the average of the transferred parameters and returns it.Sub ParamArrayExample() Dim a As Double, b As Double, c As Double, d As Double a = 3 b = 10 c = 15 d = 7 MsgBox Average() MsgBox Average(a, b) MsgBox Average(a, b, c, d) End Sub Function Average(ParamArray x() As Variant) As Double Dim i As Integer Dim total As Double Dim count As Double For i = 0 To UBound(x) total = total + x(i) Next count = UBound(x) + 1 If count > 0 Then Average = total / count End FunctionComments
■ The
Average()function is called with a different number of parameters (0, 2, and 4).■ The parameter array
x(usingParamArray) is used to store the parameters. It is a data array, and its size is not fixed. This data array must be of data typeVariant.■ In the function, the parameters are summed using a loop. The upper bound of the loop (i.e., the highest index value) is determined using the
UBound()function. First, you must determine the number of elements in the parameter array.■ As is known, the average of a series of numbers is the sum of the values divided by their count. If the function is called without parameters,
UBound()returns the value -1. A division by zero would occur in that case. It is important to avoid this.■ If a value cannot be determined for the function during execution, the initial value applies—just like with variables. In the interest of clean programming style, this should be avoided. A function should always receive an explicit value during its course.
There is also the
LBound()function, which you can use to determine the lower bound—that is, the lowest value—for the index of an array. TheUBound()andLBound()functions can determine these indices for all dimensions of a one- or multi-dimensional array. They have an optional second parameter, the dimension number (1, 2, 3 …). If not specified, the limit for the first dimension is determined, as in theAverage()function given above.Using the Function in a Worksheet
Let’s take the example of a function called
REMOVEVOWELS. This function removes all vowels from a sentence.Function REMOVEVOWELS(text As String) As String ' Convert all vowels in the text argument to uppercase Dim i As Long REMOVEVOWELS = "" For i = 1 To Len(text) If Not UCase(Mid(text, i, 1)) Like "[AOEIU]" Then REMOVEVOWELS = REMOVEVOWELS & Mid(text, i, 1) End If Next i End FunctionComments
■ This custom function uses a single argument (
text), enclosed in parentheses.As Stringdefines the data type of the function’s return value. Excel uses theVariantdata type if no data type is specified.■ The first line in the
For-Nextloop uses VBA’sMidfunction to return a single character from the input string and converts this character to uppercase using theUCasefunction. This character is then compared to a list of characters using Excel’sLikeoperator. In other words, theIfclause is true if the character is not A, E, I, O, or U. In that case, the character is appended to the variableREMOVEVOWELS.■ When the loop is finished,
REMOVEVOWELSconsists of the input string with all vowels removed. This string is the value returned by the function.This function is certainly not the most useful one, but it demonstrates some key concepts related to functions.
When you enter a formula that uses the
REMOVEVOWELSfunction, Excel executes the code to obtain the value returned by the function. Here is an example of using the function in a formula:=REMOVEVOWELS(A1)
See the following figure for examples of this function in action. The formulas are in column C and they use the text from column B as arguments. As you can see, the function returns the input string with the vowels removed.
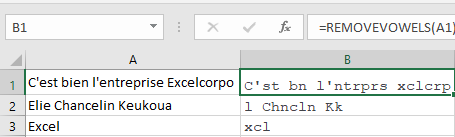
The
REMOVEVOWELSfunction works just like any built-in worksheet function. You can insert it into a formula. You can also nest custom functions and combine them with other elements in your formulas.In the Insert Function dialog box, your custom functions are located by default in the User Defined category, as shown in the following figure.
Insert Function dialog box
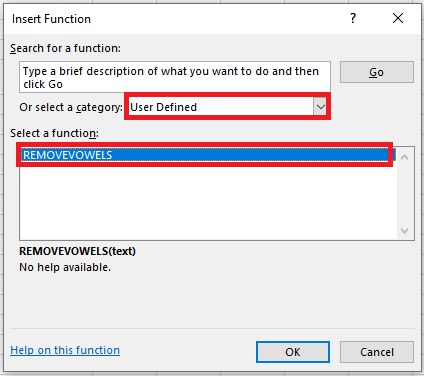
In addition to using custom functions in worksheet formulas, you can also use them in other VBA procedures.
What Custom Worksheet Functions Cannot Do
When developing custom functions, it’s important to understand a key distinction between functions you call from other VBA procedures and those you use in worksheet formulas. Functions used in worksheet formulas must be passive. For example, the code of a function cannot manipulate ranges or modify worksheet elements.
You may be tempted to write a custom worksheet function that changes a cell’s formatting. For example, it may be useful to have a formula that uses a custom function to change the text color in a cell based on its value. No matter how hard you try, such a function is impossible to write. Whatever you do, the function will not change the worksheet. Remember: a function simply returns a value. It cannot perform actions on objects.
That said, there is one notable exception. You can modify the text of a cell comment using a custom VBA function.
Managing the Insert Function Dialog Box
Excel’s Insert Function dialog box is a useful tool. When creating a worksheet formula, this tool lets you select a particular worksheet function from a list of functions. These functions are grouped into different categories to make it easier to locate a particular one. When you select a function and click OK, the Function Arguments dialog box appears to help you enter the function’s arguments.
The Insert Function dialog box also displays your custom worksheet functions. By default, custom functions are listed under the User Defined category. The Function Arguments dialog prompts you to enter arguments for the custom function.
You can also search for a function by keyword in the Insert Function dialog. Unfortunately, you cannot use this search feature to find VBA custom functions.
Using the MacroOptions Method
You can use the
MacroOptionsmethod of theApplicationobject to make your functions appear as built-in or user-defined functions (UDFs). Specifically, this method allows you to do the following:■ Provide a description of the function.
■ Specify a function category.
■ Provide descriptions for the function’s arguments.
The syntax for the
MacroOptionsmethod is:Application.MacroOptions Macro, Description, HasMenu, MenuText, HasShortcutKey, ShortcutKey, Category, StatusBar, HelpContextID, HelpFile, ArgumentDescriptions
Where:
- Macro – The name of the macro or user-defined function.
- Description – The description text.
- HasMenu – This argument is ignored.
- HasShortcutKey – Allows you to assign a shortcut key to your macro. If false, no shortcut key is assigned. Default is false.
- ShortcutKey – Contains the actual shortcut key when
HasShortcutKeyis true. - Category – An integer specifying the function category. You can also use a string for a custom category. If you use a name that matches a built-in category name, it maps to that category.
- StatusBar – The macro’s status bar text.
- HelpContextID – An integer specifying the help topic context ID.
- HelpFile – The name of the help file that contains the help topic.
- ArgumentDescriptions – (Added in 2010) A one-dimensional array containing descriptions of the user-defined function’s arguments. These are displayed in the Function Arguments dialog.
Another useful benefit of using the
MacroOptionsmethod is that it enables Excel to automatically correct the capitalization of your functions. For example, if you create a function calledMyFunctionand you enter the formula=myfunction(a), Excel will automatically change the formula to=MyFunction(a). This behavior provides a quick way to check if you’ve misspelled the function name. (If the lowercase letters are not corrected automatically, the function name is misspelled.)Here is an example procedure that uses the
MacroOptionsmethod to provide information about a function:Sub DescribeFunction() Dim strFunction As String ' Name of the function you want to register Dim strDescription As String ' Description of the function Dim strCategory As Long Dim strArguments() As String ' Description of function arguments ' LINEARINTER: 2D linear interpolation function ReDim strArguments(1 To 3) 'Upper limit is number of function arguments strFunction = "LINEARINTER" strDescription = "2D linear interpolation function that automatically selects the range" & _ " to interpolate between based on the KnownX value closest" & _ " to the NewX value for which you want to interpolate." strCategory = 3 strArguments(1) = "1D range containing your known Y values." strArguments(2) = "1D range containing your known X values." strArguments(3) = "The value for which you want to perform linear interpolation." Application.MacroOptions Macro:=strFunction, _ Description:=strDescription, _ ArgumentDescriptions:=strArguments, _ Category:=strCategory End Sub Function LINEARINTER(ByVal KnownY As Range, ByVal KnownX As Range, NewX As Variant) As Double End FunctionComments
■ You’ll notice we defined 3 variables at the top of the
DescribeFunctionmacro:–
strFunction: The name of the function you want to register
–strDescription: A description of what the function does
–strArguments: An array containing the description of each argument of the functionIf your user-defined function has 3 arguments, you must size the
strArgumentsarray with 3 elements and add a description for each one. We do this with theReDimcommand, but you could also do it during the initial declaration if you prefer.■ The function is assigned to category 3 (Math & Trig).
■ In this example, we’re not writing the actual code for the
LINEARINTERfunction since that’s not the point of this section.■ You need to run the
DescribeFunctionprocedure only once. After that, the information assigned to the function is stored in the workbook. You can also omit arguments in theMacroOptionsmethod if you don’t need them. For example, if you don’t need descriptions for the arguments, just omit theArgumentDescriptionsargument in the code.You’re not required to place your UDFs into new categories. In fact, you don’t have to include the
Categoryargument at all when callingMacroOptions. If you omit theCategoryargument completely, your custom function will appear in a new category named User Defined. Each of these categories is assigned an integer that you can refer to instead of a string.Function Categories
Integer Category 1 Financial 2 Date & Time 3 Math & Trig 4 Statistical 5 Lookup & Reference 6 Database 7 Text 8 Logical 9 Information 10 Commands 11 Customizing 12 Macro Control 13 DDE/External 14 User Defined 15 First Custom Category The following figure shows the Insert Function and Function Arguments dialog boxes after executing this procedure.
Manually Adding a Function Description
Instead of using the
MacroOptionsmethod to provide a function description, you can use the Macro dialog box.If you don’t provide a description for your custom function, the Insert Function dialog displays « No help available ».
Follow these steps to provide a description for a custom function:
- Create your function in the VBE.
- Activate Excel, making sure the workbook containing the function is the active workbook.
- Choose Developer / Macros (or press Alt+F8). The Macro dialog lists available procedures, but your function won’t appear in the list.
- In the Macro Name box, type the name of your function.
- Click the Options button to display the Macro Options dialog box.
- In the Description field, enter the function description. The Shortcut Key field is not relevant for functions.
- Click OK, then click Cancel.
After performing these steps, the Insert Function dialog will display the description you entered in step 6 when the function is selected.