Votre panier est actuellement vide !
Catégorie : Excel VBA Course
Sending a Workbook as an Email Attachment in Excel VBA
The SendMail() method allows you to send the active workbook as an email attachment easily. The example email addresses used below should be adjusted to your own addresses so you can verify the email delivery.
Example 1: Sending to a Single Recipient
Sub SimpleSend1()
    ThisWorkbook.SendMail "moyofranck@gmail.com", "Test"
End Sub
The user must choose whether to ALLOW or DENY access to Outlook. This security prompt appears for many subsequent applications that try to access Outlook elements.
If permission is granted, the email with the workbook as an attachment is placed into the Outlook Outbox.
Note that in Excel 2016, the subject line was not correctly passed with SendMail(). This issue was fixed in Excel 2019. Regardless, the actual sending of the workbook as an attachment works correctly in all versions.
Example 2: Sending to Multiple Recipients
Sub SimpleSend2()
    Dim outlookApp As Object
    Dim mailItem As Object
    Dim recipients As String
    recipients = "moyo.yannick@gmail.com; mbeu.borel@gmail.com"
    Set outlookApp = CreateObject("Outlook.Application")
    Set mailItem = outlookApp.CreateItem(0)
    With mailItem
        .To = recipients
        .Subject = "Test"
        .Body = "Ceci est un test d'envoi à plusieurs destinataires via Outlook."
        .Display ' Ou .Send pour envoi direct
    End With
End Sub
Explanation of Both Procedures:
- The SendMail() method has one required and two optional parameters.
- The first parameter specifies the recipient(s):
- A single string for one recipient.
- An array of strings for multiple recipients.
- The second parameter allows you to specify the email subject.
- The optional third parameter, if set to True, requests a read receipt. The success of this request depends on the recipient’s email client supporting and honoring read receipts.
- The generated email, including the active workbook as an attachment, is placed into the Outlook Outbox for sending.
Outlook Object Model in Excel VBA
Some key elements of the hierarchical Outlook object model include:
- The main object Application represents the Outlook application.
- Similar to Word, an object of type Outlook.Application is created using the CreateObject() function to access Outlook, and a reference to this object is returned. This reference is then used throughout the code to interact with the Outlook application. The Outlook application must be properly closed at the end.
- The CreateItem() method of the Application object is used to create items such as emails, contacts, or appointments. Depending on the item type, different properties and methods are available.
- The GetNameSpace() method of the Application object returns a namespace object, which is needed to access Outlook folders. The only supported namespace type is MAPI.
- The GetDefaultFolder() method of the MAPI namespace returns a Folder object representing the default folder of a specific type, such as Inbox (olFolderInbox) or Contacts (olFolderContacts).
- The Items property is a collection of items within an Outlook folder. Depending on the type of item, different properties and methods are available.
To access the Outlook object model from Excel’s Visual Basic Editor (VBE), you must first set a reference to the Microsoft Outlook Object Library. This is done via the menu Tools → References by selecting the appropriate version of the Microsoft Outlook Object Library, as shown in next Figure.
- For Outlook 2019 and Outlook 2016, this is the Microsoft Outlook 16.0 Object Library.
- For Outlook 2013, it is the Microsoft Outlook 15.0 Object Library.
- For Outlook 2010, it is the Microsoft Outlook 14.0 Object Library.
- For Outlook 2007, it is the Microsoft Outlook 12.0 Object Library.
Reading a Webpage in Excel VBA
Word can open HTML files, which contain the code of webpages. Word automatically converts the HTML content and displays it as a Word document. You can use this feature to import HTML content into your Excel workbook.
Consider the following example HTML code:
<!DOCTYPE html>
<html>
<body>
<p>Line 1</p>
<p>Line 2</p>
<p>Line 3</p>
</body>
</html>
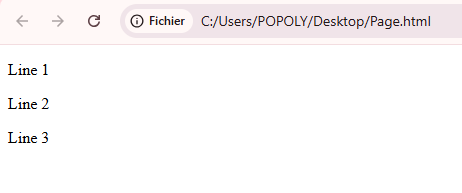
This HTML file, named page.htm, displays three paragraphs as shown in Figure when opened in a browser.
Using the following VBA code, the contents of these three paragraphs are extracted and placed into three cells in Excel . The code trims the paragraph end character using string functions Left() and Len().
Sub ReadWordHtml()
    Dim appWord As Word.Application
    Dim document As Word.document
    Dim paragraphText As String
    Dim i As Integer
    ThisWorkbook.Worksheets("Sheet1").Activate
    ' Create Word application object
    Set appWord = CreateObject("Word.Application")
    ' Open the HTML file as a Word document
    Set document = appWord.Documents.Add(ThisWorkbook.Path & "C:\Users\POPOLY\Desktop\page.html")
    ' Loop through all paragraphs
    For i = 1 To document.Paragraphs.Count
        paragraphText = document.Paragraphs(i).Range.Text
        ' Remove the paragraph end character and write to Excel
        Cells(i, 8).Value = Left(paragraphText, Len(paragraphText) - 1)
    Next i
    ' Close document and quit Word
    document.Close
    appWord.Quit
    Set document = Nothing
    Set appWord = Nothing
End Sub
Explanation:
- The HTML file is opened as a Word document via Documents.Add().
- Word parses the HTML and treats the <p> tags as paragraphs.
- Each paragraph’s text includes a paragraph end character, which is removed by trimming the last character.
- The cleaned paragraph text is transferred to column 8 (column H) in the Excel worksheet.
Reading a Word Table in Excel VBA
The following procedure reads the entire content of the Word table shown in next Figure and stores it in an Excel worksheet. Make sure the Word document is not open in Word before running this VBA code:

Sub ReadWordTable()
    Dim appWord As Word.Application
    Dim document As Word.Document
    Dim table As Word.Table
    Dim i As Integer
    Dim k As Integer
    Dim cellText As String
    Dim numberValue As Double
    Dim dateValue As Date
    ThisWorkbook.Worksheets("Sheet2").Activate
    ' Create Word application object
    Set appWord = CreateObject("Word.Application")
    ' Open the Word document
    Set document = appWord.Documents.Add(ThisWorkbook.Path & "\table.docx")
    ' Reference the first table in the document
    Set table = document.Tables(1)
    ' Loop through rows and columns
    For i = 1 To table.Rows.Count
        For k = 1 To table.Columns.Count
            ' Get the text of the cell, including cell end characters
            cellText = table.Cell(i, k).Range.Text
            ' Remove the two end-of-cell characters
            cellText = Left(cellText, Len(cellText) - 2)
            ' Determine the data type and write accordingly
            If IsNumeric(cellText) Then
                If InStr(cellText, ".") > 0 Then
                    dateValue = CDate(cellText)
                    Cells(i + 10, k).Value = dateValue
                Else
                    numberValue = CDbl(cellText)
                    Cells(i + 10, k).Value = numberValue
                End If
            Else
                Cells(i + 10, k).Value = cellText
            End If
        Next k
    Next i
    ' Close document and quit Word
    document.Close
    appWord.Quit
    Set table = Nothing
    Set document = Nothing
    Set appWord = Nothing
End Sub
The result of this import is shown in Figure.

Explanation:
- The variable table references the first Word.Table object in the document by accessing Tables(1).
- The properties Rows and Columns provide the collections of rows and columns in the table. The Count property gives the total number, which is used as the limit for the loops.
- The text of the entire content of a cell is accessed via Cell(row, column).Range.Text.
- Each cell’s text includes two end-of-cell characters; these are removed by using the string functions Left() and Len() to trim the last two characters.
- The data type of the remaining text is determined, as described in Section 8.4.1, « Converting Strings. » Based on the result, the value is converted to a number, date, or left as a string.
- The processed data is written into the Excel worksheet, starting from row 11 (offset by +10), with rows and columns corresponding to those in the Word table.
Writing a Word Table in Excel VBA
The contents of the Excel worksheet shown in Next Figure are to be written as a table into the Word document Doc.docx.

Sub WriteWordTable()
    Dim appWord As Word.Application
    Dim document As Word.Document
    Dim table As Word.Table
    Dim i As Integer
    Dim k As Integer
    ThisWorkbook.Worksheets("Sheet2").Activate
    ' Start Word application
    Set appWord = CreateObject("Word.Application")
    ' Create a new Word document
    Set document = appWord.Documents.Add
    ' Add a new table at the beginning of the document with 3 rows and 5 columns
    Set table = document.Tables.Add(appWord.ActiveDocument.Range(0), 3, 5)
    ' Set table borders for inside and outside lines to single line style
    table.Borders.InsideLineStyle = wdLineStyleSingle
    table.Borders.OutsideLineStyle = wdLineStyleSingle
    ' Transfer data from Excel to Word table cells
    For i = 1 To 3
        For k = 1 To 5
            table.Cell(i, k).Range.Text = Cells(i, k).Value
        Next k
    Next i
    ' Save the Word document and close it
    document.SaveAs ThisWorkbook.Path & "C:\Users\POPOLY\Desktop\Doc.docx"
    document.Close
    ' Quit Word application and clean up
    appWord.Quit
    Set table = Nothing
    Set document = Nothing
    Set appWord = Nothing
End Sub
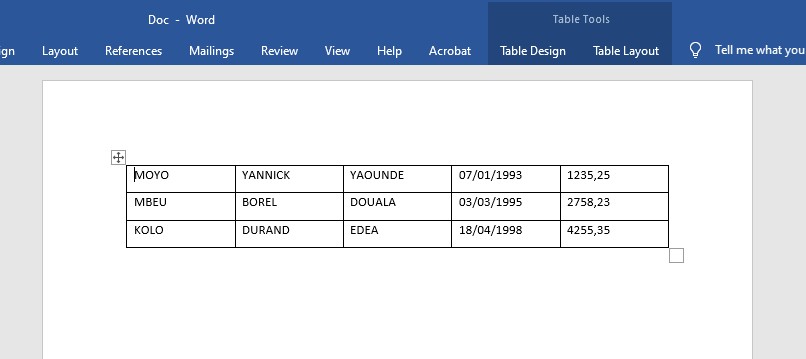
The result of this code is shown in next Figure.
Explanation:
- The Add() method of the Tables collection inserts a new table into the document with the specified size. It requires at least three parameters:
- A Range object that specifies the location of the new table. Using Range(0) places the table at the very beginning of the document.
- The number of rows and columns for the new table.
- The Add() method returns a reference of type Word.Table to the newly created table. This reference is used to interact with the table in subsequent code.
- The Borders property contains all the borders of the table. Properties beginning with Inside… and Outside… control the appearance of inner and outer borders respectively. Here, InsideLineStyle and OutsideLineStyle are set to wdLineStyleSingle, which corresponds to a single-line border. Thus, the table receives a simple grid border.
- Nested loops iterate through all cells of the Excel worksheet and transfer their contents to the corresponding cells in the Word table. In Word, the Cell(row, column) method is used similarly to Excel.
- The Add() method of the Tables collection inserts a new table into the document with the specified size. It requires at least three parameters:
Reading Word Paragraphs in Excel VBA
The following program reads all paragraphs from a Word document and stores each paragraph into a cell in an Excel worksheet. Ensure that the Word document is not open in Word before running this VBA program:
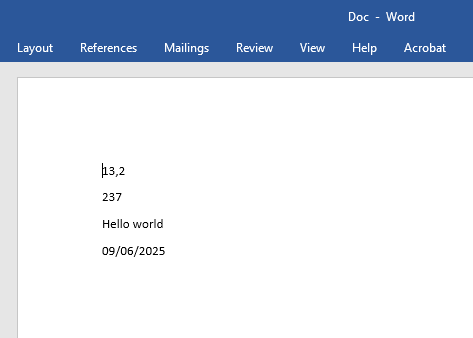
Sub ReadWordParagraphs()
    Dim appWord As Word.Application
    Dim document As Word.Document
    Dim i As Integer
    Dim paragraphText As String
    Dim numberValue As Double
    Dim dateValue As Date
    ThisWorkbook.Worksheets("Sheet1").Activate
    ' Create Word application object
    Set appWord = CreateObject("Word.Application")
    ' Open the Word document
    Set document = appWord.Documents.Add(ThisWorkbook.Path & "C:\Users\POPOLY\Desktop\Doc.docx")
    ' Loop through all paragraphs
    For i = 1 To document.Paragraphs.Count
        ' Get the text of the paragraph including paragraph mark
        paragraphText = document.Paragraphs(i).Range.Text
        ' Remove the paragraph end character (last character)
        paragraphText = Left(paragraphText, Len(paragraphText) - 1)
        ' Determine the data type and write to Excel cells
        If IsNumeric(paragraphText) Then
            If InStr(paragraphText, ".") > 0 Then
                dateValue = CDate(paragraphText)
                Cells(i + 12, 1).Value = dateValue
                Cells(i + 12, 2).Value = "Date"
            Else
                numberValue = CDbl(paragraphText)
                Cells(i + 12, 1).Value = numberValue
                Cells(i + 12, 2).Value = "Number"
            End If
        Else
            Cells(i + 12, 1).Value = paragraphText
            Cells(i + 12, 2).Value = "String"
        End If
    Next i
    ' Close the document and quit Word
    document.Close
    appWord.Quit
    Set document = Nothing
    Set appWord = Nothing
End Sub
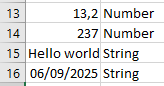
The result of this code is shown in next Figure.
Explanation:
- The Add() method of the Documents object, when called with a file path parameter, opens the specified Word document and returns a reference to it.
- A loop iterates over all paragraphs in the document.
- Using the Paragraphs collection and the Range property, the full text of each paragraph (including the paragraph mark) is accessed.
- The paragraph mark, which is part of the text, is removed by using the string functions Left() and Len() to exclude the last character.
- The data type of the remaining text is determined, as explained in Section 8.4.1, « Converting Strings. » Based on this, the text is converted into a number, date, or left as a string.
- The converted values are written to the Excel worksheet, starting from row 13 (i + 12), with the value in column 1 and its data type in column 2.
Writing Word Paragraphs in Excel VBA
The contents of the cells shown in Figure of an Excel worksheet are to be written as individual paragraphs into the Word document Doc.docx.
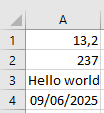
Sub WriteWordParagraphs()
    Dim appWord As Word.Application
    Dim document As Word.document
    Dim i As Integer
    ThisWorkbook.Worksheets("Sheet1").Activate
    ' Start Word application
    Set appWord = CreateObject("Word.Application")
    ' Create a new Word document
    Set document = appWord.Documents.Add
    For i = 1 To 4
        ' Add a new paragraph
        document.Paragraphs.Add
        ' Fill the paragraph with text from the Excel cell
        document.Paragraphs(i).Range.Text = Cells(i, 1).Value
    Next i
    ' Save the Word document with the given filename and close it
    document.SaveAs ThisWorkbook.Path & "C:\Users\POPOLY\Desktop\Doc.docx"
    document.Close
    ' Quit Word application and release memory
    appWord.Quit
    Set document = Nothing
    Set appWord = Nothing
End Sub
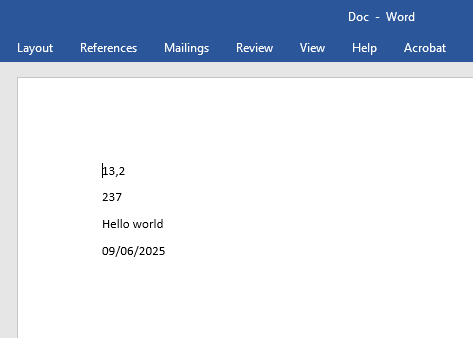
The result of the code is shown in next Figure.
Explanation:
- The variable appWord is declared as a reference to an object of type Word.Application (the Word application). This object type (along with other Word-specific object types) is available only if the Word library is referenced, as explained in Section 9.6.1, « Word Object Model. »
- The function CreateObject() creates an object of type Word.Application and returns a reference to it. This reference is used subsequently to control the Word application.
- The method Add() of the Documents object, when called without parameters, opens a new Word document and returns a reference to a Document object. This reference is then used to interact with the Word document.
- Inside the loop, a new paragraph is added using the Add() method of the Paragraphs collection.
- Each paragraph is filled with the content of an Excel cell.
- The new Word document is saved using the method SaveAs(), under the name paragraphs.docx in the same folder as the Excel workbook that contains this VBA code.
- Afterwards, the Word document is closed using the Close() method, and the Word application is terminated with the Quit() method.
- For exporting larger amounts of data, an alternative approach is to concatenate all the data into a single string variable, including necessary line breaks (using the constant vbCrLf), and output this variable in one operation at the end.
Object Model of Word in Excel VBA
There are parallels between the hierarchical object models of Word and Excel:
- The main object, Application, represents the Word application itself.
- Using the CreateObject() function, ActiveX objects can be created. To access Word, an object of type Word.Application is created and a reference to this object is returned. This reference is used throughout the program to interact with the Word application. At the end, the Word application must be properly closed.
- A property of the Application object is the Documents collection, which contains all the Word documents currently open or accessible.
- A property of an individual document is the Paragraphs collection, which contains all paragraphs within that document.
- Similarly, the Tables collection contains all tables within a single document.
- A property of an individual table is the Cells collection, which contains all the cells of that table. A single cell can be accessed, similarly to Excel, via the Cells collection.
- The term Range in Word also refers to a range of content. This range can include one or more paragraphs, either completely or partially, and can also encompass table cells.
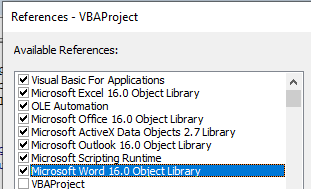
To access the Word object model from Excel’s Visual Basic Editor (VBE), a reference to the Microsoft Word Object Library must first be set up. This is done via the menu Tools → References by selecting the appropriate version of the Microsoft Word Object Library, as shown in Figure.
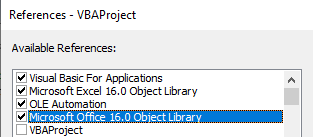
- For Word 2019 and Word 2016, this is the Microsoft Word 16.0 Object Library.
- For Word 2013, it is the Microsoft Word 15.0 Object Library.
- For Word 2010, it is the Microsoft Word 14.0 Object Library.
- For Word 2007, it is the Microsoft Word 12.0 Object Library.
Performing Operations with Directories in Excel VBA
Using VBA, you can create directories and delete them if they are empty. The following example demonstrates creating a subdirectory, copying a file into it, moving another file there, then deleting both files, and finally removing the subdirectory.
Between each step, a list of currently existing files in the subdirectory is displayed for verification. For this purpose, the procedure ListFilesInPath() is used.
Sub ListFilesInPath(path As String)
    Dim fileName As String
    Dim output As String
    fileName = Dir(path & "\*.txt")
    output = ""
    Do While fileName <> ""
        output = output & " " & fileName
        fileName = Dir
    Loop
    MsgBox output
End Sub
The directory operations are implemented in the following procedure:
Sub DirectoryOperations()
    Dim basePath As String, subPath As String
    basePath = ThisWorkbook.Path
    subPath = basePath & "\Subfolder"
    On Error GoTo ErrorHandler
    ' Create subdirectory
    MkDir subPath
    ' Copy a file in the base directory
    FileCopy basePath & "\lines.txt", basePath & "\linesCopy1.txt"
    ' Copy a file into the subdirectory
    FileCopy basePath & "\lines.txt", subPath & "\linesCopy2.txt"
    ' Move a file into the subdirectory
    Name basePath & "\linesCopy1.txt" As subPath & "\linesCopy1.txt"
    ' List files in the subdirectory
    ListFilesInPath subPath
    ' Delete files from the subdirectory
    Kill subPath & "\linesCopy1.txt"
    Kill subPath & "\linesCopy2.txt"
    ' List files in the subdirectory again (should be empty)
    ListFilesInPath subPath
    ' Remove the now-empty subdirectory
    RmDir subPath
    Exit Sub
ErrorHandler:
    MsgBox Err.Description
End Sub
Explanation:
- The function MkDir() creates a directory. It requires a string parameter specifying the name (or path) of the directory to create.
- The functions FileCopy() and Name() have been introduced earlier; they are used here to copy and move/rename files between directories.
- The function RmDir() deletes an empty directory. Like MkDir(), it requires a string parameter specifying the directory to remove.
Performing File Operations in Excel VBA
In VBA, you can perform several common file operations using built-in functions. However, you should exercise great caution, especially when deleting files.
The following example copies a file, then renames it, and finally deletes it. After each step, a list of currently existing files is displayed for verification:
Sub ListFiles(folderPath As String)
    Dim f As String
    Dim output As String
    f = Dir(folderPath & "\*.*")
    Do While f <> ""
        output = output & f & vbCrLf
        f = Dir
    Loop
    MsgBox "Fichiers dans " & folderPath & ":" & vbCrLf & output
End Sub
Sub FileOperations()
    Dim path As String
    path = Environ("USERPROFILE") & "\Desktop\Doc"
    On Error GoTo ErrorHandler
    ' Afficher les fichiers du Bureau
    ListFiles path
    ' Copier le fichier
    FileCopy path & "\Document.txt", path & "\DocumentCopy.txt"
    ListFiles path
    ' Renommer le fichier copié
    Name path & "\DocumentCopy.txt" As path & "\DocumentNew.txt"
    ListFiles path
    ' Supprimer le fichier renommé
    Kill path & "\DocumentNew.txt"
    ListFiles path
    Exit Sub
ErrorHandler:
    MsgBox Err.Description
End Sub
Explanation:
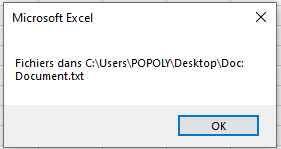
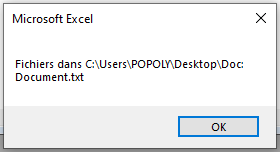
The procedure ListFiles is used to display the list of existing files at each step. Initially, the file list appears as shown in Figure 9.12.
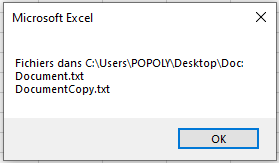
- The FileCopy() function copies a file. If the destination file already exists, it will be overwritten without any prior warning. After copying, the file list changes as illustrated in Figure.
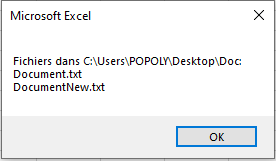
- The Name() function renames or moves a file. If the target file already exists, it will not be overwritten, and a runtime error will occur. If the destination is in a different folder, the file is moved and possibly renamed. The file list after renaming looks like Figure.
- The Kill() function deletes one or more files, optionally using wildcards, without any confirmation. The final file list after deletion is shown in Figure.